

Aperture Explained: How to use the f/stop
The aperture is arguably the most important setting on your camera because it has the strongest impact on the aesthetic of photos. It affects 2 things; depth of field and the amount of light reaching the sensor. The aperture is a mechanical diaphragm inside the lens that can be opened and closed to create a larger or smaller hole. The specific diameter that the aperture is opened to is called the f/stop. When the aperture is wide, it has a small number like f/2.8 or f/4. When it’s narrow, it has a large number like f/16 or f/22.
How f/stop affects Depth of Field

Using the wide aperture f/4 kept Depth of Field very shallow to capture the mushrooms in focus with a blurry background. DOF was also made shallower by shooting extremely close to the subject. Olympus E-M5 III, Olympus 12-40mm f/2.8 lens.
The main reason you open or close the Aperture is to affect Depth of Field. DOF is how much of the photo is in focus on either side of the plane that you’ve focused on. A wide aperture like f/2.8 produces shallow DOF, and a small one like f/16 creates greater DOF. In a photo with shallow DOF where the subject is sharp and the background is blurred, a wide aperture like f/2.8 or f/4 was used. In landscape photography, a small aperture like f/11 or f/16 creates enough DOF to capture most of the scene from front to back in focus.
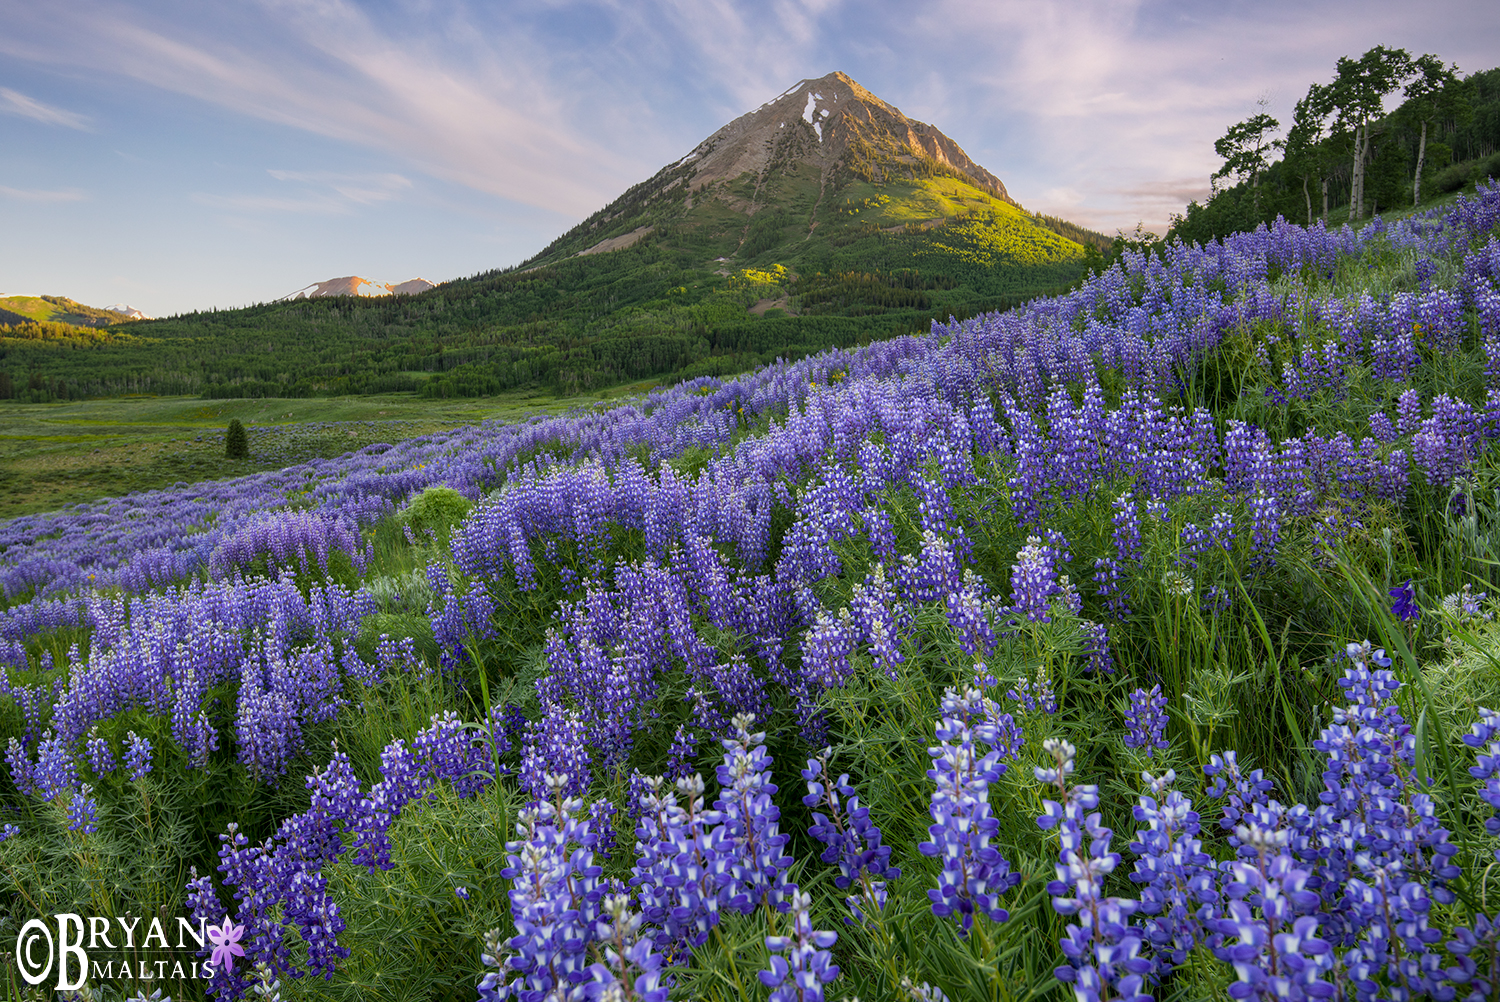
DOF isn’t controlled entirely by the aperture. DOF becomes shallower by moving closer to the subject. If you get very close to the subject, it’s possible to have a blurry background even when using a small aperture. Also, the higher the lens focal length, the shallower the DOF at each f/stop.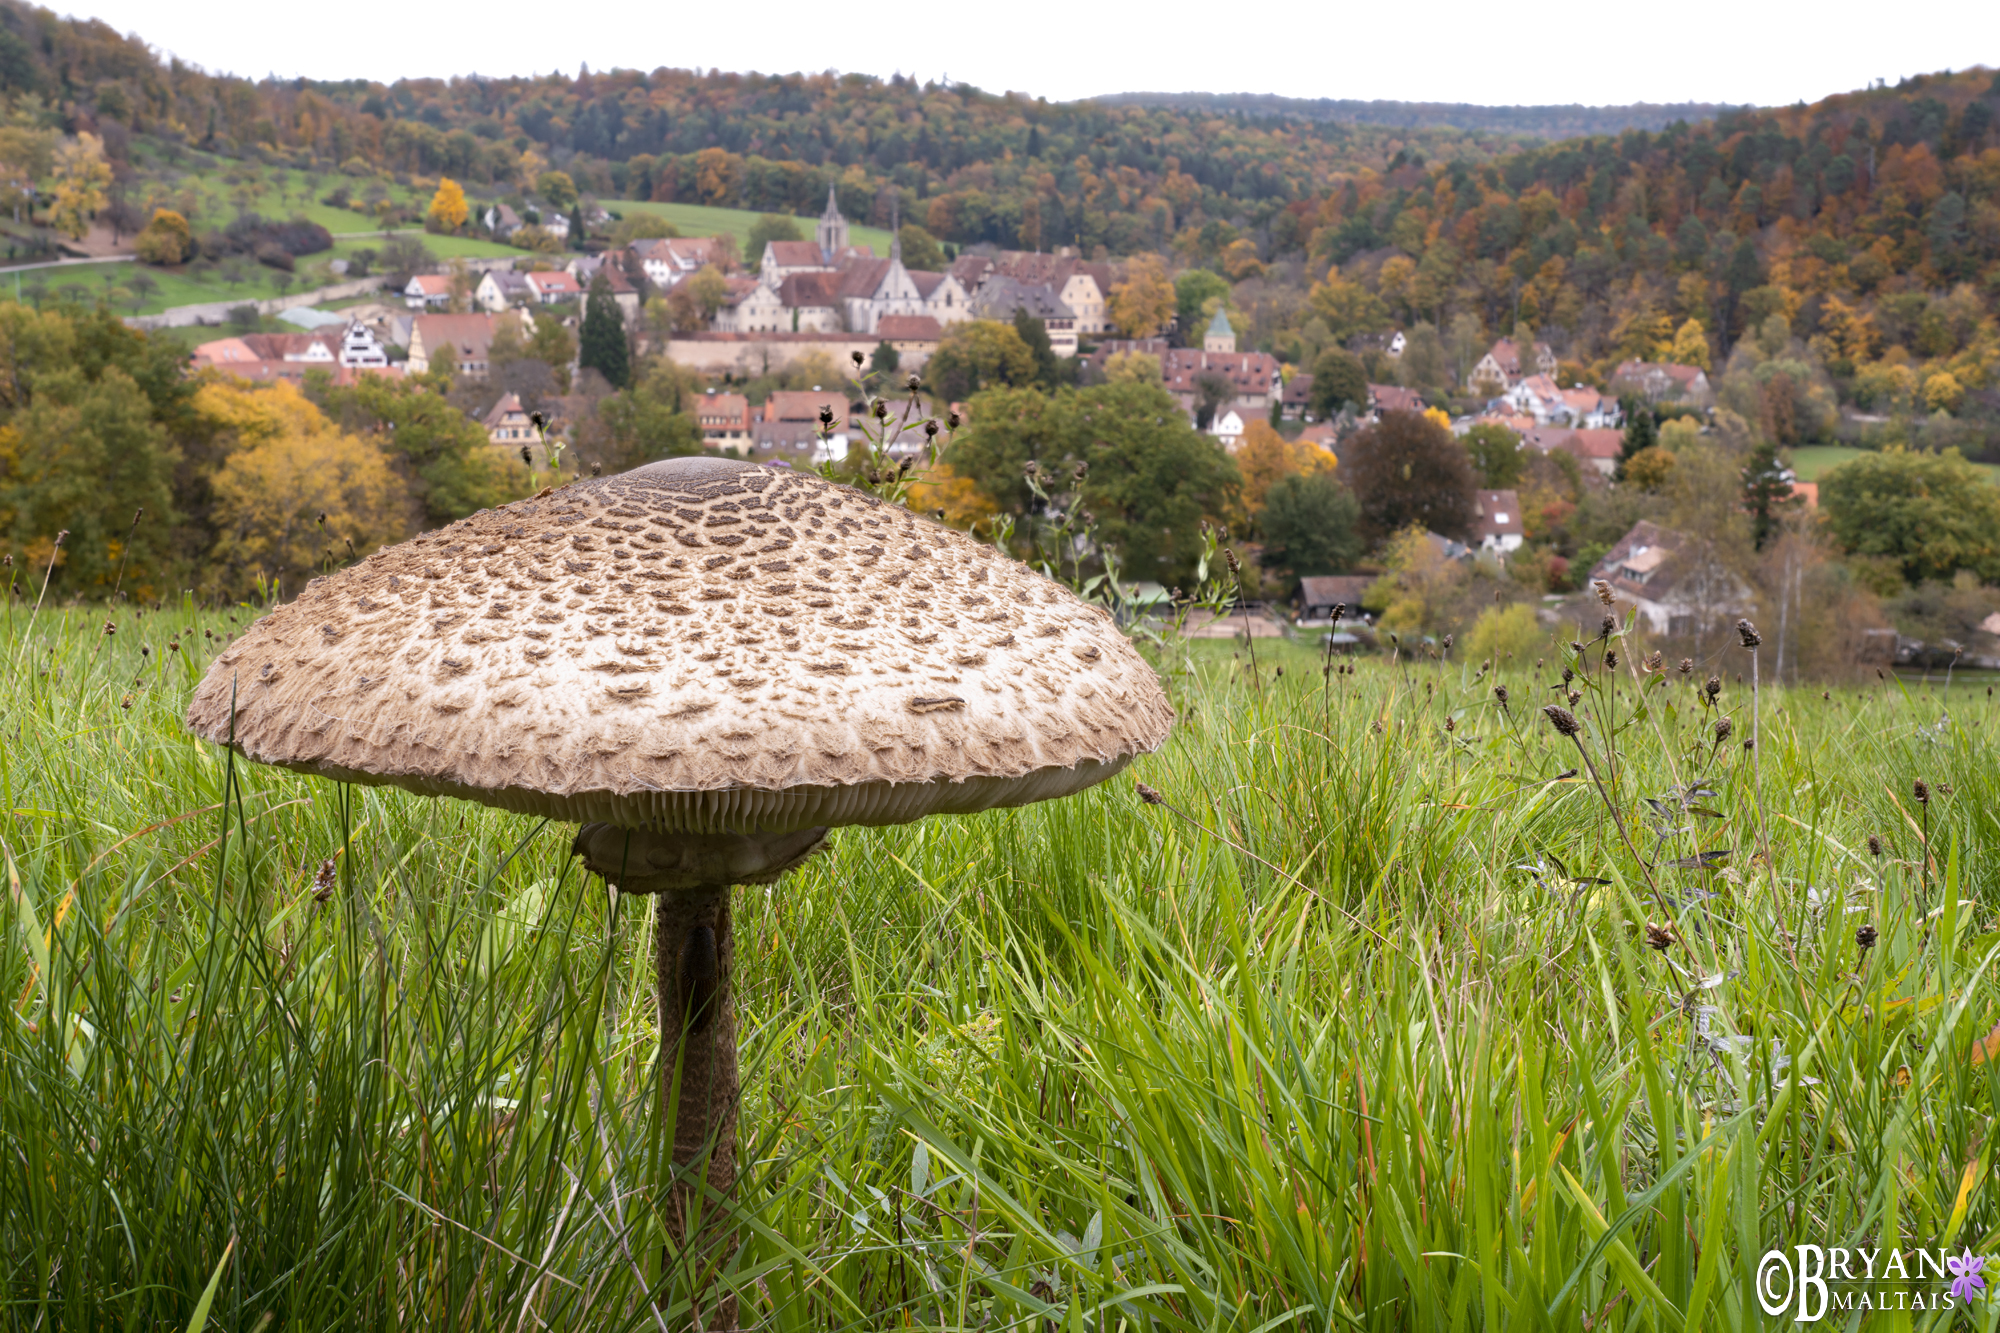 Using the small aperture f/16 created broad Depth of Field so you can see the village in the background. Olympus E-M5 III, Olympus 12-100mm f/4 lens.

Please support this blog by shopping through the Amazon affiliate links as you normally would.
How the Aperture affects the Exposure Triangle
The aperture also regulates the amount of light that reaches the sensor. When you close or open the aperture by one f/stop, it halves or doubles the amount of light reaching the sensor. For example, f/8 transmits twice as much light as f/11. This volume of light is interchangeably called an Exposure Value or Stop.
The aperture isn’t the only mechanism that regulates light. Shutter Speed, ISO* and ambient light also do. Light can flow through each by any proportion, but it must add up to 100% for proper exposure. Whenever light is changed by opening or closing the aperture, an equal amount of light must be added or subtracted by changing the shutter speed, ISO, or literally by adding light to the scene. Shutter speed and ISO are also adjusted in stops. Slowing the shutter speed from 1/500th sec to 1/250th sec increases light by 1 stop. Changing ISO from 800 to 400 removes a stop. If the sun emerges from behind the clouds, this may add several stops of light to the scene and you have to adjust the settings accordingly. This interconnected relationship between aperture, shutter speed and ISO is called the exposure triangle.
While this may sound like a lot of juggling, you don’t actually have to control all three of the settings yourself. Using an auto mode like Aperture Priority lets you control the aperture while the camera takes care of the rest.
The amount of available light always dictates the settings that you can use, and sometimes you won’t be able to use the exact f/stop that you want. In dim light for example, you can’t simultaneously use a small f/stop, low ISO and fast shutter speed. This combination would transmit less than 100% light, leaving the photo underexposed. You have to sacrifice one of these settings or a little bit from each to add more exposure. If hand-holding the camera in dim light, you’d have to keep a fast shutter speed to prevent blur from camera shake, while using a wide f/stop to transmit enough light.
*ISO doesn’t physically transmit any light to the sensor. It’s digital gain, which means that it artificially adds exposure to the image.
 With flowers in the foreground and mountains behind it, this scene demanded a lot of DOF. f/11 handled it just fine. Nikon D810, Nikon 16-35mm f2.8 lens.
Memorize the f/stops
It’s important to memorize the f/stops and each one’s effect on DOF to plan your shots. It’s easier to know that you want to shoot a scene at f/8, instead of, “that f/stop in the middle”. Below is a list of standard f/stops with 1/3 stops in between. Maximum and minimum apertures vary by lens, so yours might not have all of the f/stops listed.
f/2.8 3.2 3.5 f/4 4.5 5 f/5.6 6.3 7.1 f/8 9 10 f/11 13 14 f/16 18 20 f/22
Observe how the f/stop changes in your Camera
To become familiar with the f/stops, set your camera to Aperture Priority mode and remove the lens cap. Find the f/ number on the display-it may look something like this: “F 11”. Rotate the aperture dial and observe how the f/ number changes as you cycle through them. Also observe how the shutter speed changes as you change the f/stop. The 1/3 stops in between the prime f/stops are just for fine tuning-you don’t need to pay too much attention to them.
Observe how f/stop affects Depth of Field
Put your camera on a tripod, focus on a nearby object, and cycle through the f/stops while observing the image in your camera’s display. Note how the background becomes blurrier at wide f/stops, and sharper with small f/stops. For this to work, ensure that live view is on, which shows real-time camera settings on the display. You can also take pictures at each f/stop and view them larger on your computer for greater detail.
DOF is greater on wide-angle lenses and shallower on telephoto lenses. If using a wide-angle lens, you might have a hard time discerning the differences in DOF between f/stops. You also won’t see as big a difference if using a slow lens like f/5.6, which can’t produce a very blurred background. To partially overcome these problems, get as close to the subject as possible, which is the lens’ minimum focus distance. This creates the shallowest depth of field possible, making the effect of a blurred background more obvious.
Shallow Depth of Field can create a dreamy effect with only the subject sharp and everything else blurry. DOF was also made shallower in this shot because I used a telephoto lens. I shot this at the lens’ widest aperture of f/4. I also left the corner vignetting intact because it looks cool, an artifact of shooting wide open. Sony A7rV, Sony 100-400mm G Master f/4 lens.
Fast and Slow Lenses
In photography jargon, a fast lens has a large maximum aperture like f/2.8 or wider. A slow lens has a smaller maximum aperture like f/5.6. Fast implies that the lens transmits more light, allowing a faster shutter speed to freeze movement. A fast lens also has shallower depth of field at the maximum aperture, making it easier to create images with a blurred background.
Fast lenses are significantly more expensive and bigger because they’re constructed of larger, more complex glass elements. For example, Sony offers a 16-35mm lens in an f/4 version that costs around $1000, and a f/2.8 version for over $2000.
Paying double just for an extra f/stop may sound expensive. However, just an additional stop can make the difference in being able to capture the Milky Way with low noise, sharp hand-held photos in low light, and portraits with nice bokeh. Bokeh is how attractive the blur in the background is. The cheap kit lenses that come with mid to entry-level cameras may seem like a good deal, but they’re limiting because they have a slow maximum aperture.


You control the Aperture, not the Camera
In nature photography, you should virtually always control the aperture manually. This is accomplished in Aperture Priority Mode for most types of shooting, or Manual Mode in some circumstances. When the camera takes control of the aperture through Auto or Shutter Priority mode, it constantly changes the f/stop in response to changing ambient light to maintain proper exposure. This causes DOF to constantly change, altering the look of the photo. You don’t want that.
f/stop affects Image Quality
Lenses render their best image quality around the middle of their aperture range while suffering from different types of image degradation near their maximum and minimum f/stops. This is important because image degradation reduces the effective resolution of your hard-earned camera. You shouldn’t avoid shooting at the extremes entirely; minor image degradation may be worth the visual effect of using a specific f/stop. Every lens suffers from some amount of image degradation. It’s important to become familiar with the performance characteristics of each of your lenses to know when these problems kick in and how severe they are.
The Sweet Spot
This refers to the f/stop at which a lens renders its sharpest image quality with the least degradation. It’s generally 3 stops above the lens’s maximum aperture. If a lens’ max aperture is f/2.8, the sweet spot would typically be around f/8.
You should use the sweet spot whenever possible. This would most typically be in compositions where DOF doesn’t matter, like when all of the elements fall within the same plane of focus. An example is a picture of a distant mountain with nothing in the near foreground. In this case, DOF would look the same whether you shot it at f/2.8 or f/16 because the mountain falls within a single plane of focus.
Spherical Aberration
Spherical aberration causes softness in the image center when shooting at wide f/stops. It happens because light rays passing through the edge of the lens don’t converge at exactly the same point as rays passing through the center of the lens. You can minimize it by shooting at a smaller f/stop. It’s probably worth tolerating a bit of softness from aberration if you’re after the shallowest possible DOF. Some lenses are so good that softness from aberration is barely present when shooting at wide apertures.
Longitudinal Chromatic Aberration
LoCA appears as red, green, yellow or bluish colored fringing along the lines and details in an image. The fringing can bleed across the image, causing it to look blurred. When present, it’s more noticeable at wide f/stops. It’s caused when the lens focuses different wavelengths of color at slightly different positions on the focal plane. LoCa is usually a minor problem that isn’t obvious on all lenses. It can be reduced by using a smaller f/stop. Fringing in the final image can be reduced in post-processing. There are several types of chromatic aberration, but LoCa is the one affected by aperture.
Vignetting
Vignetting is when the corners of the frame appear darkened. It’s most visible at a lens’ maximum aperture. At wide apertures, light enters the lens from various angles. Light from diagonal angles reaches the center of the camera’s sensor, but it’s physically blocked by the lens barrel from directly reaching the corners. This results in light fall-off in the corner of the image. Vignetting disappears as the f/stop approaches the lens’ sweet spot. It’s easily corrected in post-processing or can be left as a deliberate creative effect.
Diffraction
While the other types of image degradation happen at wide apertures, diffraction causes the image to be unsharp at small aperture. It makes the picture look slightly blurry or out of focus. Landscape photographers tend toward using small apertures for maximum DOF, but the gain in sharpness is counteracted by diffraction. It happens when light squeezes through the narrow opening of a small aperture, causing it to bend and form a distorted image. The opening of small apertures like f/16 or f/22 is a mere pinhole.
On Full-frame cameras, minor diffraction becomes noticeable above f/11. Many landscape photographers automatically use f/16, unaware that diffraction might affect resolution. This was standard practice in the film days because film lacked enough resolution to actually show the effects of diffraction. However, small f/stops should only be used when necessary. When using a wide-angle lens, f/11 has sufficient DOF for most landscapes. f/16 should be reserved for scenes with close foreground objects.
Cropped Format Cameras and Severe Diffraction
Diffraction is more severe on cropped formats because the f/stop diameters are even smaller than the same f/stops on full-frame lenses. This applies to APS-C, Micro Four Thirds (MFT) and compact cameras. Diffraction generally worsens by the format’s crop factor when compared to full-frame. For example, MFT has a crop factor of 2x, so diffraction at f/11 is roughly as severe as a full-frame lens at f/22. Diffraction is a particularly important consideration for MFT and smaller formats because it becomes noticeable at much wider f/stops than full-frame. On MFT, diffraction becomes noticeable above f/8.
Focus Stacking to avoid Diffraction
So what if you need deep DOF in a photo that has a lot of detail from front to back, but want to avoid diffraction? Focus stacking is the solution. Using an f/stop near the sweet spot, you take one shot at every plane of focus and composite them together in stacking software. This creates an extremely detailed image with sharp focus through 100% of the image, with no diffraction.
How to use F/stop in summary
- Use a large aperture like f/2.8 or f/4 to create shallow DOF with a blurry background and sharp subject
- Use a small f/stop like f/11 or f/16 for deep DOF with focus throughout the photo
- DOF also decreases by moving closer to the subject
- Lenses produce the best image quality around their center f/stop like f/8
- Image quality degrades around their largest and smallest f/stops due to aberrations, diffraction and vignetting.
- Aperture is part of the exposure triangle. When you change it, you must in-turn change the ISO and Shutter Speed so light equals 100% exposure.

Clear, concise, perfectly explained article, thank you. Nothing else on the entire internet explains this better.