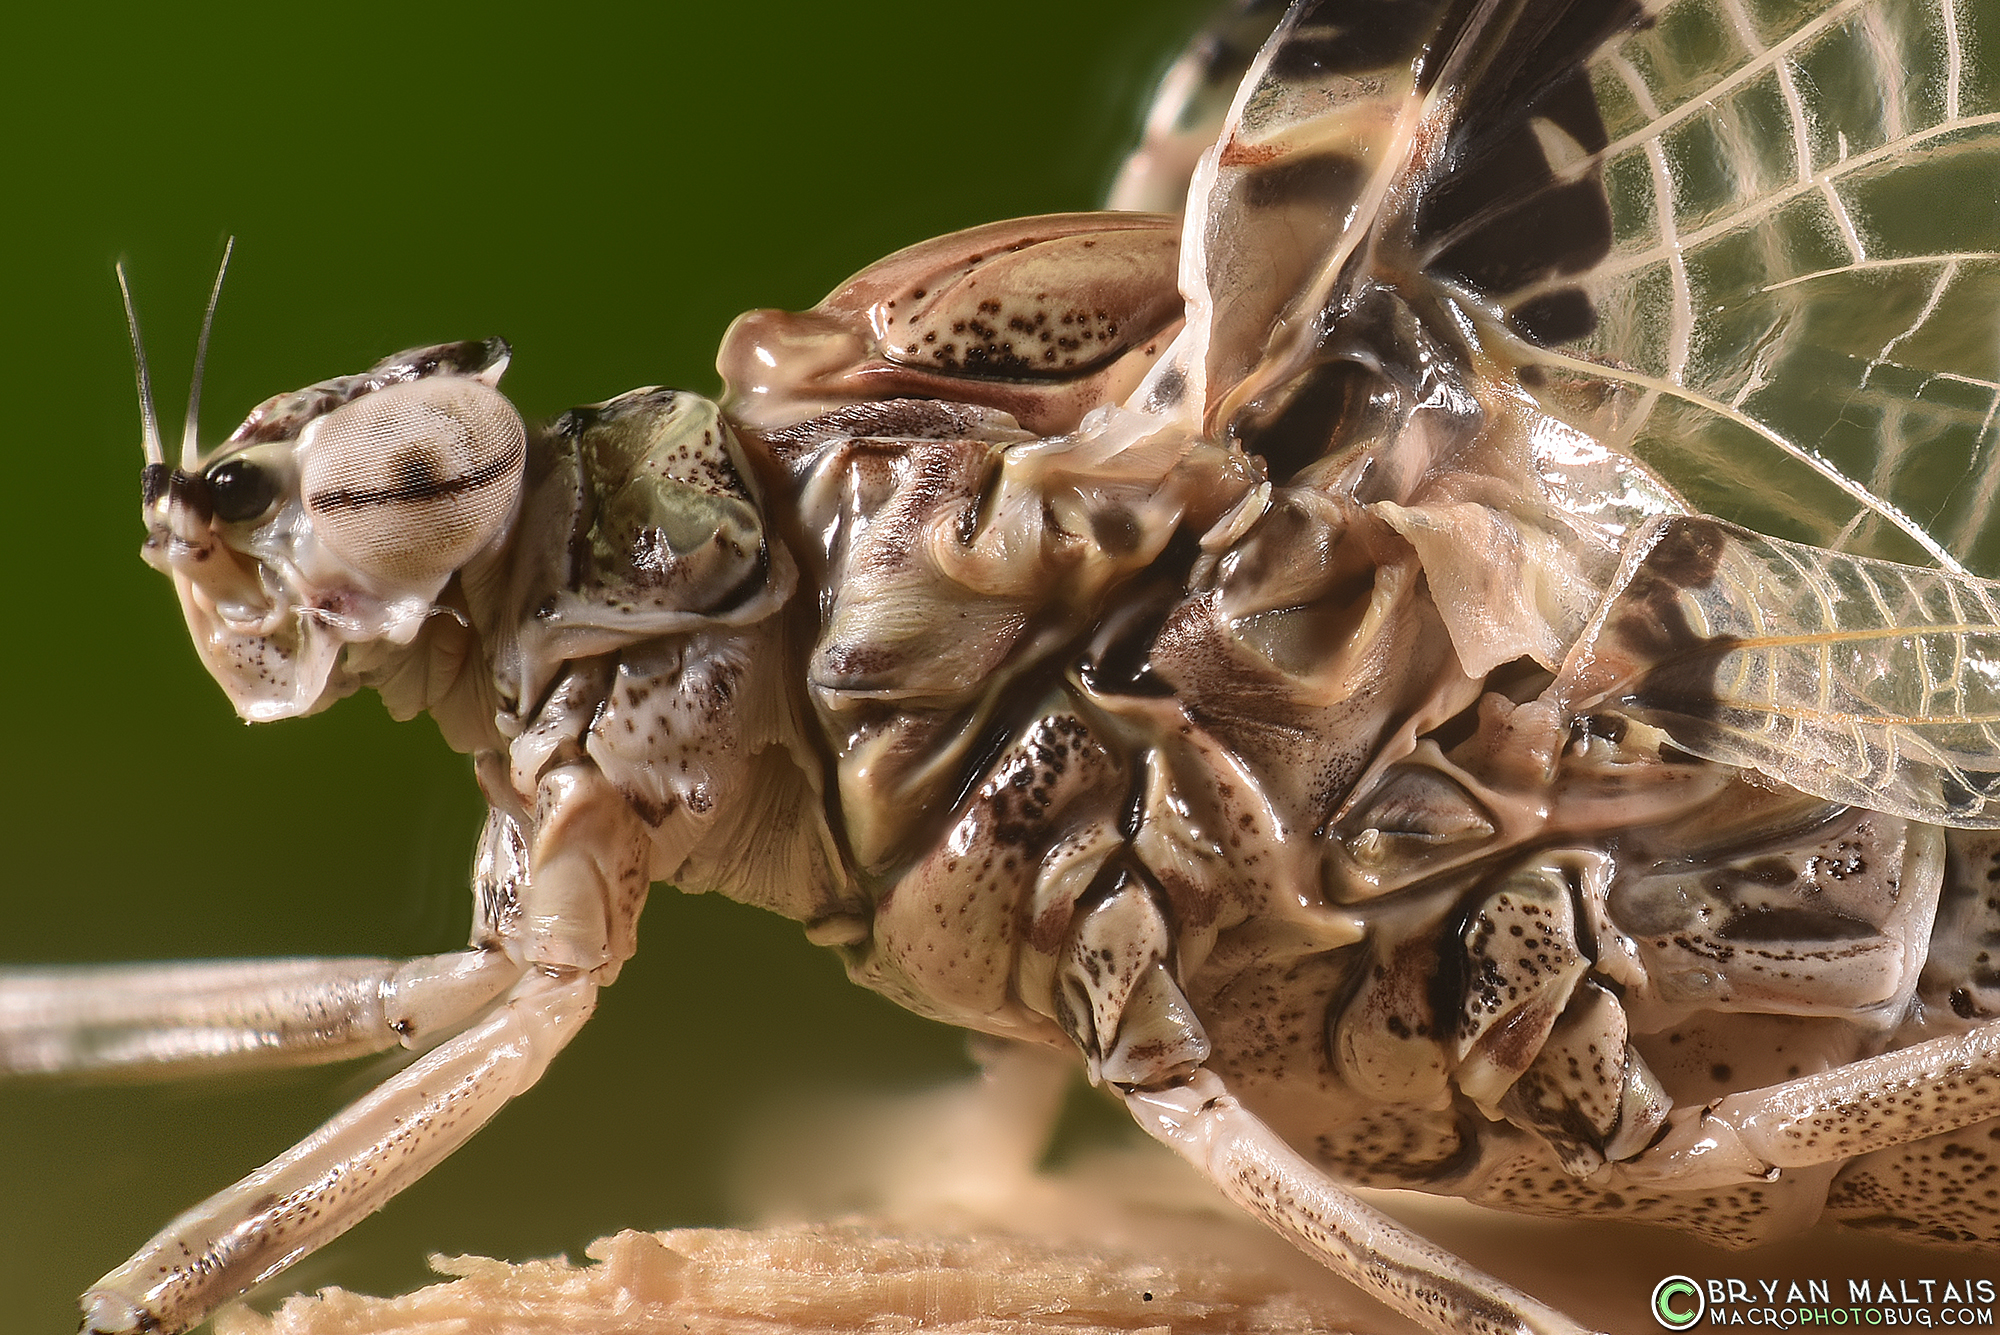
To produce the 5x magnification on this Mayfly I used a reverse mounted vintage 24mm lens with a manual aperture ring. I also added a 36mm extension tube for further magnification. This is a focus stack of 15 images accomplished manually on a focus rail using flash.Nikon D810, 24mm AF-D, Nikon R1 flash
What is Super Macro Photography?
I define it as shooting at magnifications 2:1 or greater, which is twice life size. In other words, if a 10mm long insect is projected on to the camera’s sensor at 20mm, it’s magnified by 2:1. For simplicity, this can be called 2x. This is enough magnification to fill an entire full-frame image with a medium sized insect. Higher magnifications like 3x and 4x can fill the frame with only part of the insect, and 5x can fill the frame with just the eyes and head. This is a really big deal because when you print a large image of an insect that was captured at even 1x life size, it’s being displayed at thousands of times its original size.
(on sensor size) / (actual size) = Magnification
There are many ways to achieve super macro magnification, but some have prohibitive disadvantages. For example, enlarger lenses, stacked lenses and bellows are too cumbersome for field work; they’re better suited to photographing dead specimens in a studio. There are, however, surprisingly simple ways to produce high quality super macro photography with equipment that’s either inexpensive or that you probably already own.
This blog contains Amazon affiliate links. You can support this blog by using these links to shop on Amazon as you normally would.
The Standard Macro Lens and what it can’t do
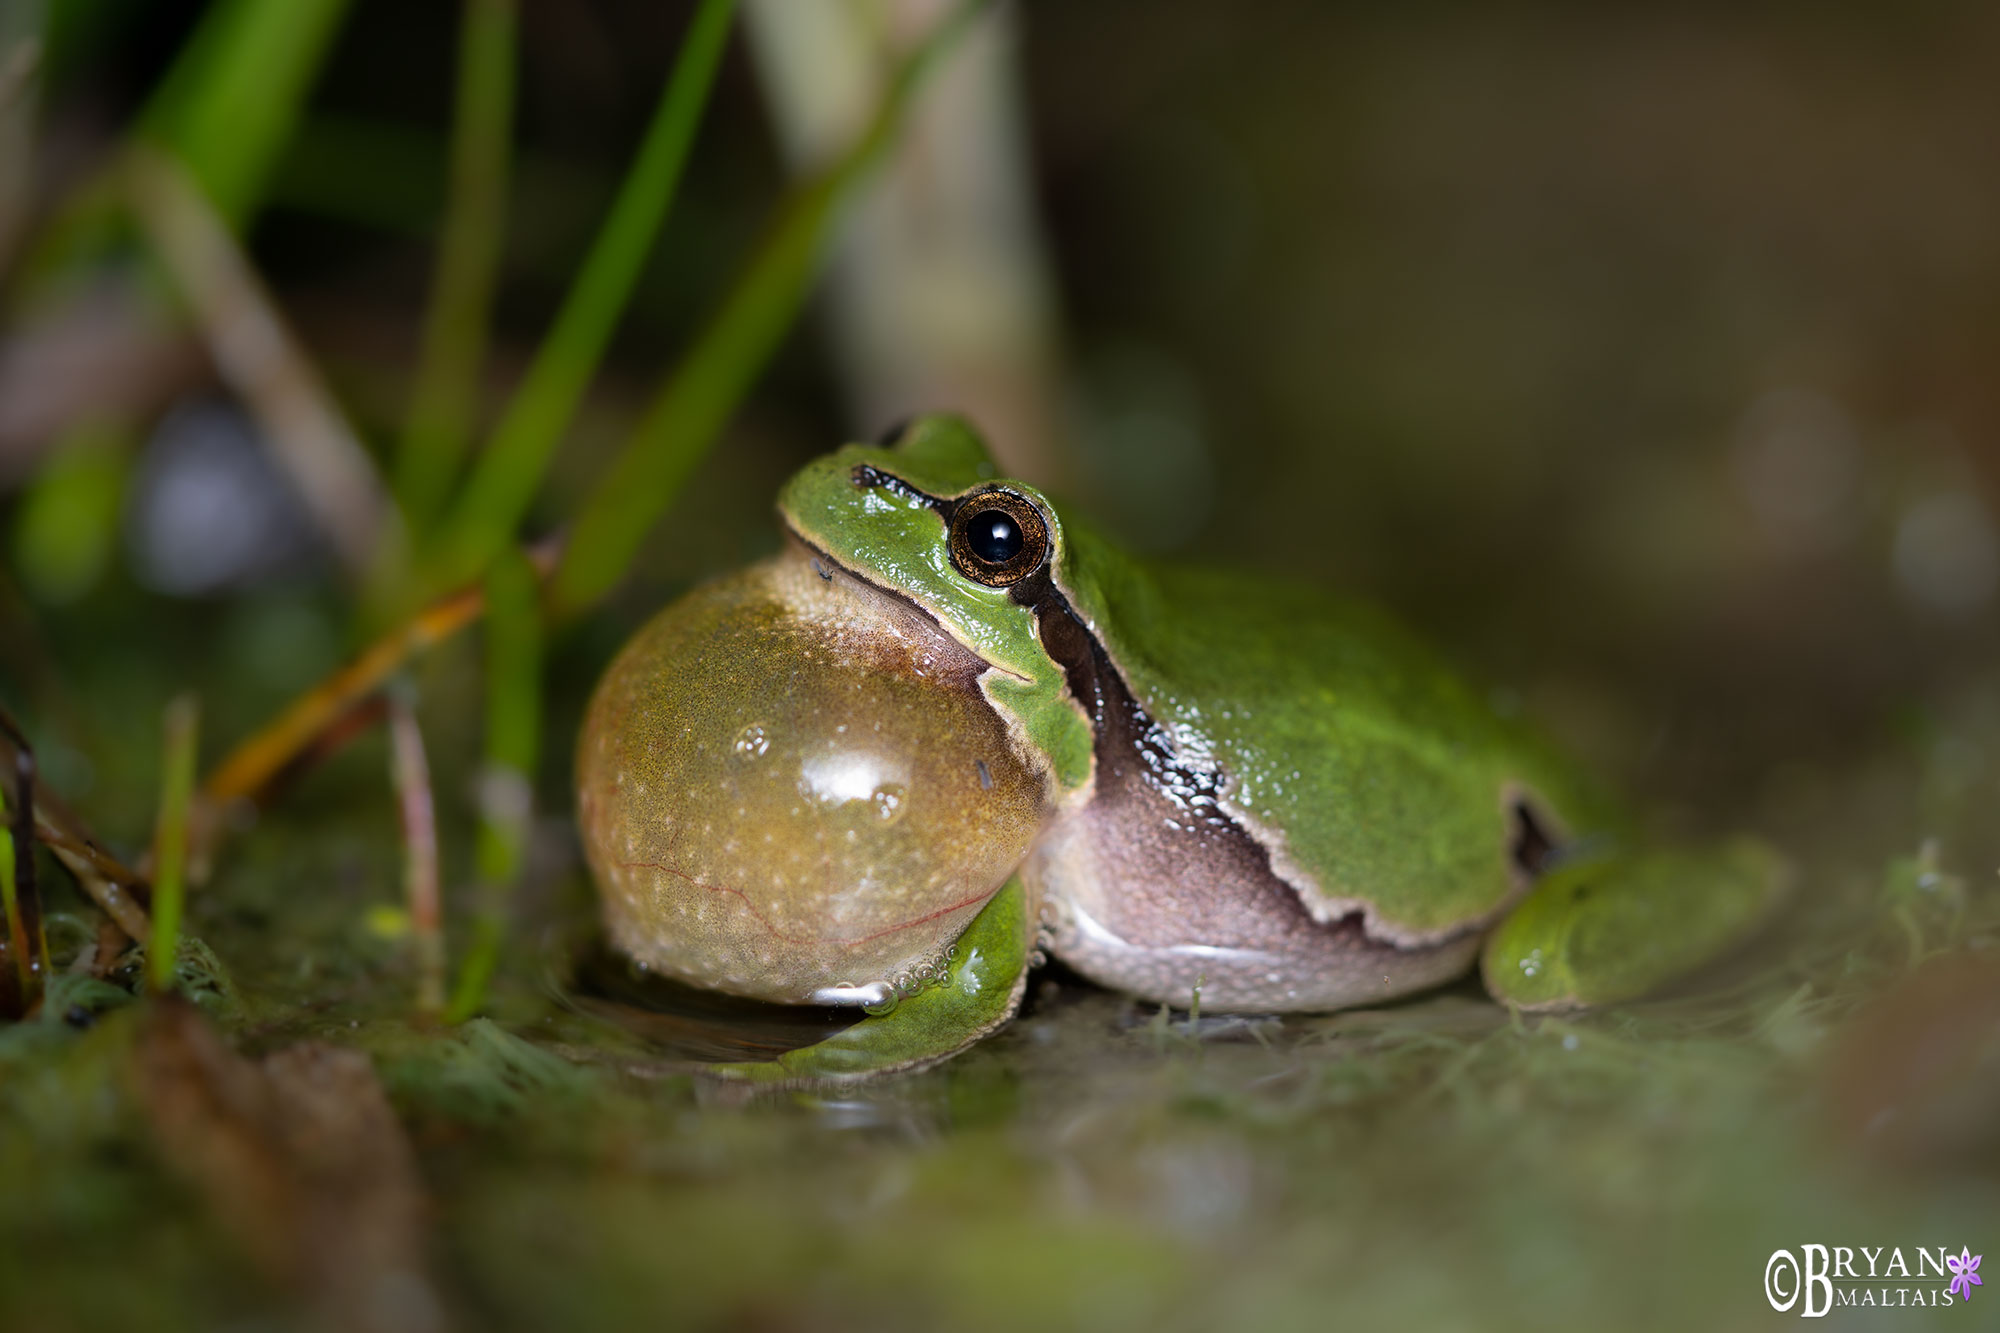
A standard 1x macro lens is perfect for shooting small animals like frogs, but isn’t strong enough to fill the frame with tiny insects. Sony A7rV, Sony 90mm Macro Lens, Godox TT350 Flash, Angler Flash Diffuser. f/11, 1/250th, ISO 100, Flash WB. European Treefrog, Stuttgart, Germany.
Aspiring macro photographers usually begin by purchasing a standard macro lens, so let’s start off by identifying what one can and can’t do. A standard macro lens produces 1x magnification on a full-frame sensor (though Olympus offers the 90mm 2x macro lens). That’s not strong enough for super macro photography. It can fill the frame with smallish animals about the size of a grasshopper, but tiny animals like a fly will appear in the middle of the frame surrounded by too much breathing room. You’ll need to crop the photo greatly for the subject to fill the frame rather than achieving high magnification organically. The great news is that if you already own a macro lens, it’s easy to bring it up to super macro magnification, for example, with a macro adapter like the Raynox 250. However, you don’t actually need a macro lens at all for super macro photography.
If your intent is to shoot subjects around the size of flowers, mushrooms and frogs, then the standard macro lens is perfectly suited to this. They have autofocus and image stabilization, which makes hand-holding easy when there’s enough natural light. This liberates you from needing a tripod or flash, making it easier to wander through nature and photograph small wonders as they arise. Furthermore, focus bracketing is a powerful feature for creating insanely sharp macro photos. Ever more cameras posses this feature when using the brand’s standard macro lens.
Remember, if you shoot a cropped format (APS-C and M3/4), then 1x is enough magnification to fill the frame with larger insects, but this isn’t real magnification. It’s the same as just cropping a full-frame image to make the subject fill the frame.
Standard macro lenses typically range from around 60mm to 105mm, and up to 200mm. The shorter the focal length, the shorter the working distance (aka, minimum focus distance). Short working distance brings you closer to the subject making it easy to reach out and manipulate it while looking through the viewfinder. This is useful for removing distracting objects like grass and leaves from the frame without having to get up. Short focal length macro lenses have a wider FOV with slightly more of the background visible, which marginally reduces bokeh quality.
Higher focal length macro lenses like 105mm have a longer working distance, which gives skittish subjects more space. They also render better bokeh. More powerful macro lenses like 200mm are excellent for specializing in butterflies, for example, but require far too much working space to photograph scenes in tight spaces, which often happens in macro photography.
What is a Super Macro Photography Lens?
Super macro lenses achieve 2x or greater magnification and deliver the types of photos that most people imagine in macro photography. There are only a few manufacturers of super macro lenses, mainly Venus Optics. Focus and aperture control are fully manual. This may sound burdensome, but auto focus doesn’t work at super magnification because DOF is too shallow. Instead, you focus by leaning your body back and forth in tiny increments. You also don’t need auto aperture control because you set the f/stop and keep it there. There are 2 main types of super macro lenses; fixed 2x and variable up to 5x.
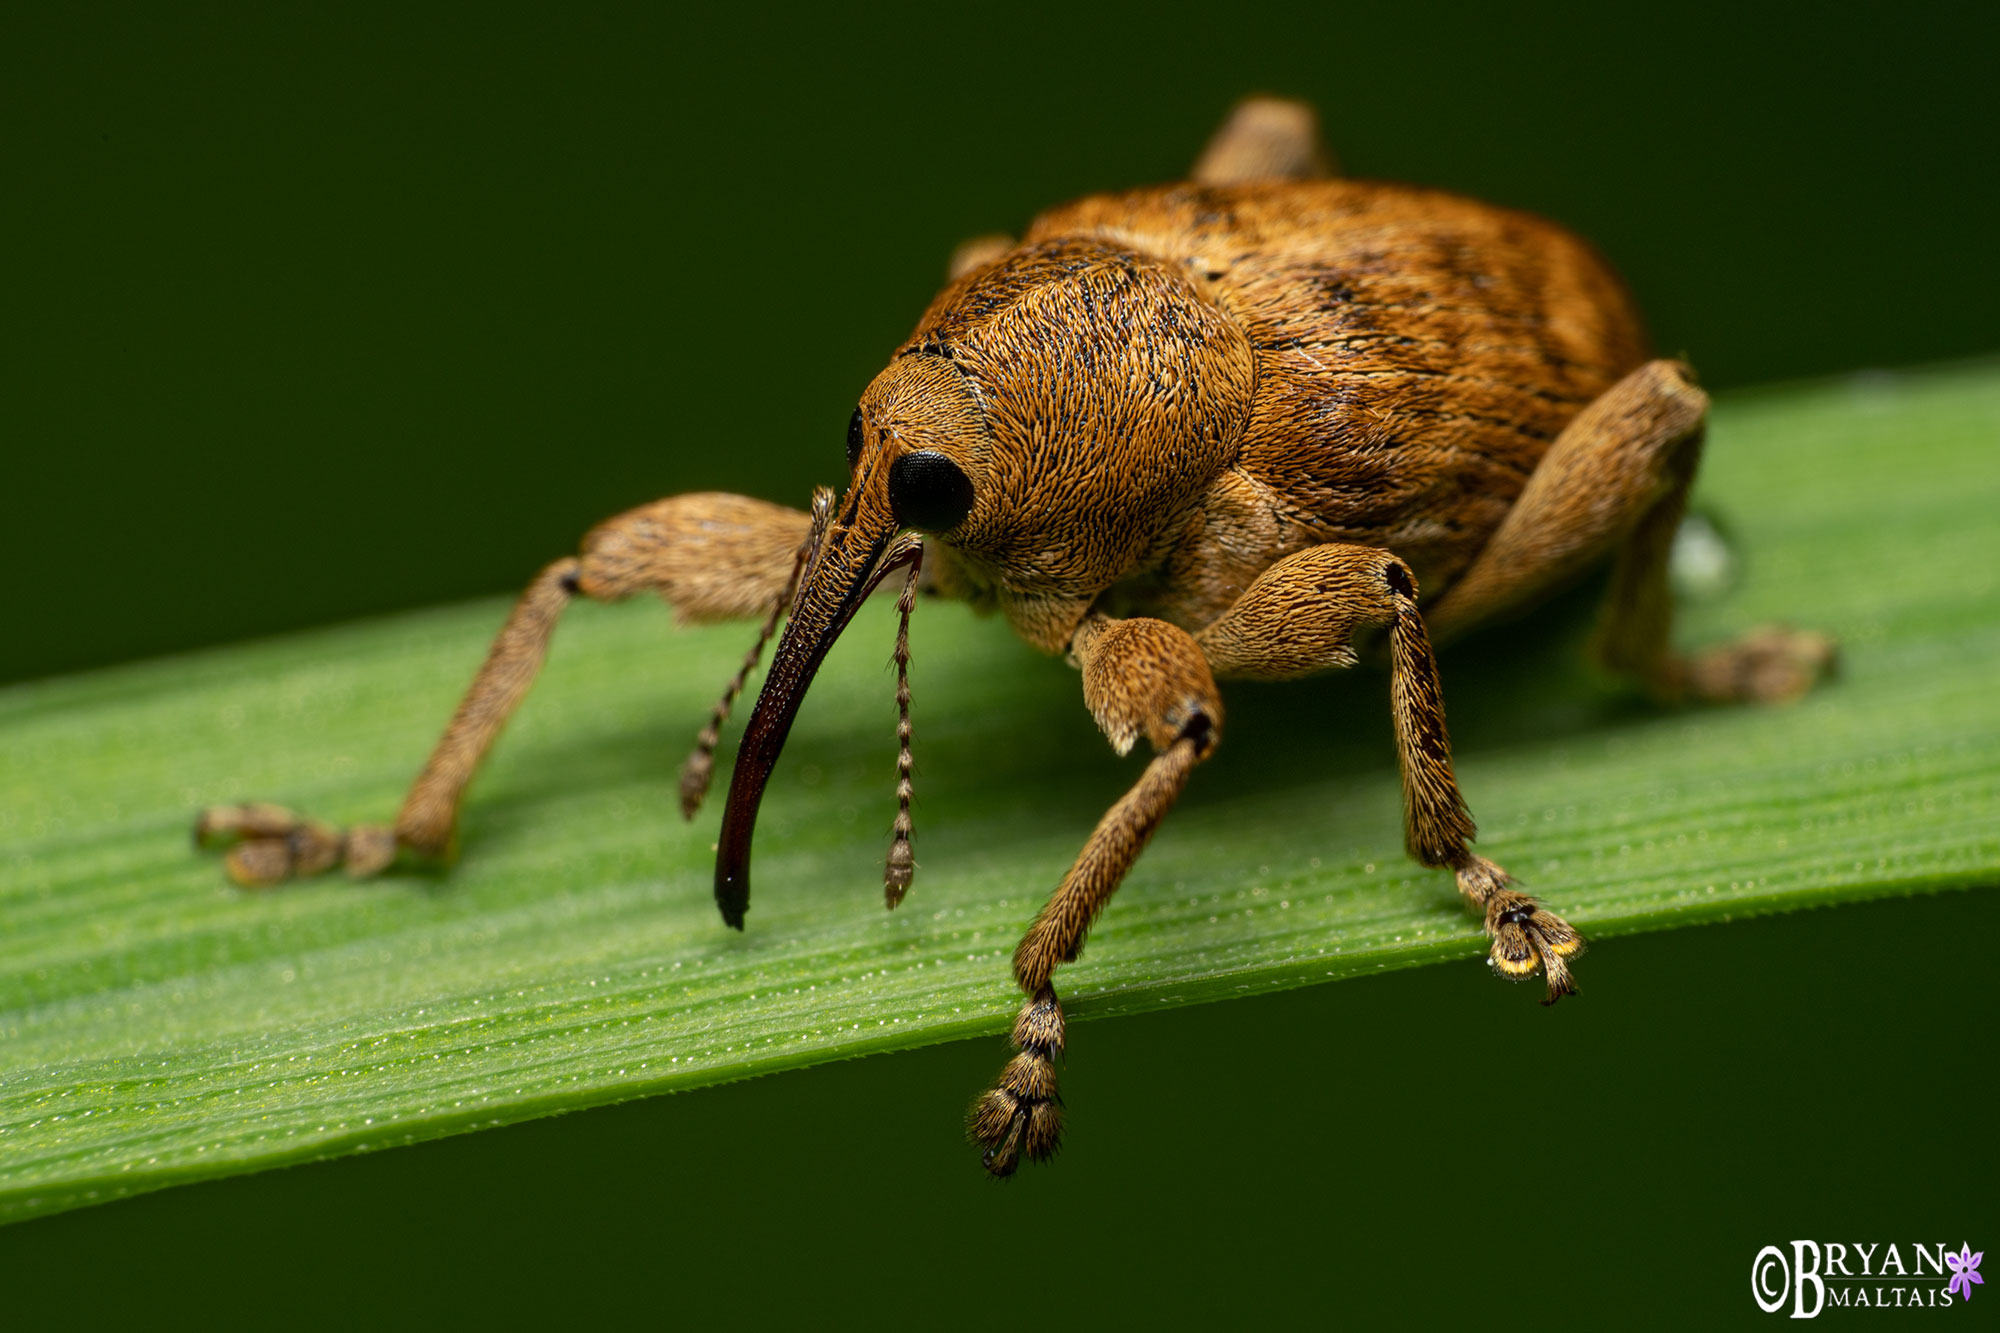
This Nut Weevil is less than .5″ yet occupies the whole frame at 3x magnification. Sony A7rV , Venus Laowa 90mm 2x macro lens, Raynox 250 close-up adapter, Godox TT350 Flash, Angler Flash Diffuser. f/16, 1/250th, ISO 100
The 2x Super Macro Lens
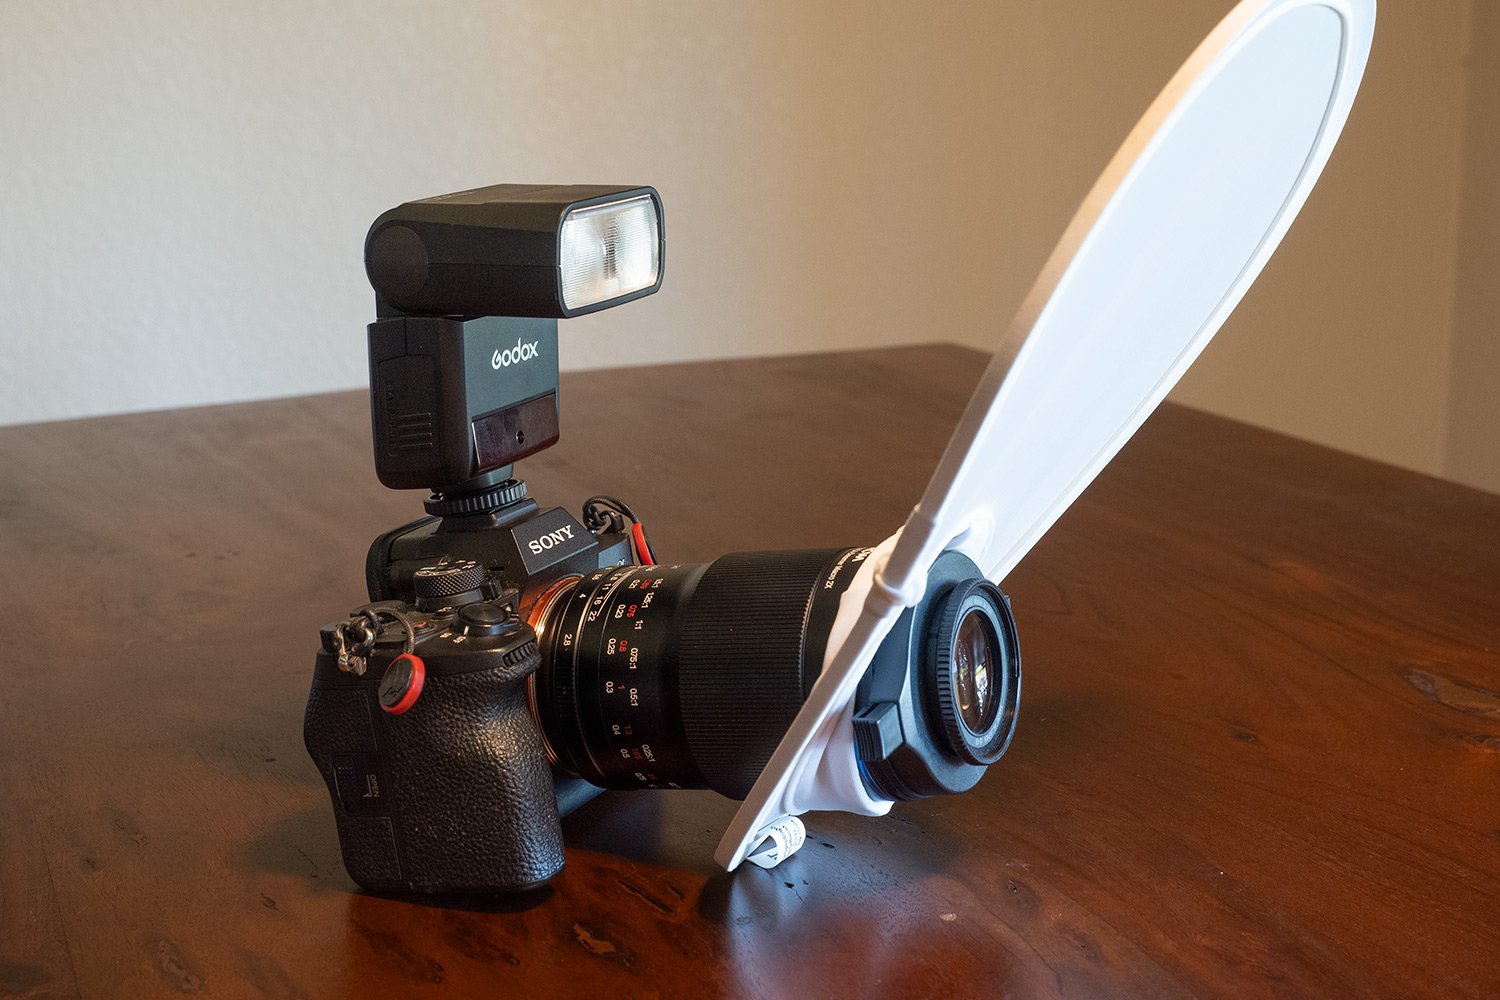
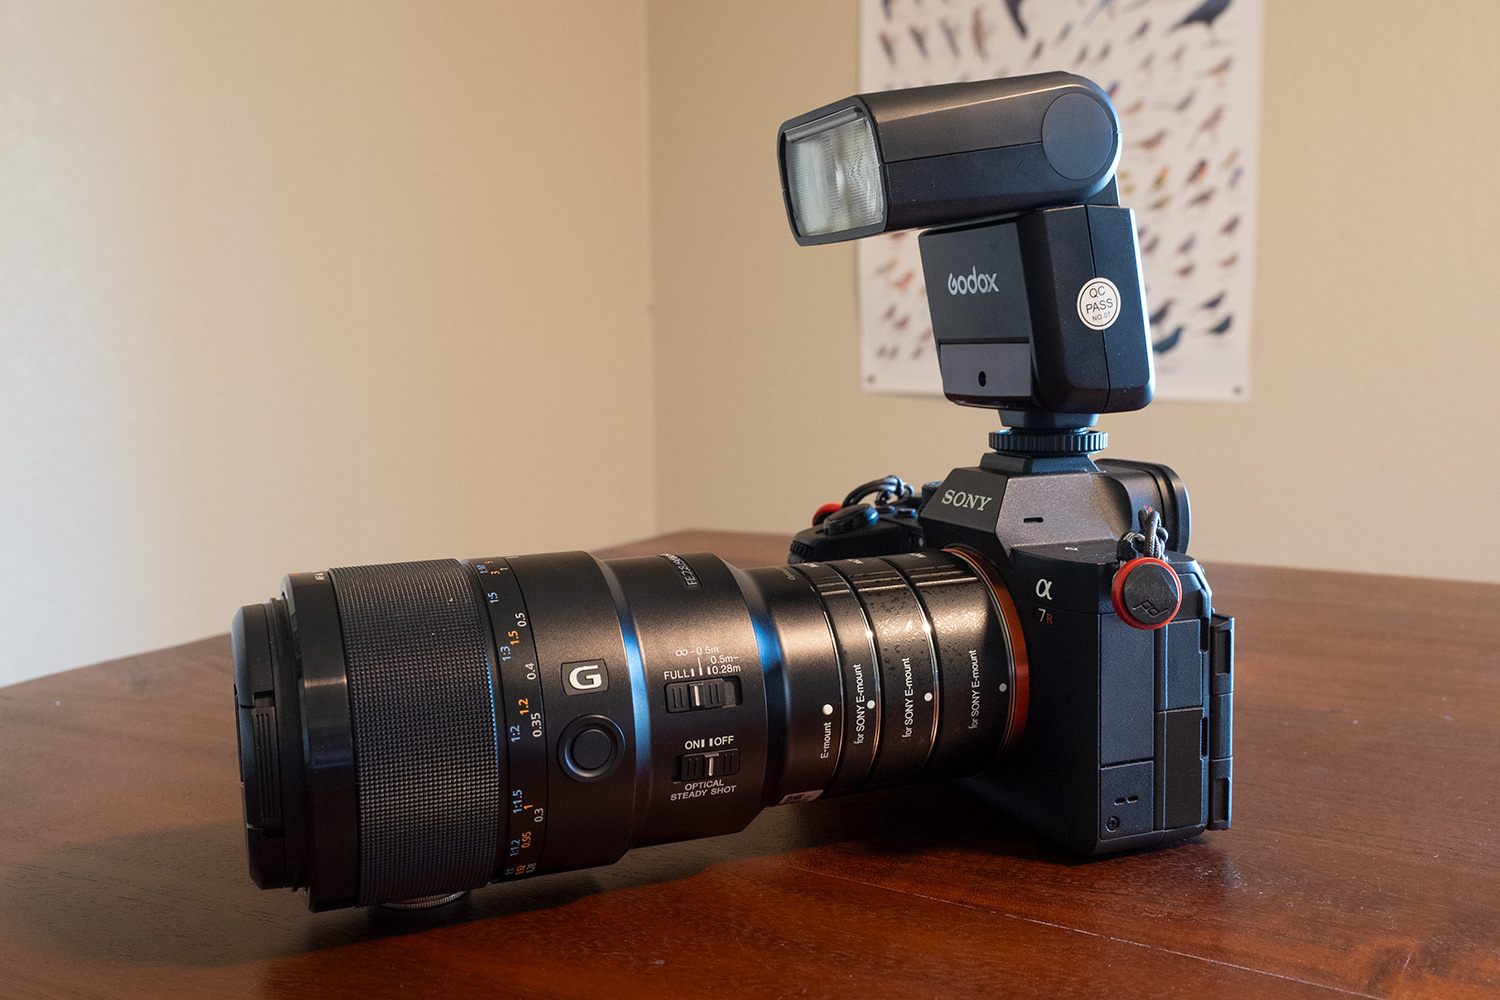
The 2x macro lens is a sweet spot for field photography. Magnification is strong enough to fill the frame with small subjects, while DOF is still deep enough to hand-hold. However, blur from camera shake becomes severe at 2x so flash should be the sole source of illumination when hand-holding. The 2x super macro lens is the workhorse for photographers wanting to pursue serious macro photography who aren’t satisfied with the magnification of standard macro lenses. A powerful combination that I use and is extremely popular in the macro community is the Venus Laowa 90mm 2x macro lens, Godox flash and a pop-up diffuser. Make sure to get the right lens for your camera mount. When subjects are particularly minute, throwing on a Raynox 250 close-up adapter brings this configuration up to 3x.
Field macro monster. Sony A7rV , Venus Laowa 90mm 2x macro lens, Raynox 250 close-up adapter, Godox TT350 Flash, Angler Flash Diffuser.
The 5x Super Macro Lens
At the extreme magnification spectrum are ultra macro lenses with up to 5x magnification. They include the discontinued Canon MP-E 65 (1-5x), Mitakon 85mm (1-5x) and Venus Laowa 25mm (2.5-5x). They have variable magnification that’s controlled via the zoom ring. Their extreme magnification causes staggeringly thin DOF, which makes it very difficult to capture in-focus hand-held images. They’re more suited to fixed shooting of still subjects in the home studio. Focus stacking on a focus rail is often used with these lenses to overcome their shallow DOF. This class of macro lenses are essentially reversed wide angle lenses (explained below). Of the 3 lenses, the Venus Laowa 25mm is the most practical for field shooting.
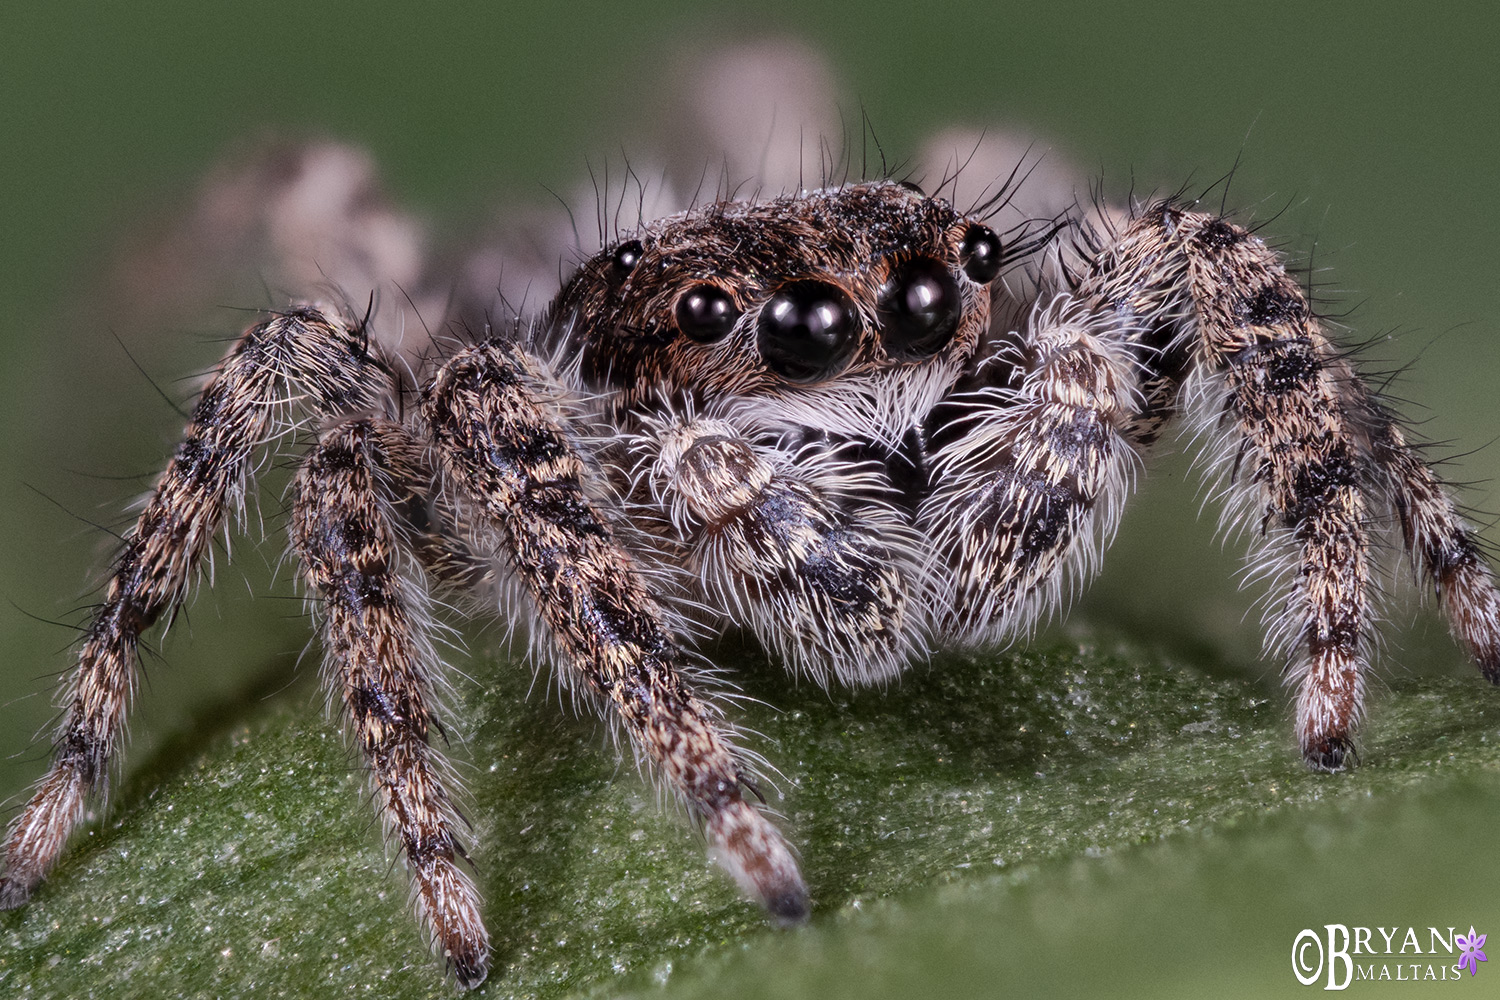
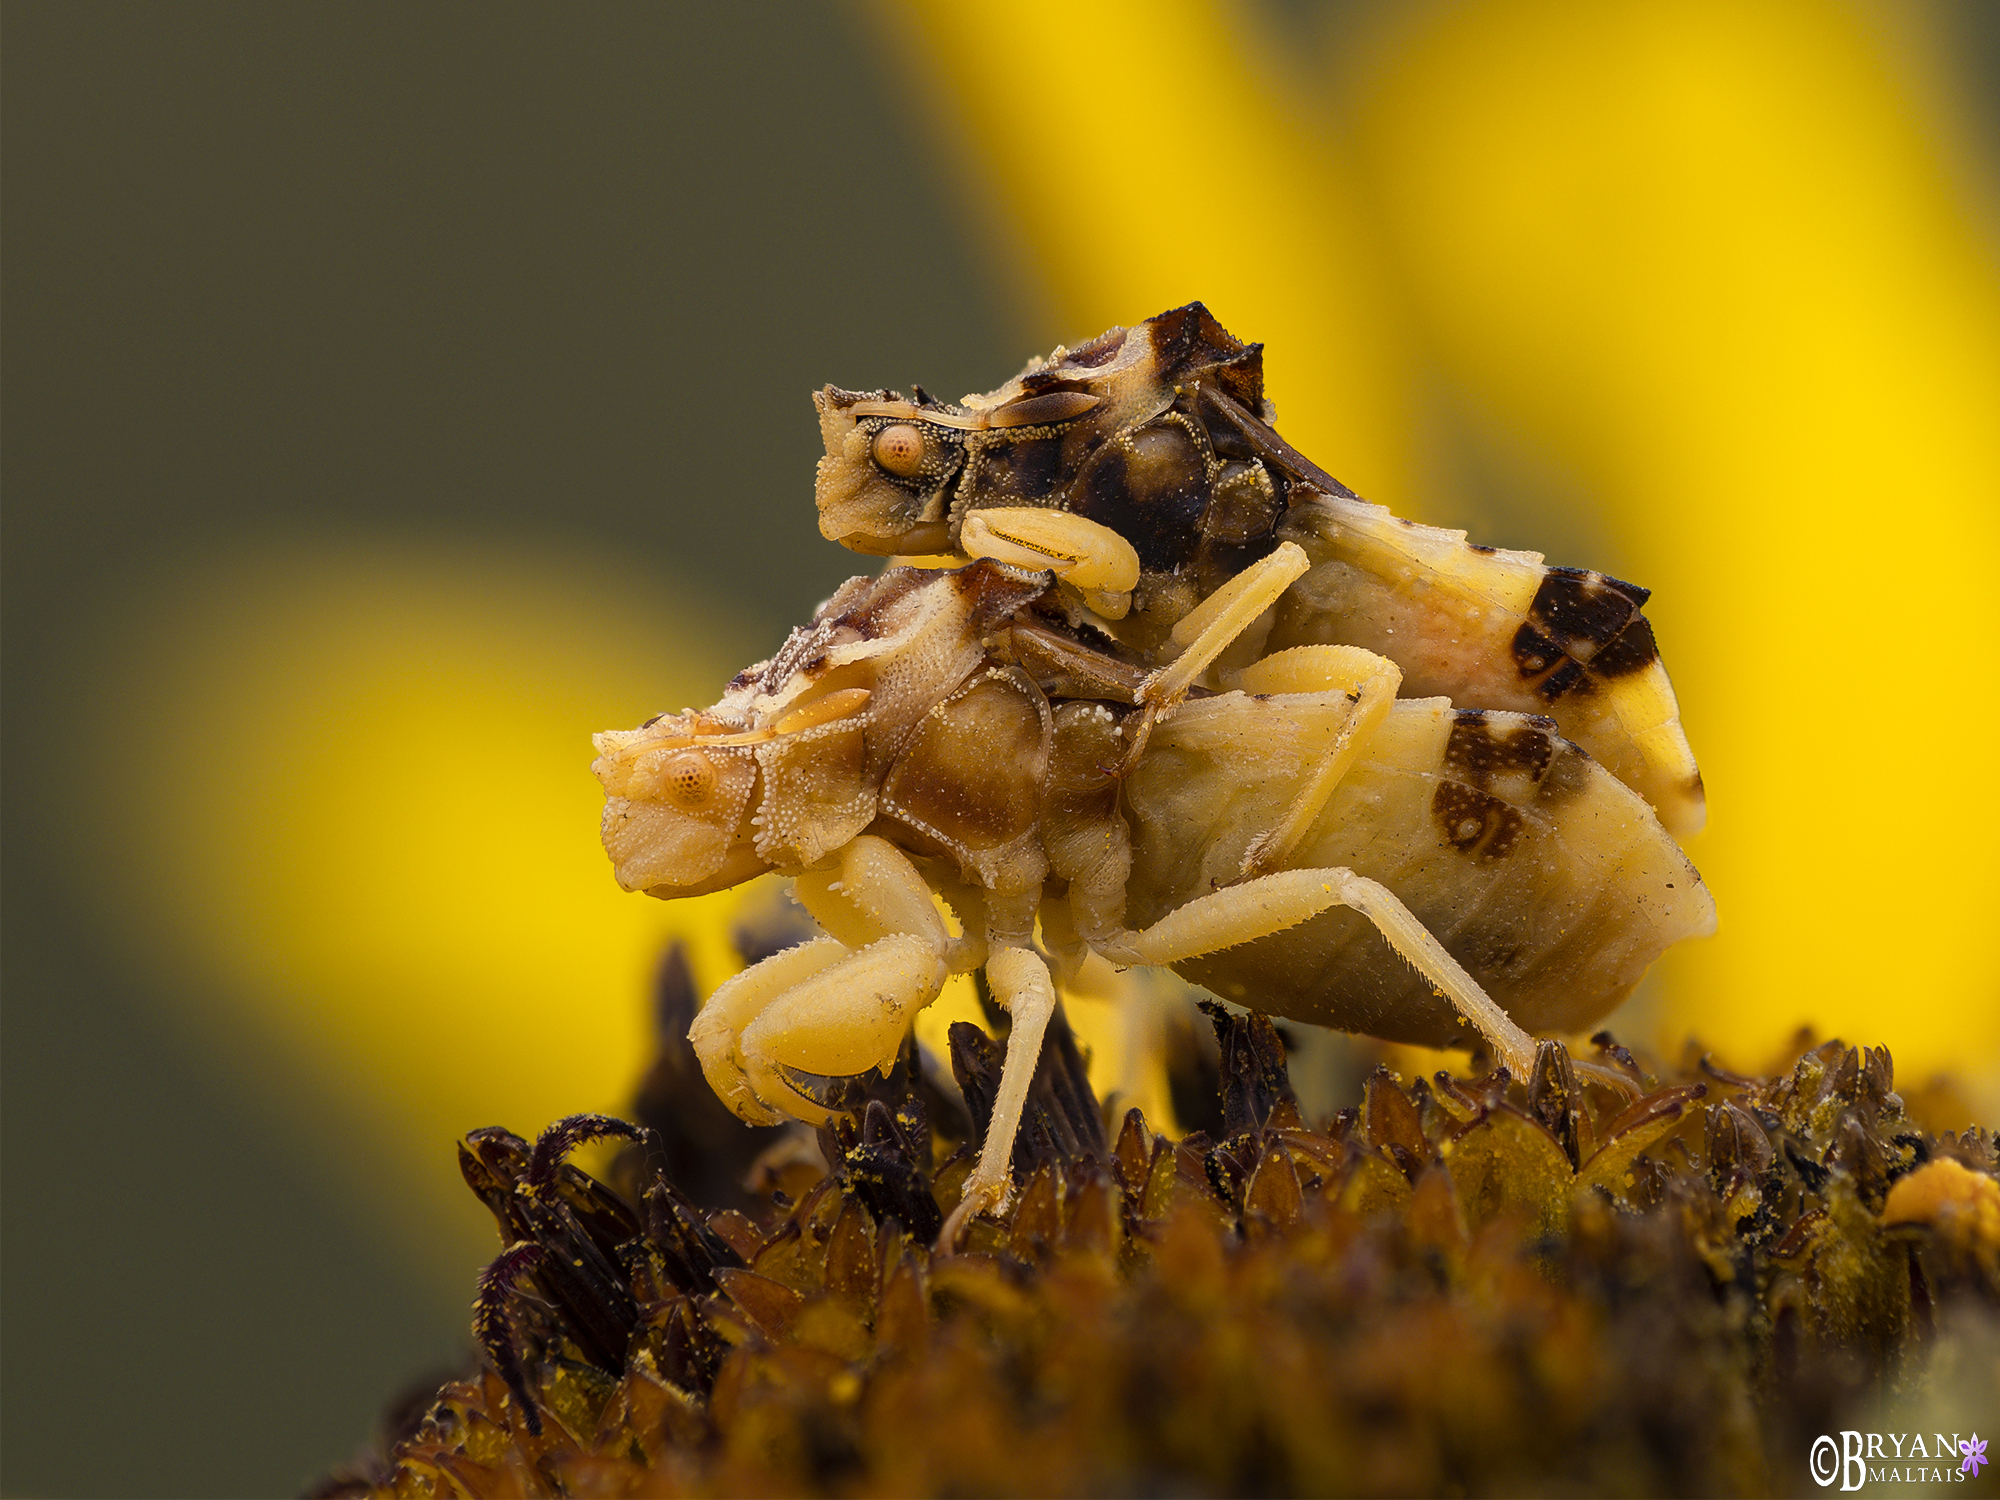
A Platycryptus jumping spider at 4x magnification
How do you achieve Super Magnification without a Macro Lens?
Close-up Macro Adapter
The close-up adapter is basically a magnifying glass that attaches to the front of a lens. They increase magnification without cutting light transmission or auto controls, which makes them easy to use. This is the best option in the lineup to convert a regular lens to a macro lens without any technical know-how. If you already own a macro lens, a macro adapter can increase its magnification to 2x!
Any glass that you add to a lens decreases image quality to some extent. This can be severe on cheap macro adapters, but negligible on high quality, vetted models. Fortunately, excellent close-up adapters cost well under $100. The most popular one is the Raynox 250.
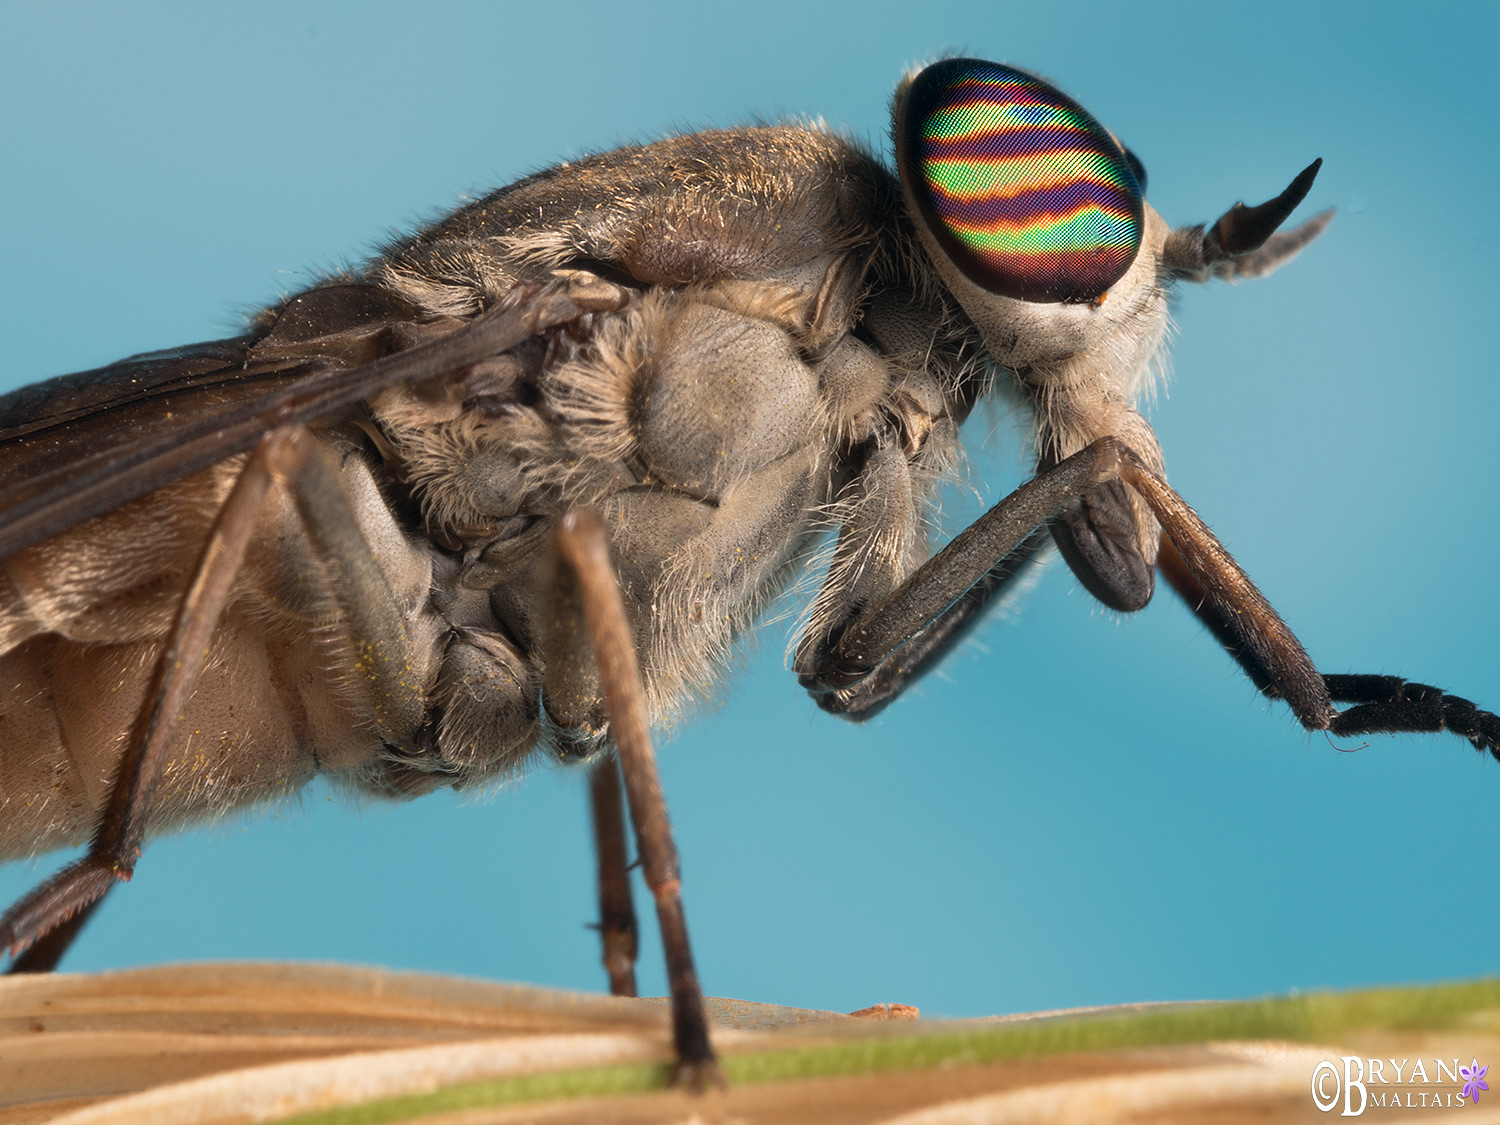
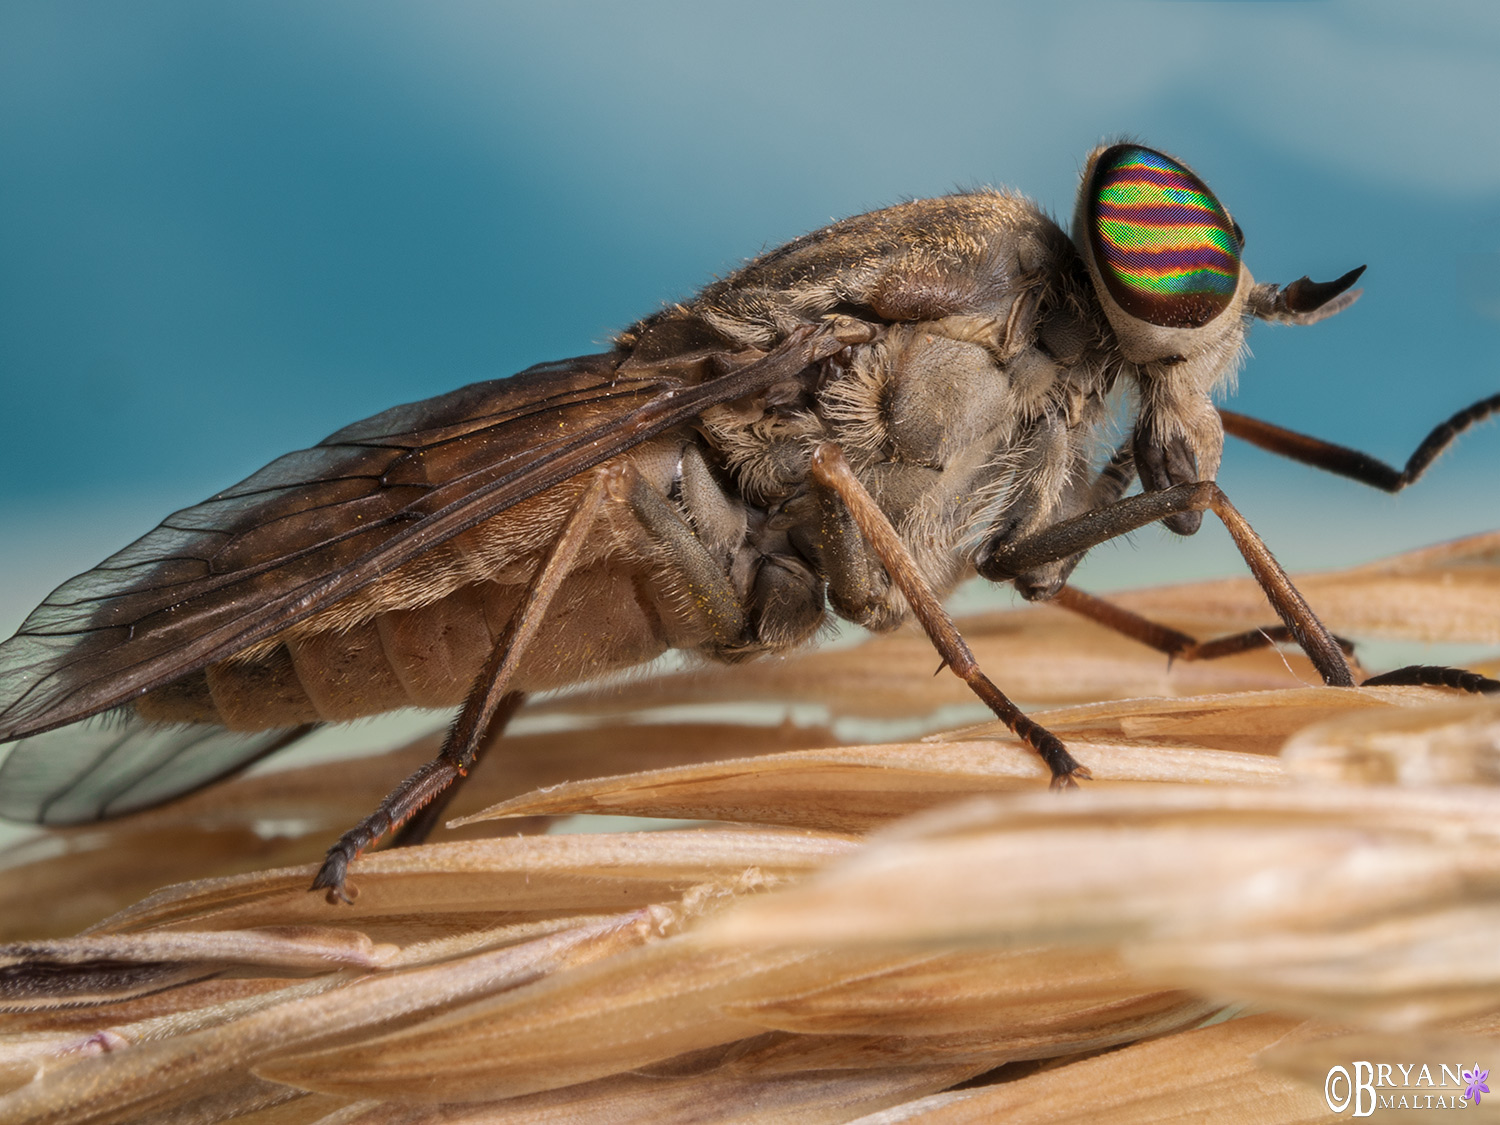
The Raynox 250 macro adapter doubles magnification on a standard macro lens. The Horse Fly on the left was taken at 2x with the Rayonx 250, and on the right, without.
Reverse Mounted Lenses for Macro Photography
Reverse mounting a wide angle prime or zoom can produce huge magnification with relatively high image quality. It’s practically free if you already own one, requiring only a cheap reversing ring to get started.
Wide angle lenses normally take huge objects and make them fit on your sensor. But when reversed, the optics work the opposite way; they take tiny subjects and make them bigger than life size. The smaller the focal length, the more magnification you get. For example, a reversed 16 mm lens renders an astonishing 5x mag. This fits only the head of a housefly on a full frame sensor. However, the smaller the focal length, the shorter the working distance. Though 16mm is powerful, the price for this magic is that the tip of the lens almost touches the subject.
A reversed wide angle zoom lens is versatile in the field because the zoom ring becomes a magnification selector. Take the common 18-55mm kit lens. While mediocre for regular photography, it’s a secret macro photography monster. At 18mm it produces almost 4x magnification, and at 55mm it produces 1x like a regular macro lens. With such a wide magnification range, you can shoot any macro subject that you’re likely to encounter without additional equipment or even having to own a macro lens.
To reverse mount lenses you just need an inexpensive reversing ring made for your camera’s mount with its other end in the diameter of the lens. Since there’s no electronic connection, you can mix lens and camera brands.
The disadvantage of reverse mounting a lens is loss of auto aperture control because there’s no electronic connection between lens and camera. This means the lens will be stopped down to its minimum aperture, which will be too dark to see much on DSLR’s. Reversed lenses also suffer from severe diffraction at small apertures, which causes bad IQ. The easiest way to control the aperture is to use a vintage lens with a manual aperture control ring. Contemporary DSLR lenses have a mechanical bayonet that controls the aperture that you can open up by wedging an object into the groove beside it. There are kits that accomplish this. If using a mirrorless lens, there’s a trick to set it to a specific f/stop. With the camera in A or M mode, select the desired f/stop, hold down on the DOF preview button and remove the lens.
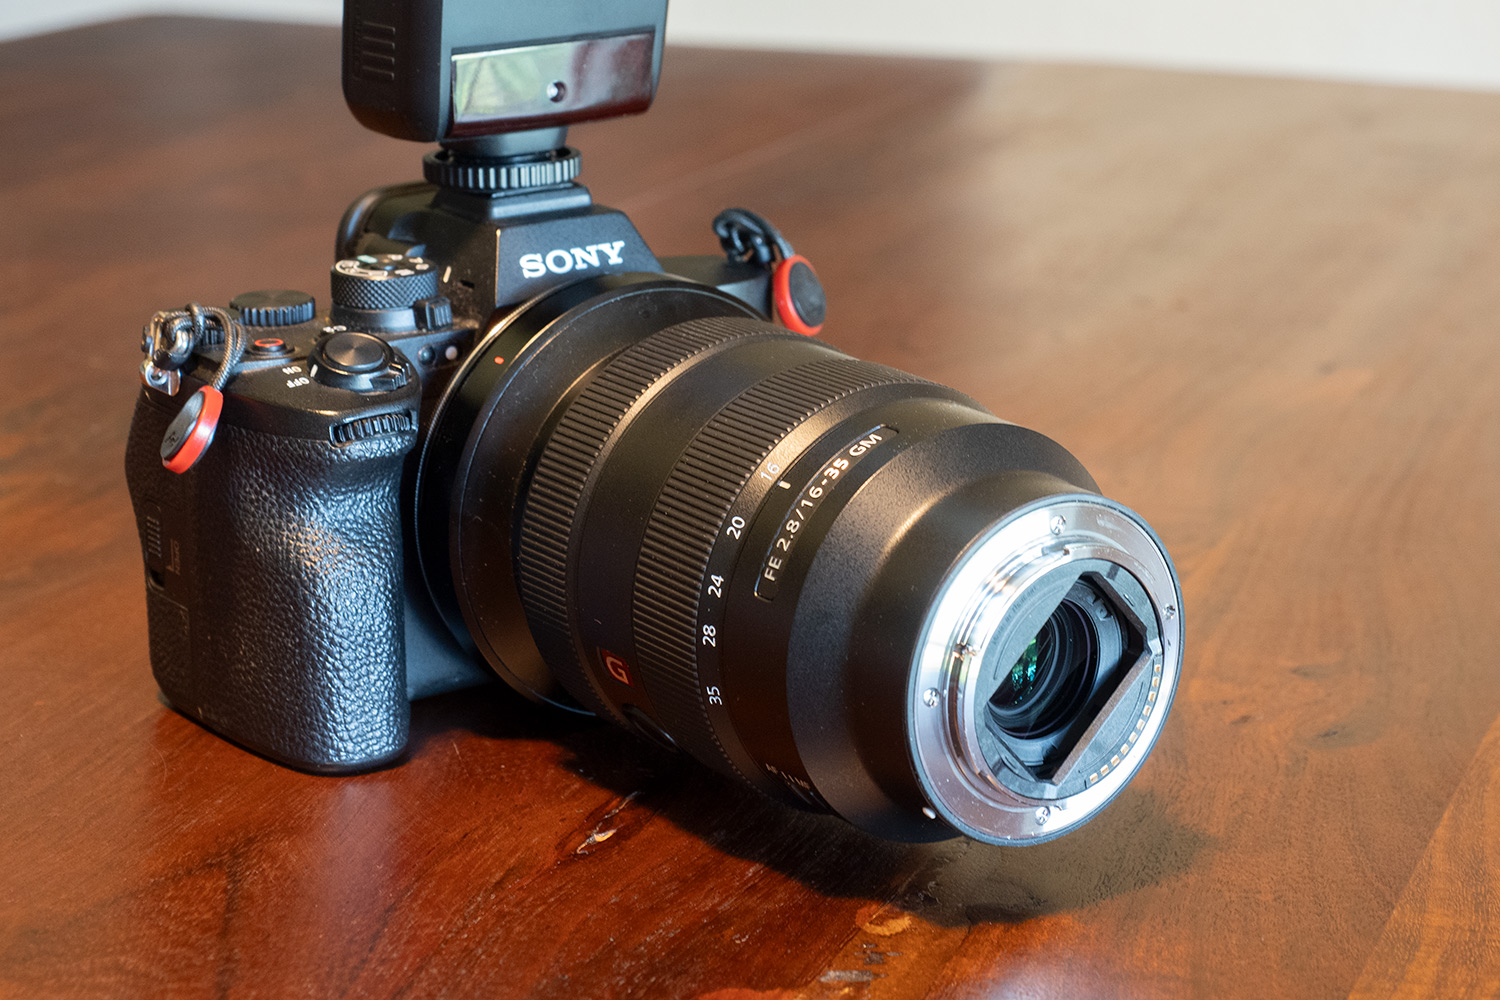
Though odd in appearance, reversing wide-angle lenses turns them into ridiculously powerful super macro lenses. This Sony 16-35mm G Master musters 5x when at 16mm.
Extension Tubes
Extension tubes are a very cheap way to add magnification, but they only work well in certain cases. They’re empty tubes without any optics that connect between your camera and lens. They increase magnification by moving the lens’ front element closer to the subject, reducing the minimum focus distance.
To determine the magnification factor of extension tubes, divide the tube length by the lens focal length. For example, adding 50mm of extension tubes to a 50mm prime lens increases magnification by a whopping 1x, turning it into a proper macro lens. However, extension tubes have a diminishing effect as lens focal length increases.
For example, extension tubes might sound like an easy way to increase magnification even more on a 100mm macro lens. But it would require 100mm of tubes to increase magnification from 1x to 2x, which is fraught with problems. A heavy macro lens sitting atop 100mm of extension sticks out so far that it becomes unwieldy in the field and can flex under its own weight. Finding a tiny subject so far from your eye becomes very difficult. Most significantly, light is forced to travel through such a long tunnel that diffraction becomes severe, causing fuzzy images. Vignetting is also so extreme that the corners are cut off.
Extension tubes are very effective when adding them to reversed lenses. For example, a 36mm extension tube added to a reversed 18mm lens increases magnification from 4x to 5x without much vignetting or diffraction.
Extension tubes come in sets, for example of 10mm,16mm and 21mm that can be stacked or used individually to fine-tune the magnification factor. Most extension tubes also retain electronic connection to the lens.
A set of extension tubes works poorly on this Sony 90mm Macro Lens to increase magnification, but they’re superb to convert smaller focal length lenses into macro lenses
Teleconverters for Macro Photography
A teleconverter is a magnifying glass element that mounts between the camera and lens. They’re traditionally used to increase magnification in telephoto photography, but work equally well for macro. Teleconverters typically come in 1.4x and 2x, and increase magnification by these amounts. Their main advantage is magnifying the subject without having to get closer to it. Other methods magnify by getting very close to the subject. This reduces DOF, can cast a shadow on the subject, and scare off little critters. A disadvantage of teleconverters is that you lose one stop of light with a 1.4x teleconverter and two stops with a 2x. This is irrelevant if using flash, but can preclude handheld shooting. They also degrade image quality somewhat because it’s extra glass.
The main justification for using a teleconverter for macro photography is if you already own one. Otherwise, you can purchase a super macro lens for the price of a teleconverter. Don’t get a teleconverter for macro photography before testing it out first. Some have protruding elements that prevent mounting a macro lens.
Combining all of the Above for ultra high magnification
Combining some or all of the above methods can achieve extreme magnification. As more magnification is added, image quality and DOF reduce. There’s no recipe on how to combine components, it’s mostly trial and error.
Tripods and Stabilization for Macro Photography

The camera rests on a Gorillapod, which can be bent into the desired height, and a Plamp holds the flower in place.
When using ambient light instead of flash, vibrations are too amplified at super magnifications to hand-hold without frequently getting blurry images. Stabilization is also needed for focus stacking. For this we need to employ a tripod. However, macro photography often takes place at odd angles and low to the ground, which conventional tripods can’t handle well. Luckily, specialized solutions for this exist. I’ve come to rely on the Gorillapod, Plamp and beanbags.
The Gorillapod comes in different sizes, but the largest one is the most versatile at about 15” tall. Each leg is composed of articulating joints that allow bending them into various heights and shapes. This makes it perfect for shooting objects near the ground, or wrapping it around tree branches to shoot at eye level.
A beanbag lets you shoot flat on the ground. You can make them out of old pant legs and cinch the ends with zip ties in lieu of sewing them up. Don’t use filler smaller than beans because it can become too dense to easily shift around.
The Plamp isn’t a tripod to hold the camera, but an articulating arm to hold wiggly things in place like a flower swaying in the breeze with an insect on it. One end is a stiff clamp that grabs a fixed object, the other is a precision clamp that delicately holds the subject in place. It can also be used as a third arm to hold a sun diffuser over your subject.
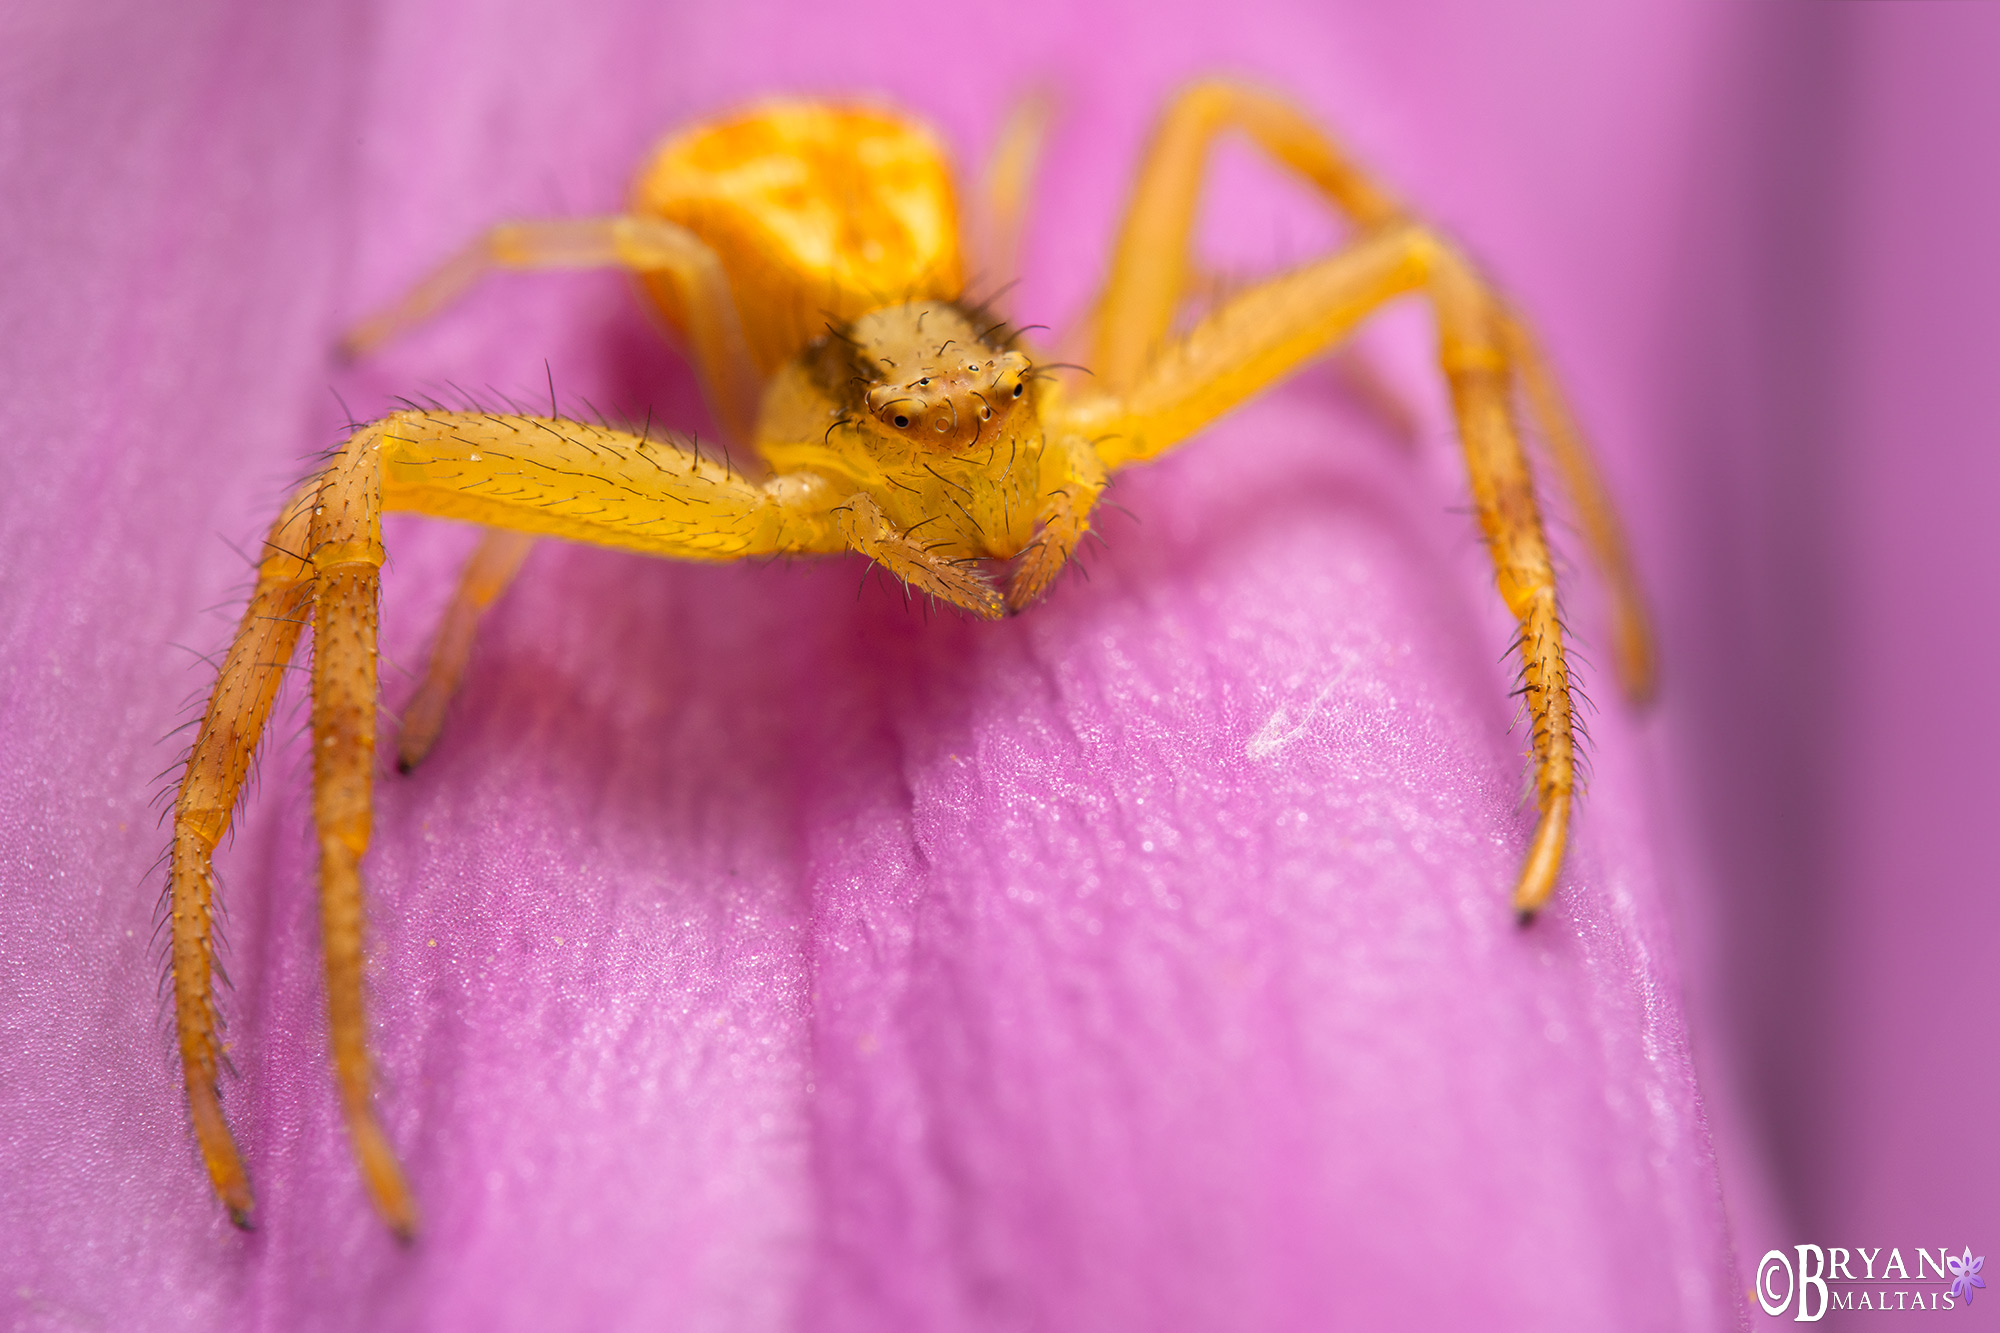 Crab spider in my garden. Sony A7rV , Venus Laowa 90mm 2x macro lens, Raynox 250 close-up adapter, Godox TT350 Flash, Angler Flash Diffuser. f/16, 1/250th, ISO 100

I quite simply don’t believe you have achieved these photographs at that level of detail using the equipment you describe. Like a lot of so called microphotographers giving tips you are all holding back on information. And in the field like that I think not.
I want to learn but us amateurs are being deceived by such posts.
I’ll take that as a compliment, Kevin. I guarantee that these photos were taken with the settings and equipment stated, and I’d be happy to clarify if you have more specific questions.