How to shoot Wildlife Photography
In this post:
Telephoto Lenses and Equipment for Wildlife Photography
Though wildlife photography can be done with any lens if you can get close enough to the animal, it’s most associated with the super telephoto lens. They come in zoom and prime versions.
Telephoto zooms offer a lot of bang for the buck. A typical superzoom costs around $2000 and covers a focal range up to 600m with a few extending up to 800mm. They render very good image sharpness for the price, but aren’t quite as resolute as primes. They cost substantially less than their prime counterparts because they’re constructed from smaller glass elements, which gives them a smaller maximum aperture. For example, a typical 600mm zoom lens has a variable max aperture of f/6.3, where a prime 600mm typically has a fixed f/4 max aperture. The smaller aperture of the zoom transmits 1.5 stops less light, meaning you’ll be forced to use higher ISO and slower shutter speeds. The smaller aperture also renders greater depth of field, making it harder to get a smooth background.
While it may sound like a more expensive prime telephoto lens would always be better, zooms have significant advantages in certain cases. With smaller glass elements, they’re lighter and more compact, making them easier to wield during a full day of shooting. Being able to zoom also has a few advantages. Sometimes you need to zoom out to lower focal length to capture an animal that’s close, where having a fixed zoom lens would cause you to miss the shot. It also enables scanning a wide part of the scene, then quickly zooming in when action breaks out. Being able to zoom out also allows including more of the background when you want to show the animal in its habitat.
Prime telephoto lenses render the sharpest image quality, have smoother bokeh and a faster maximum aperture because they’re constructed from larger glass elements. They’re around 35% larger and heavier than equivalent zoom lenses. A typical 600mm prime lens cost around $13,000.
This blog contains Amazon affiliate links. Clicking on them and shopping on Amazon as you normally would supports this blog by generating small commissions.
 It’s not always about reach
When possible, it’s often better get closer to the animal than relying on magnification. Using a shorter focal length can increase image quality because it allows using a slower shutter speed while still freezing action, which allows lower ISO.
A veteran wildlife photographer once told me that his favorite lens to photograph ducks was only a 135mm. He built a pond-side blind where he could lay on his stomach and photograph them at eye-level. Over months, the birds became habituated to the blind and swam within feet of it. Similarly, you can get close to wild mammals by adopting the tactics of an archery hunter. Namely, scent and noise management, camouflage, waiting, and calling. You shouldn’t bother trying to get close to animals if it disturbs them or risks safety.
The telephoto lens makes wildlife photography accessible for the majority of photographers who don’t have the time or druthers for such measures.
Teleconverters
A teleconverter is essentially a magnifying glass that fits between the camera and lens. They typically come in 1.4x and 2x magnification. On a 600mm lens, a 1.4x teleconverter increases focal length to 840mm, and a 2x to 1200mm.
This can be an easy way to powerfully increase reach, but they sometimes have drawbacks that negate their benefits. Teleconverters reduce the maximum aperture of the lens, which requires use of higher ISO to maintain sufficiently fast shutter speeds. In dim light, the increased image noise from using a higher ISO can void the resolution gained. Resolution is also voided if the smaller aperture forces you to use a slow shutter speed that causes motion blur. Teleconverters inherently reduce image quality to some degree simply because they’re an extra piece of glass. Because of this introduced fuzziness, sometimes cropping images that were taken without a teleconverter can render equal subject resolution as images taken with one.
Teleconverters render better image clarity when shooting subjects that are close because atmospheric distortions across distance degrade image quality. Temperature variations in the air and heat rising off the ground refract the light, causing wavy images.
A teleconverter can be effective when used in bright light where it doesn’t rob shutter speed and ISO. They work best when used with lenses that are extremely sharp to begin with, but can magnify fuzziness in lower quality lenses. Ultimately, using a teleconverter is worthwhile if it produces more resolution than simply cropping the original image taken without a teleconverter.

Best Tripod and Head types for Wildlife Photography
You don’t always need a tripod or support in wildlife photography. When using shutter speeds fast enough to freeze motion, blur from hand-holding isn’t a concern. In this case, the tripod primarily serves as a place to rest your heavy rig. In low light when shooting still animals, you need a tripod to prevent camera shake just like in landscape photography. A monopod is a great alternative when moving around on foot.
A gimbal head is generally best for most types of wildlife photography. It supports the rig in a balanced position that points in the desired direction without flopping forward under its own weight. The gimbal stays unlocked so it’s ready to go without having to unscrew any knobs first.
You can also use a ballhead for wildlife photography if you already have one and don’t want to purchase a gimbal. The main disadvantage is that you have to constantly hold the camera so it doesn’t flop forward. You can make a ballhead act like a gimbal by putting it in its side orientation. With the foot of the lens connected to the head, rotate the ball head so that its neck is positioned sideways, fitting into the slot. In this position, the camera is balanced and doesn’t fall forward. However, because it positions the camera a few inches off its center axis, it rotates in a wide arc when panning, which forces you to step around the tripod or crane your neck as you turn the camera. You can also balance the camera on the ballhead and only partially lock the knob. This keeps it tight enough to not fall forward, but loose enough to move on the fly.
How to capture Action and Emotion in Wildlife Photos
Most distinguished wildlife photos show animals in motion or engaged in interesting behavior rather than just standing there. A photo of an animal “acting” is more dynamic and difficult to achieve than a static portrait. It can emotionally connect the viewer to the photo. Imagine your own reaction when seeing an already beautiful animal doing something cute, daring or fascinating. Action and behavior also convey information about the animal’s natural history and habits. To show action, strive for shots of animals in flight, running, feeding, yawning, looking at you, or interacting with each other etc..
Action is usually captured by keeping your lens focused on the animal until it does something. Holding the camera for this long, especially without a tripod, can be tiring, but it’s the price to pay for an awesome shot. For example, a bird sitting on a fence post will inevitably fly off; it’s just a matter of holding the lens on it until it does. When action finally does happen, the animal might be out of focus or have moved out of the frame too quickly. It usually takes repeated attempts and many hours spent in the field to nail the shot.
Pre-roll is a feature on some cameras that helps to never miss the shot. By half-pressing the shutter button, the camera takes continuous pictures and temporarily stores them in the buffer. When you press fully, the camera saves all the images taken a few seconds before and after, ensuring that it captured the action that you wanted. Different brands call it by different names. Sony calls it Pre-capture and Olympus/OM Systems calls it Pro-capture.
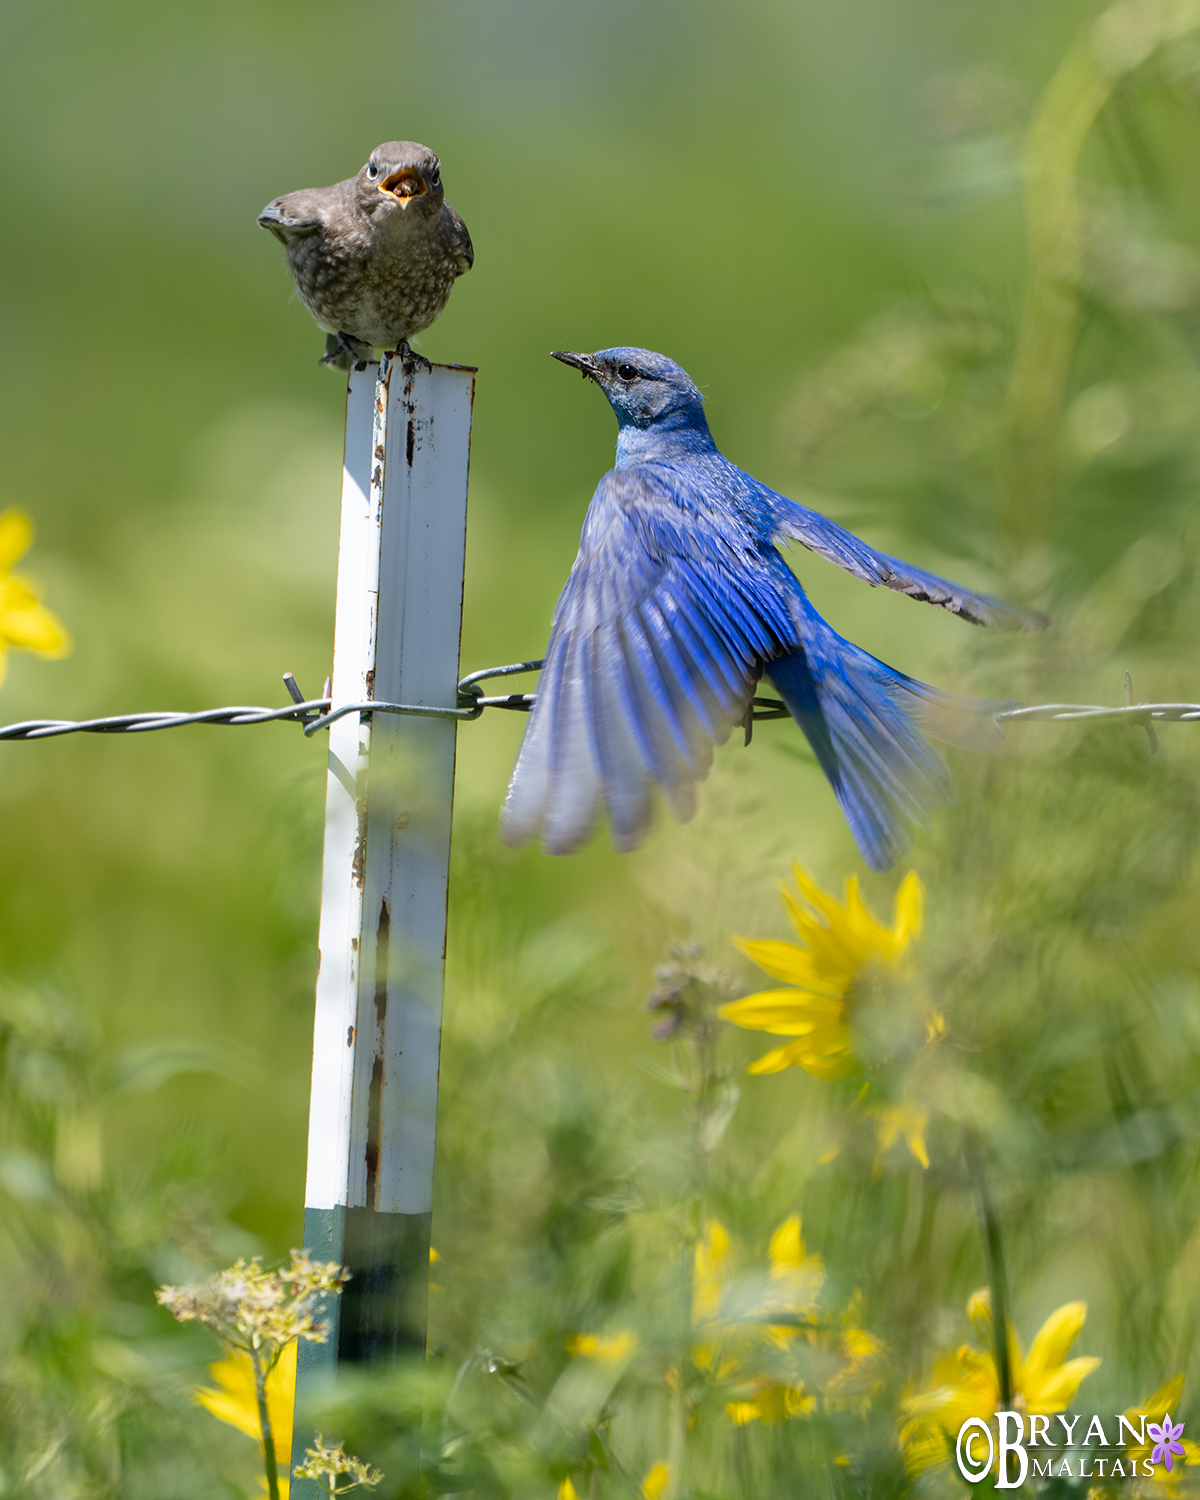 For 30 minutes I observed this male Mountain Bluebird on a constant rotation flying off to collect insects then returning 5 minutes later to feed his chicks. When he returned with a bill full of insects, he perched at the top of a tree to chirp to his babies to let them know to leave the cover of their nest and perch on a fence post to be fed. I focused on the chick to get this shot, knowing that the dad was soon to arrive in the frame.
Become a Biologist-Spending Time in the Field
Becoming familiar with animals’ natural history can help you predict when and where it will be present. This experience comes with research and observing them in the field. After a while, you’ll find that you’ve accumulated a wealth of information about wildlife, which makes you a type of biologist.
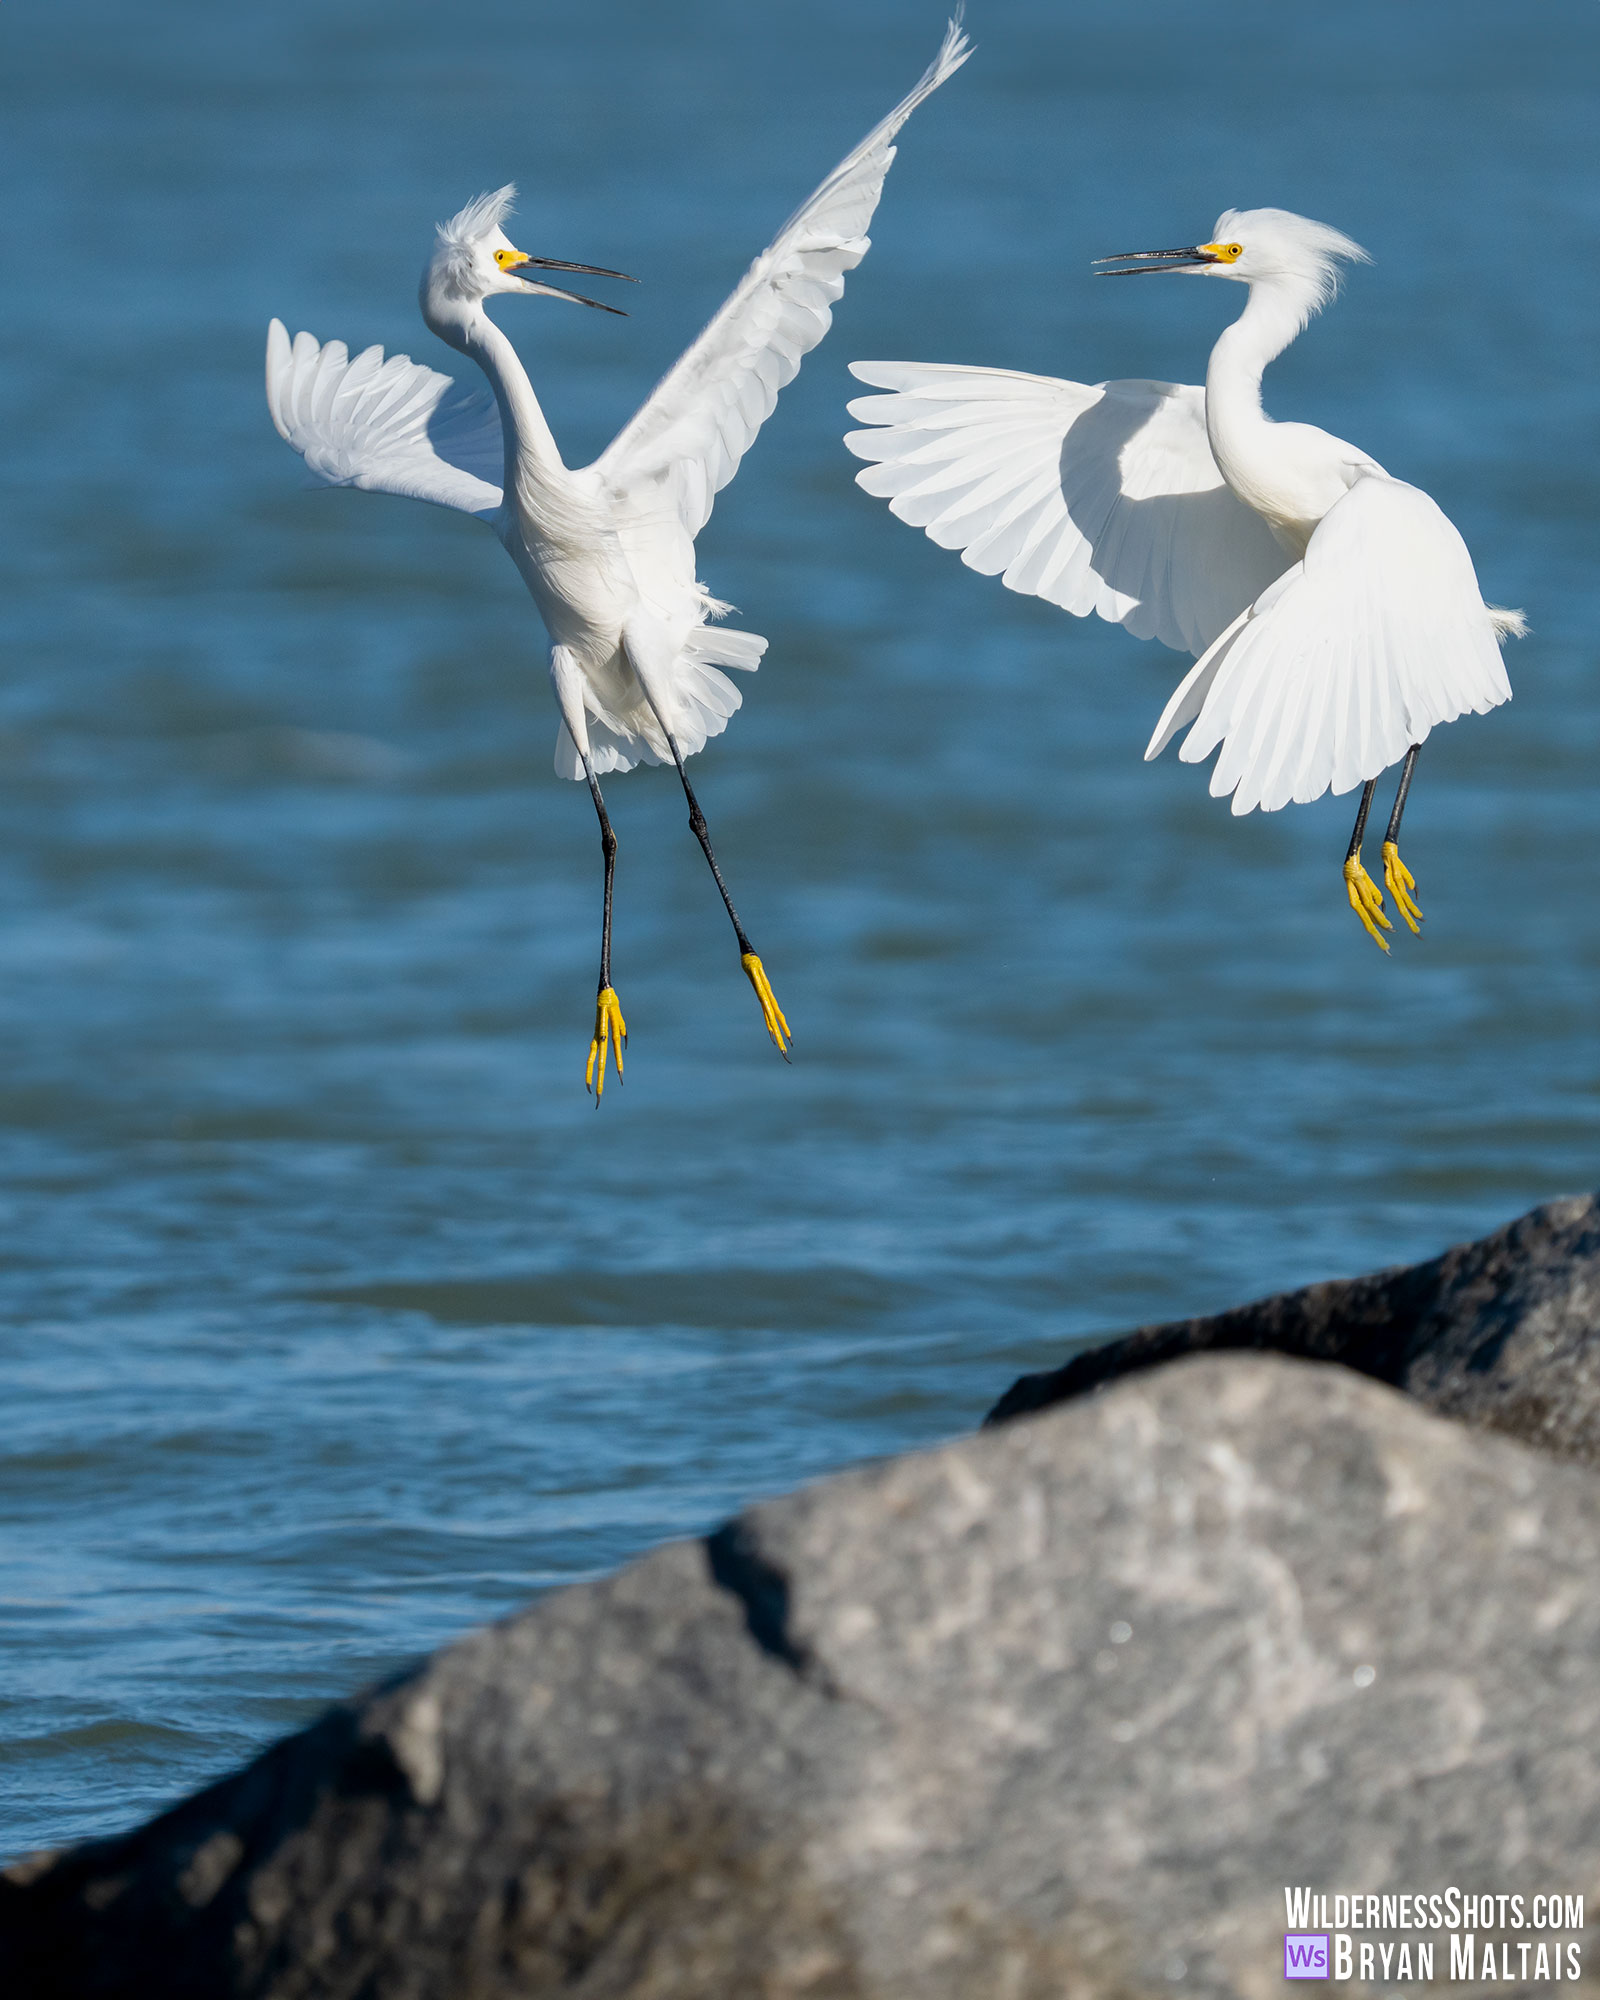
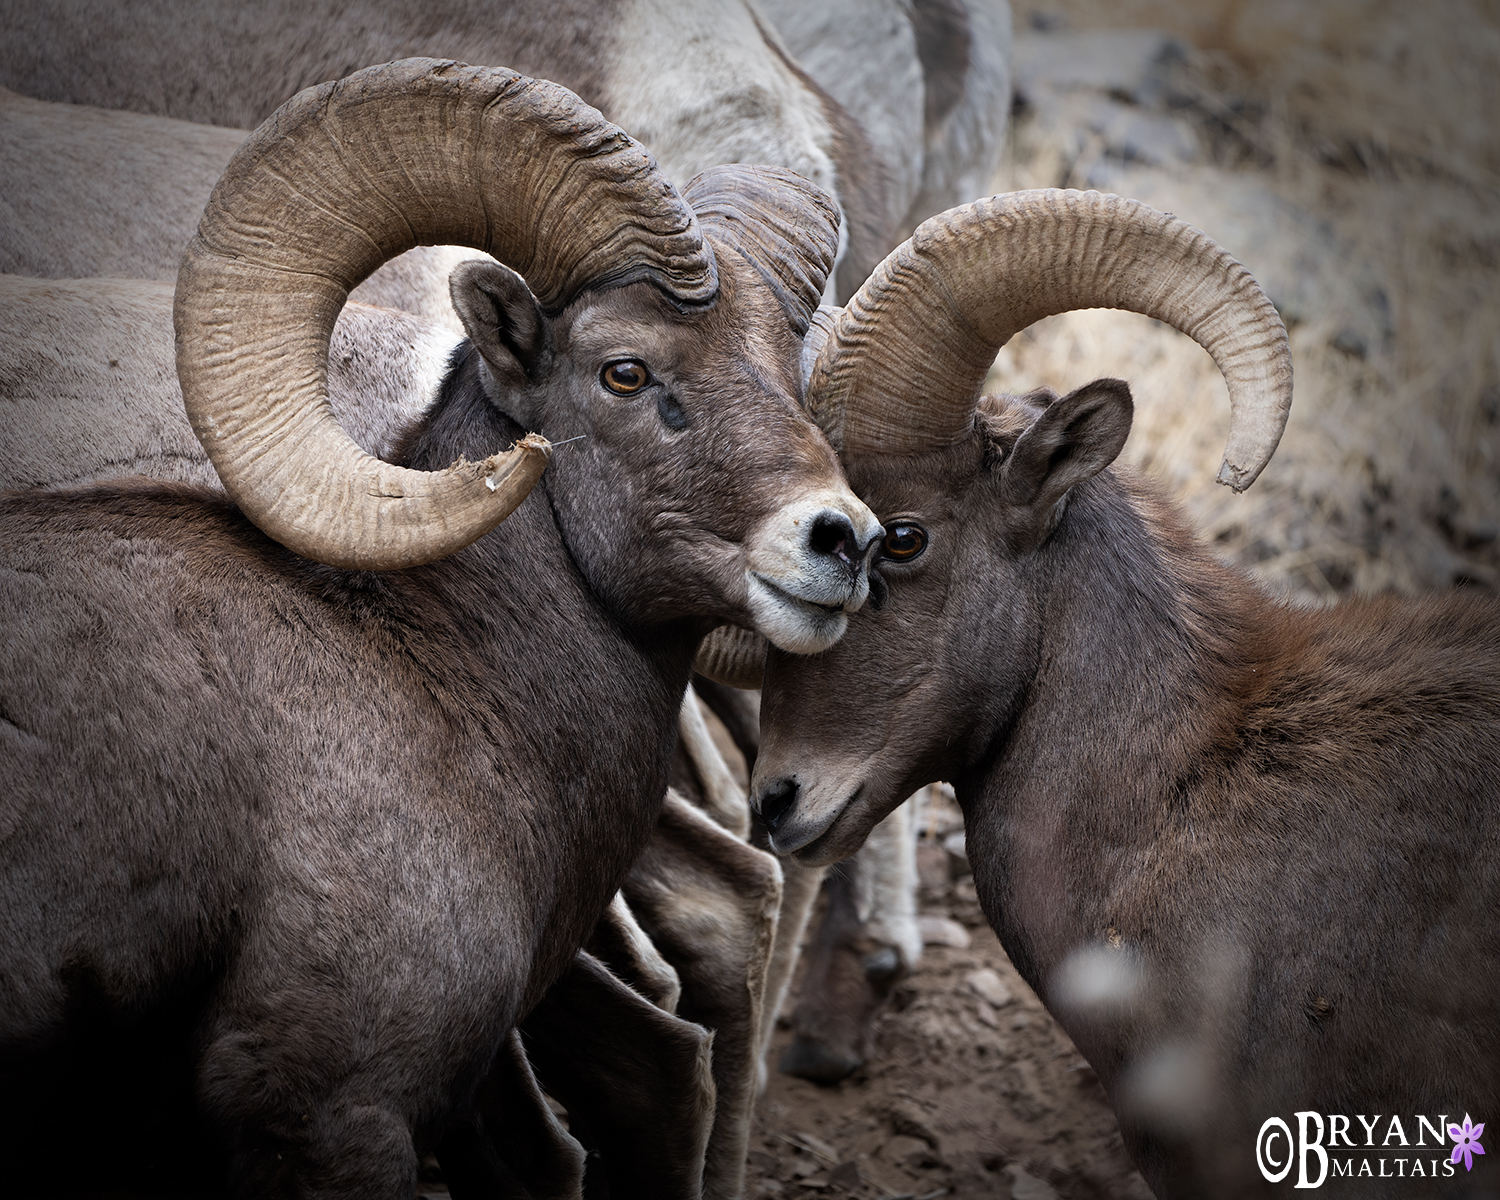
You’ll start to learn cues that indicate when animals are about to engage in interesting behavior. You can tell when Bighorn rams are about to butt heads because one male will face and challenge another. They go at it a few times then walk around peacefully as though nothing happened. Birds usually have a favorite perch that they repeatedly land on that you can focus your lens on. They look in the direction they’re about to take-off and often poop right before doing so.
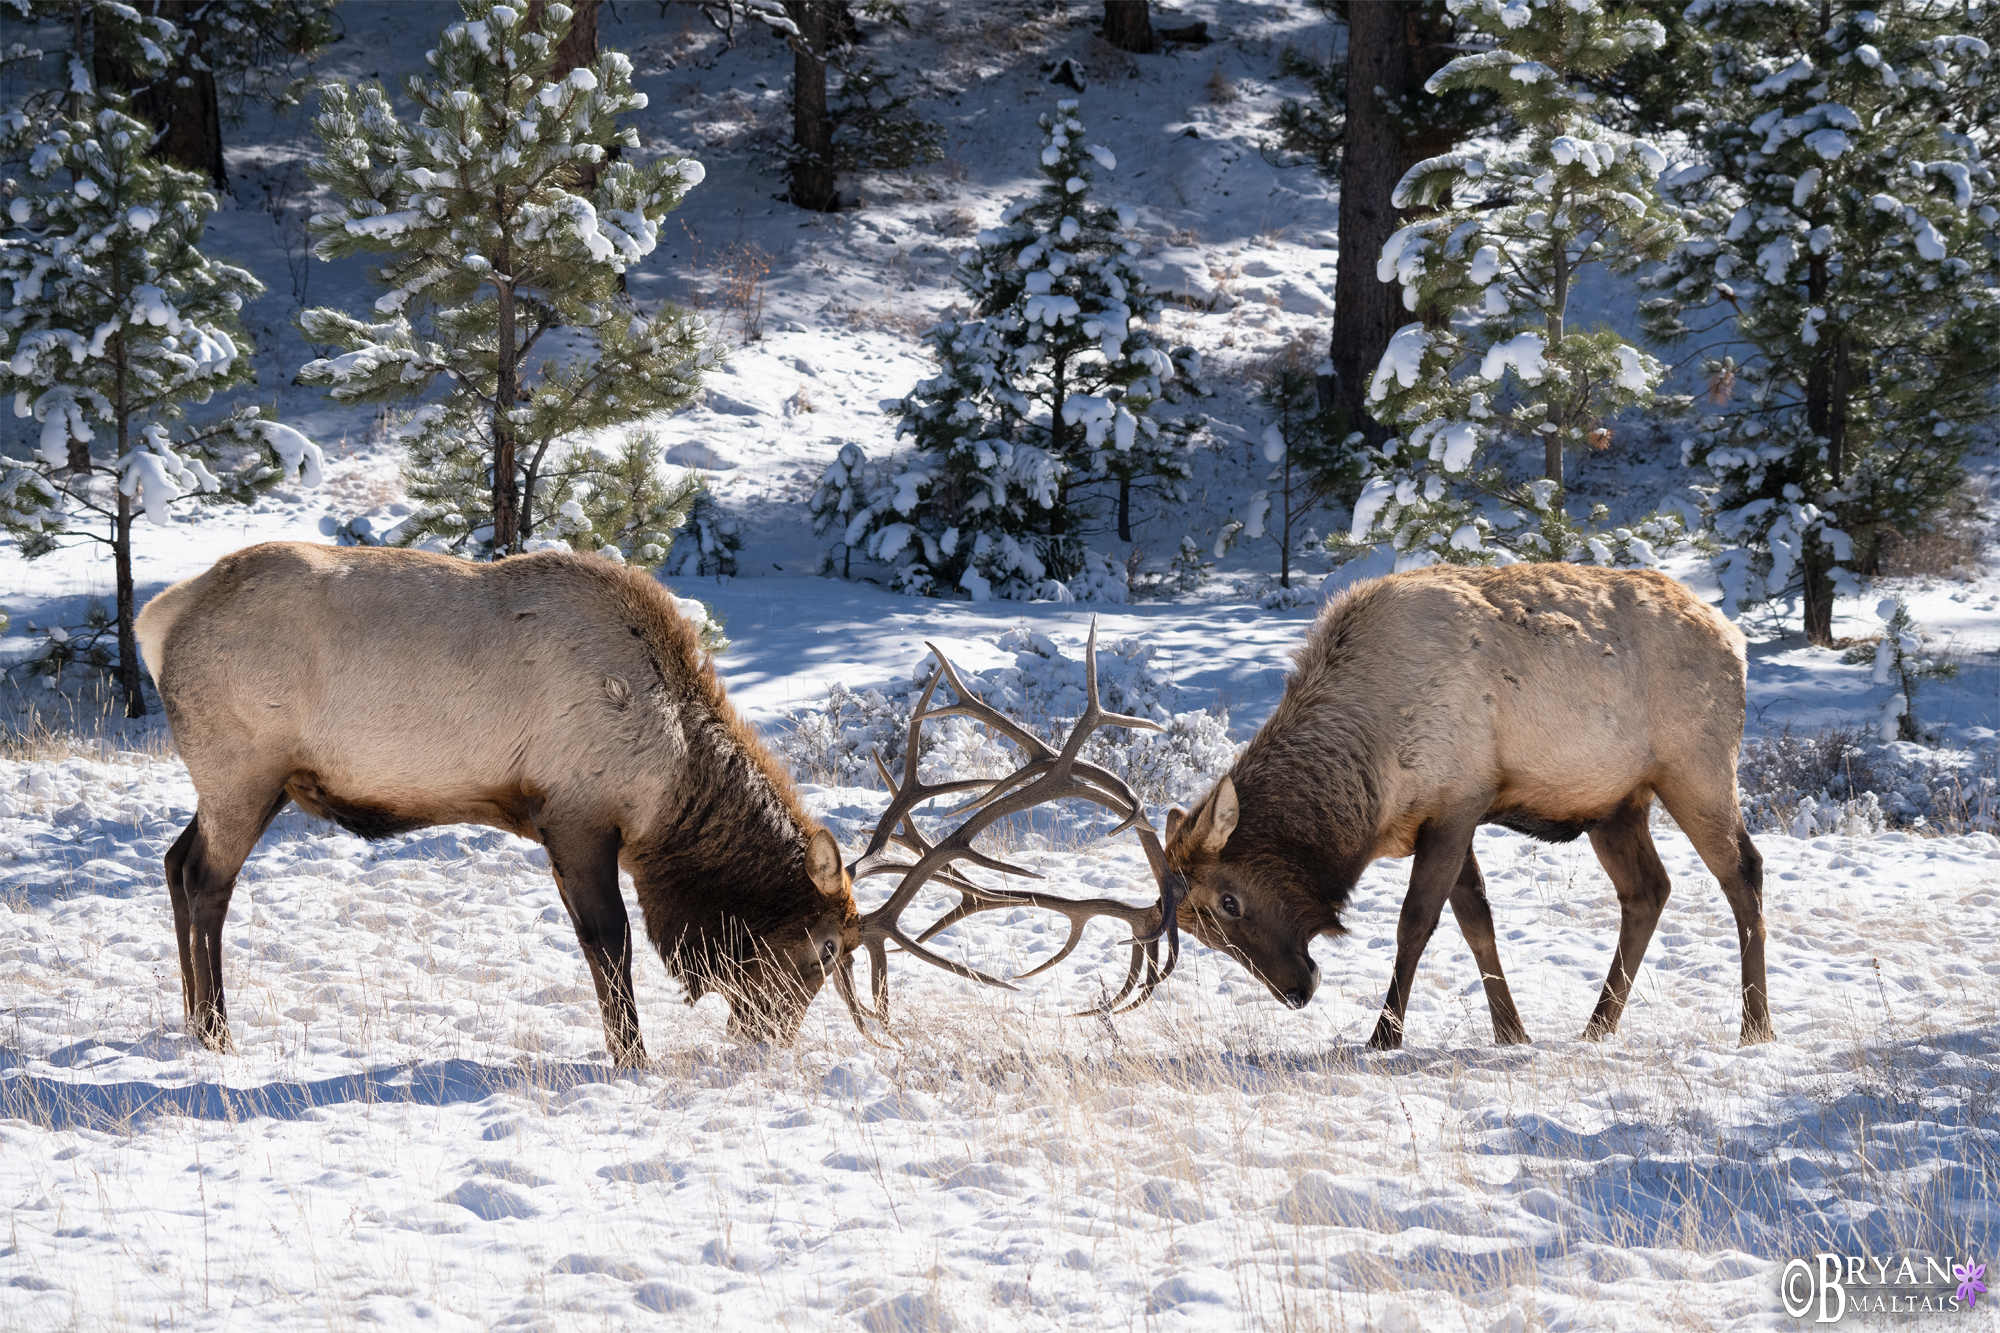
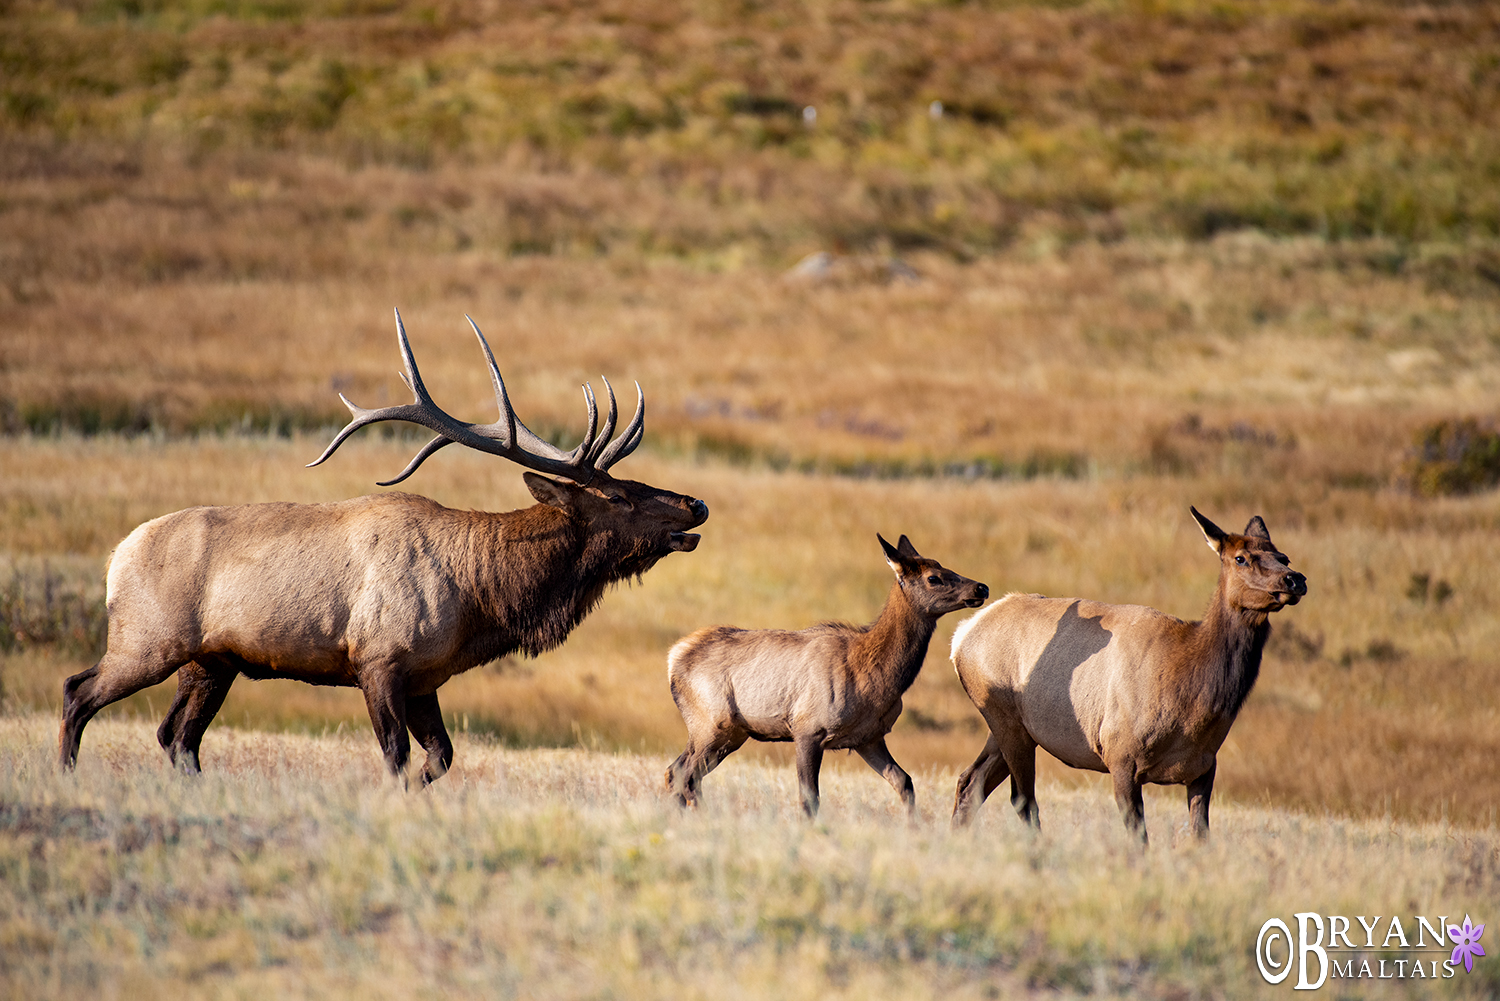
It’s also crucial to know the animal’s seasonal behavior because certain events can make for good photographic opportunities. Many animals congregate for events like breeding, feeding and migration. This makes them easier to find and approach, and allows you to target the best individuals. Elk wander far and wide throughout Rocky Mountain Natl’ Park, but during the rut, large harems gather in just a few meadows. Bulls are in peak physical condition with bristling muscles and huge racks at this time. They spar with other bulls, bugle, and corral their harems.
Most animals are also more active at a certain time of day. Many are crepuscular, meaning they’re active around dusk and dawn. In summer, songbirds explode into a cacophony of activity around dawn, then seemingly disappear by mid-morning. In many areas, deer and other ungulates emerge around golden hour after having bedded down all day. Many carnivores are mostly nocturnal.
Some animals like Mountain Lion have such sharpened senses of detection and avoidance that the chances of capturing a planned shot of one are slim. You could spend a lifetime stalking them or hiding in a blind without ever capturing a photo. You’re more likely to encounter one randomly crossing your path because it didn’t care if it was seen. Trail cams are handy for capturing the secretive behavior of such animals.
Learning the ecology of animals is a necessary planning tool so you know where to look for them. National parks and wildlife drives are the intuitive places, but sometimes you might end up closer to home than you think. Rare songbirds can end up in your backyard, and mammals like Deer, Racoon, Coyote and Fox have learned to integrate with civilization.
There are different degrees of wildlife photography depending on how specialized you want to be. On one end of the spectrum are photographers who take trips to capture everything in nature, and bring a telephoto lens along in case wildlife pops up. On the other end are photographers who devote trips specifically to photographing a particular species and nothing else. The first is more likely to capture a mere record shot of the animal and the second a memorable portfolio shot. I do both kinds of trips.
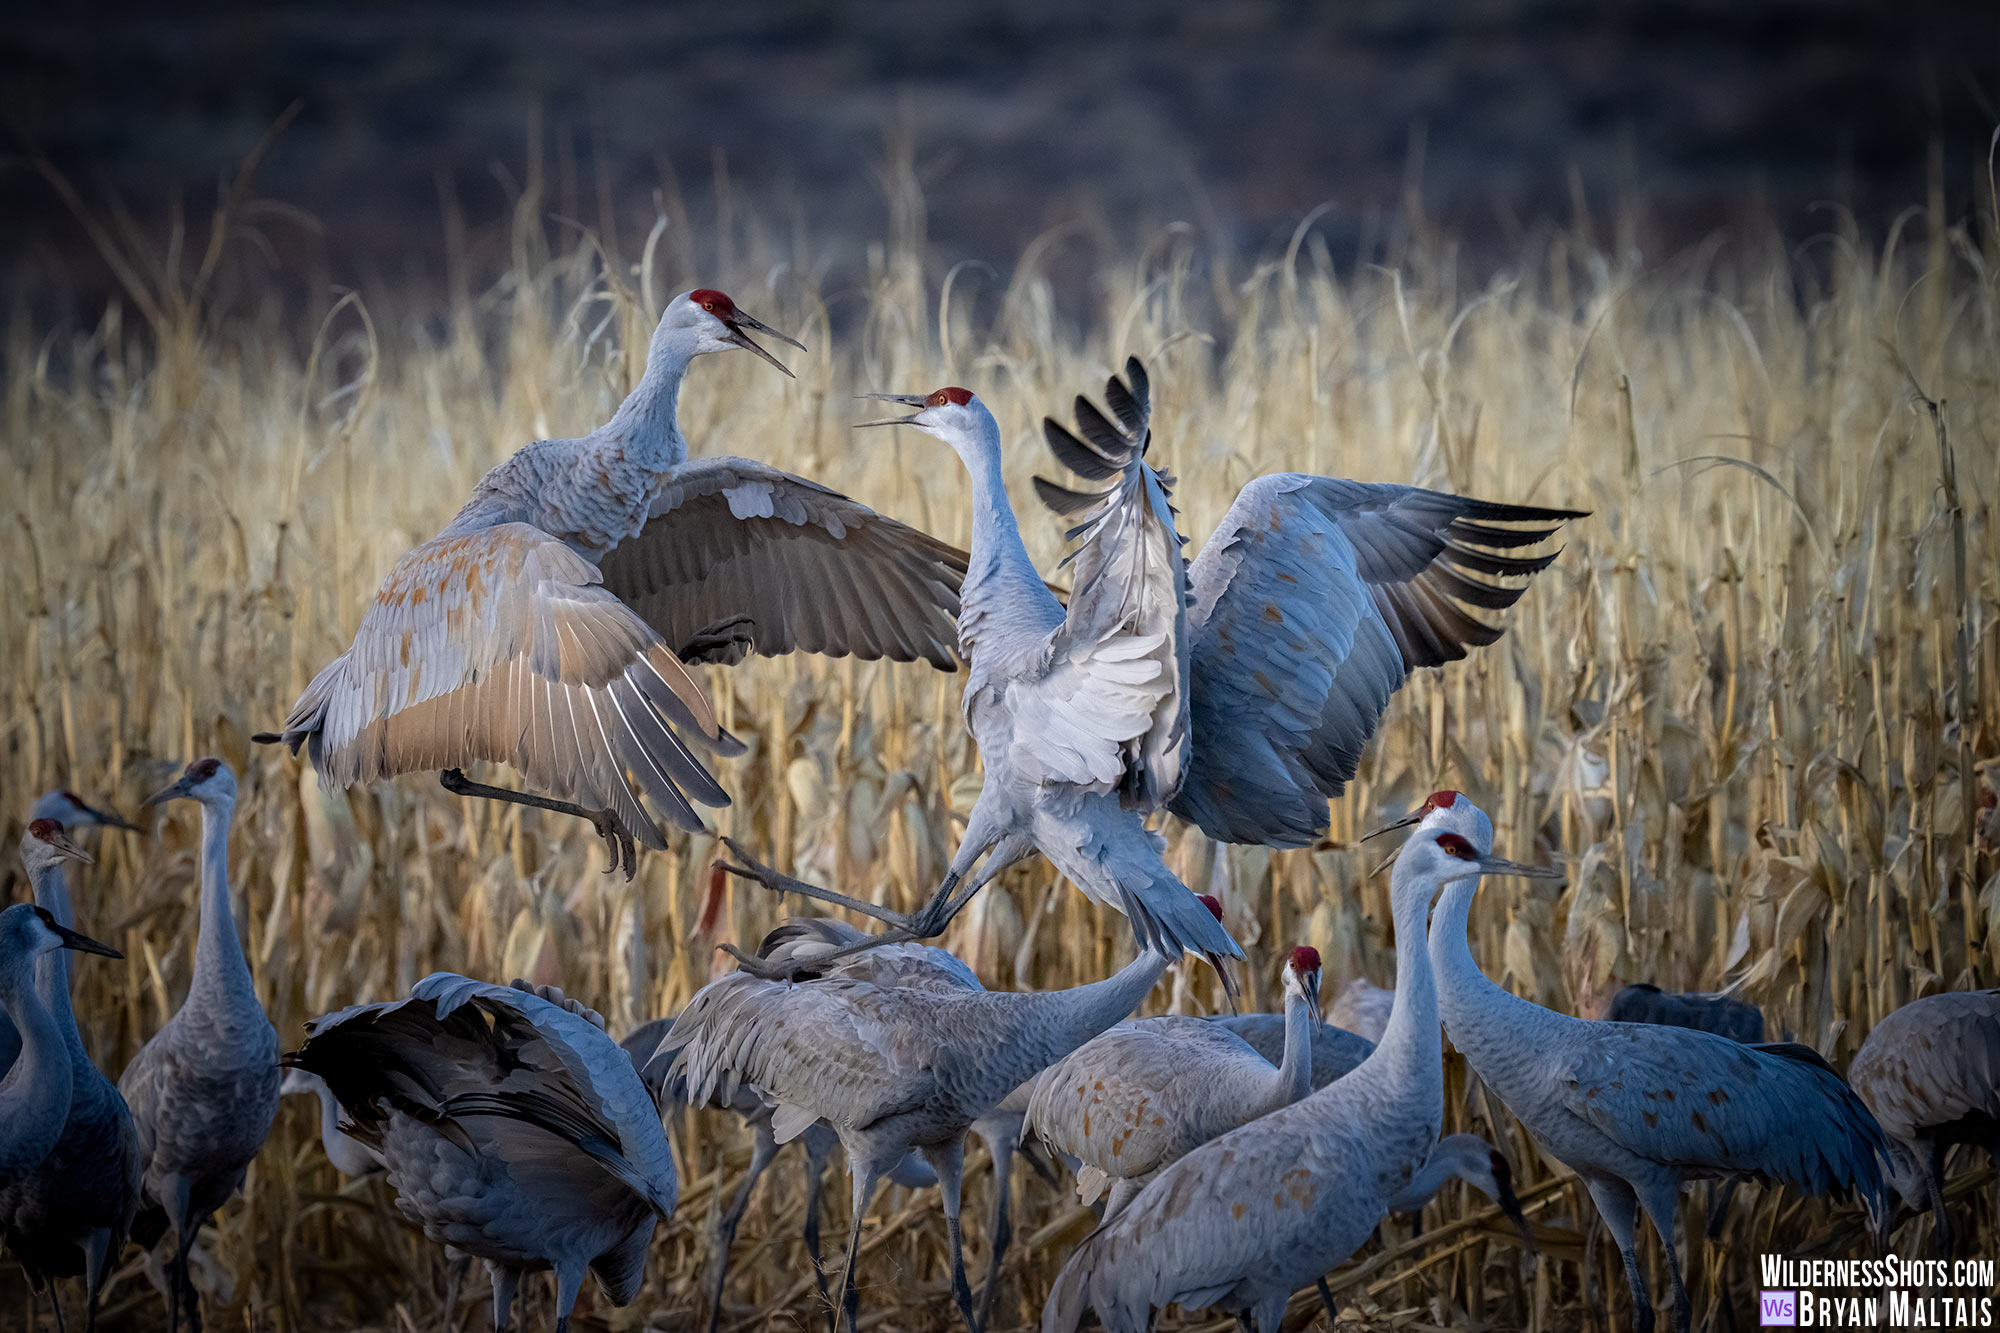
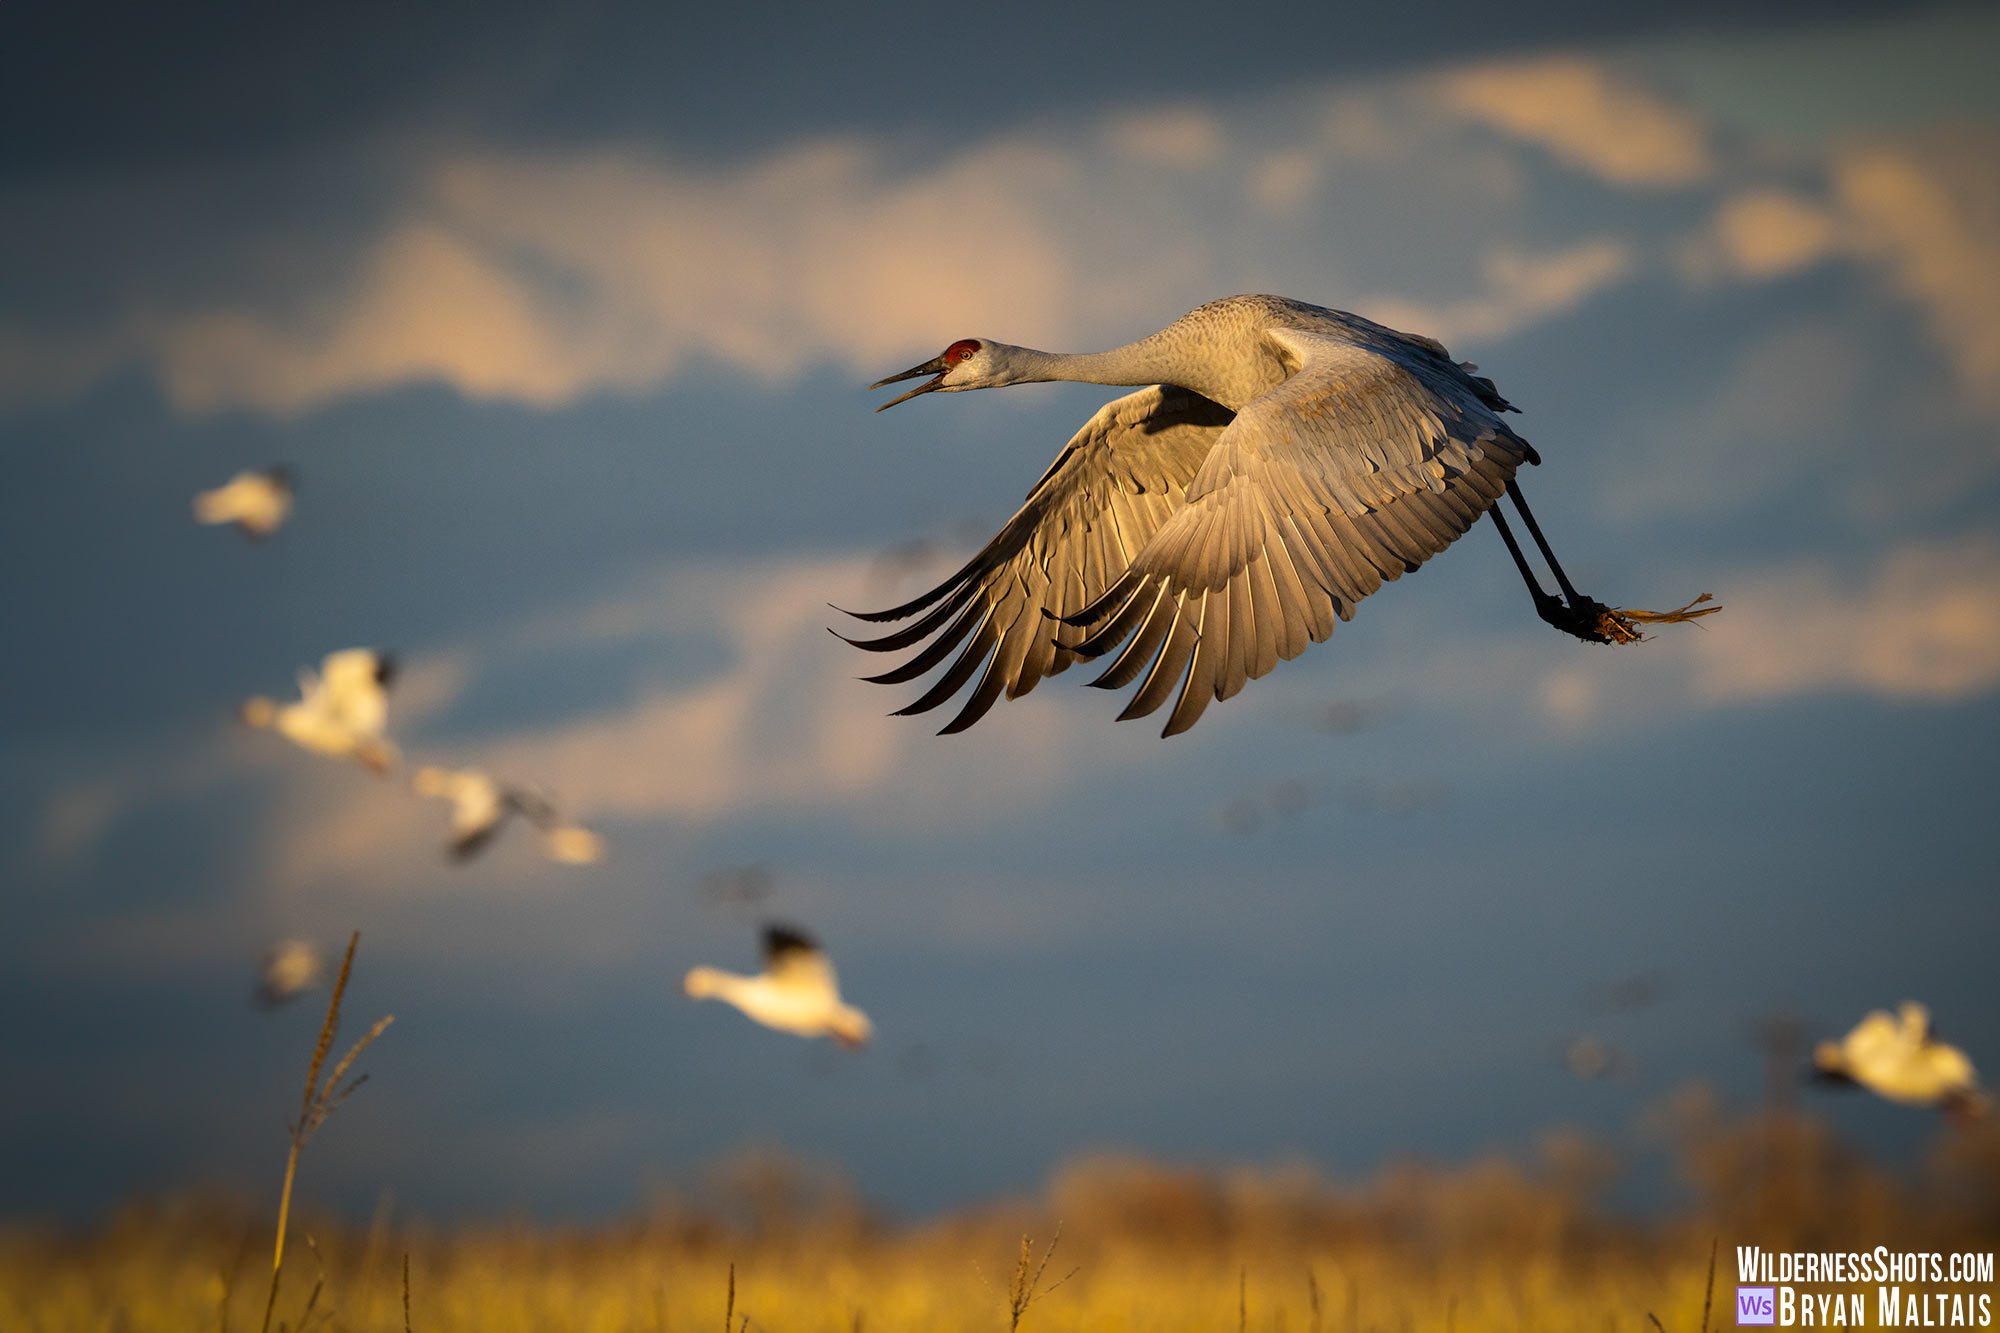 A Sandhill Crane in mid-flight at Bosque del Apache NWR, NM
How to get close to Wildlife
The strength of telephoto lenses is often overestimated. Even at 600mm, you have to be within about 100 ft of a Deer for a frame-filling shot, and within 10 ft of a songbird.
I was once hired by an outfitter to capture a close up shot of a trophy bull Elk on his property. He wanted it to help sell hunting packages. I explained how difficult this would be, but he assured me that bulls were all over, and we could just drive up and photograph one. When I arrived, we drove down a dirt road and spotted a big bull pushing his harem. They were about a half mile away up on a mountain side. He pointed to them and told me to start shooting. When I told him I needed to be within 130 ft to get the shot he wanted, he asked why I couldn’t just shoot from the truck with my big telephoto lens. I was baffled and so was he. The next morning I was in camo up on the mountain stalking the Elk. A telephoto lens is not a telescope.
For wildlife photographers, it’s not enough to just be able to see animals from a distance. We have to be able to get close enough to capture impactful photos with the animal occupying much of the frame. There are many strategies for getting close to animals depending on whether they’re habituated to humans or truly wild.
Sitting and Waiting
Sitting motionless and undetected is usually what it takes to get close to wild animals. Only, you don’t actually get close to them, you arrive early and let them get close to you. This may entail hiding in a blind or being camouflaged, but just sitting still can also work. You’ll likely observe more species than what you bargained for as nature conducts business. There’s a mountain valley near my home in Fort Collins where I often sit wearing camouflage along a river. It’s not uncommon for turkey, beaver, ducks, songbirds and trout fishermen to pass right by without detecting me.
A blind also works very well, especially if you can set it up a few days beforehand so the animals can get used to it. The main advantage of a blind is that you can sit up and move around comfortably within it.
Covering yourself with a camouflage net makes you blend right into the environment without the large silhouette of a blind. You can also roll it up and stuff it in a cargo packet. The disadvantage is that you have to remain still, but it does provide enough concealment to hide your hand movements. I use one often in the field behind my house where Northern Harriers make a predictable flight path every morning. I sit directly beneath their route between 2 bushes where I blend in. They’ve flown directly over me, getting so close that I can’t contain them in the frame.
Sitting and waiting requires either getting into position before animals arrive or sneaking in. In early spring, ponds along flyways fill with a great diversity of ducks returning north. Unlike city Mallards, most won’t let you approach without swimming into the middle of the lake. You need to arrive before sunrise so they can’t see your approach and you may even need to low-crawl to the shore.
Sometimes waterbirds like Sandhill Cranes and Snow Geese spend the night at a distant wetland, then fly in to gather at a particular location around dawn. This conveniently lets you be there and waiting for them without having to sneak in. Some birds like raptors and songbirds travel on a predictable rotation through their territory. After seeing them move through the area, you can get into position and wait for their return.
It’s harder to hide from animals who rely on smell or hearing like ungulates, owls and big cats. No amount of visual concealment will help you get close to them if your scent or sound has betrayed your presence. To get close, you have to adopt the tactics of a bowhunter by exercising scent and noise discipline.
Finding a good location with wildlife traffic and a place to conceal yourself takes a bunch of research, scouting and observation. You’ll often end up in pristine spots off the beaten-path. When you find one, you should preserve it by refraining from sharing it on Social Media.
Moving on Foot
Though most animals are wary of people on foot, sometimes a walk in the woods can be productive, especially if you move slowly and scan every part of the environment. The more often you return to the same spot, the more likely you are to encounter animals. Rather than walking continuously, it’s much more productive to periodically stop moving, look and listen.
Wildlife Driving Loops
Driving loops through wildlife refuges and national parks provide excellent opportunities to get close to animals because they’re often right on the side of the road. The animals have become habituated to the daily train of cars and behave as if you’re not even there. To wildlife, humans are benign objects as long as they remain in their vehicles. However, they usually flee the moment somebody tries to get closer by stepping out, which ruins it for everyone. It’s better to think of your car as a blind, and patiently wait until animals get within shooting distance.
Mass Gatherings of Habituated Animals
Many animal species that are normally solitary and difficult to find, gather en masse for breeding, feeding or migration, making it extremely easy to photograph them. Photographers flock there, habituating animals to human presence. This is often the dirty secret of how extraordinary shots that look impossible were captured. Examples include the fishing Brown Bears of Katmai Peninsula, Bison of Yellowstone, Eagles of Homer and Sandhill Cranes of Bosque. Most photographers would like all of their shots to be the hard-won products of challenging expeditions, but it’s hard to resist the efficiency of going where portfolio shots are virtually guaranteed.
However, it’s not always ideal when animals lose their fear of humans. People often take this for granted and get too close. This can be dangerous for people and get the animals killed.
Creating a Wildlife Sanctuary in your Backyard
Wouldn’t it be great if you didn’t have to go anywhere to photograph wildlife? The foundation of creating a wildlife sanctuary at home is planting native vegetation that offers shelter and food instead of attracting animals entirely with feeding stations. Increasing plant diversity attracts insects, which in turn attracts animals from every trophic level up the food chain. Even if you’re just trying to attract birds, chances are that overall biodiversity will increase.
Wild Sunflowers attract various seed-loving songbirds. The seeds ripen in late summer and remain on the dead heads through winter to be picked out. Shrubs like juniper, chokeberry and serviceberry attract fruit-loving birds like Waxwing, Tanagers and Orioles. Tubular-shaped flowers like Salvia and Bee Balm attract Hummingbirds.
Water can be just as enticing to wildlife as food. It can be as simple as a birdbath, or a pond that creates an entire ecosystem of life.
Shelter can come in the form of trees and placed objects. Large, flat rocks and logs attract herps, insects and small mammals. Large, food-producing trees like Oak and Pine provide nesting spots and sustenance.
Finally, you need a concealed position from which to photograph the animals. Trees and resources that are close to your house allow using it as a giant blind and shooting right out your windows. You can also set up a hunting blind in your yard, conceal yourself between bushes, or simply sit still and wait for animals that wander by.
Composition and Light in Wildlife Photography
Balance
It’s not practical to try to follow too many compositional rules when shooting wildlife because it’s hard enough just to keep moving animals in frame. The most useful guideline is the Rule of Thirds, which posits that you should split the frame into a tic-tac-toe grid and place subjects at the intersection of lines. To make this easy, most cameras have such a grid that you can turn on in the frame. This accomplishes keeping subjects from being perfectly centered. When looking at art, the human eye tends to innately prefer the asymmetry of subjects being off to one side instead of centered.
To simplify it more, in most cases the animal should be off to one side of the frame. For example, a bird in flight should be placed slightly to the left in the frame so it can “fly into” the right. In a vertical photo, an Elk standing in a field should be in the lower left instead of dead center.
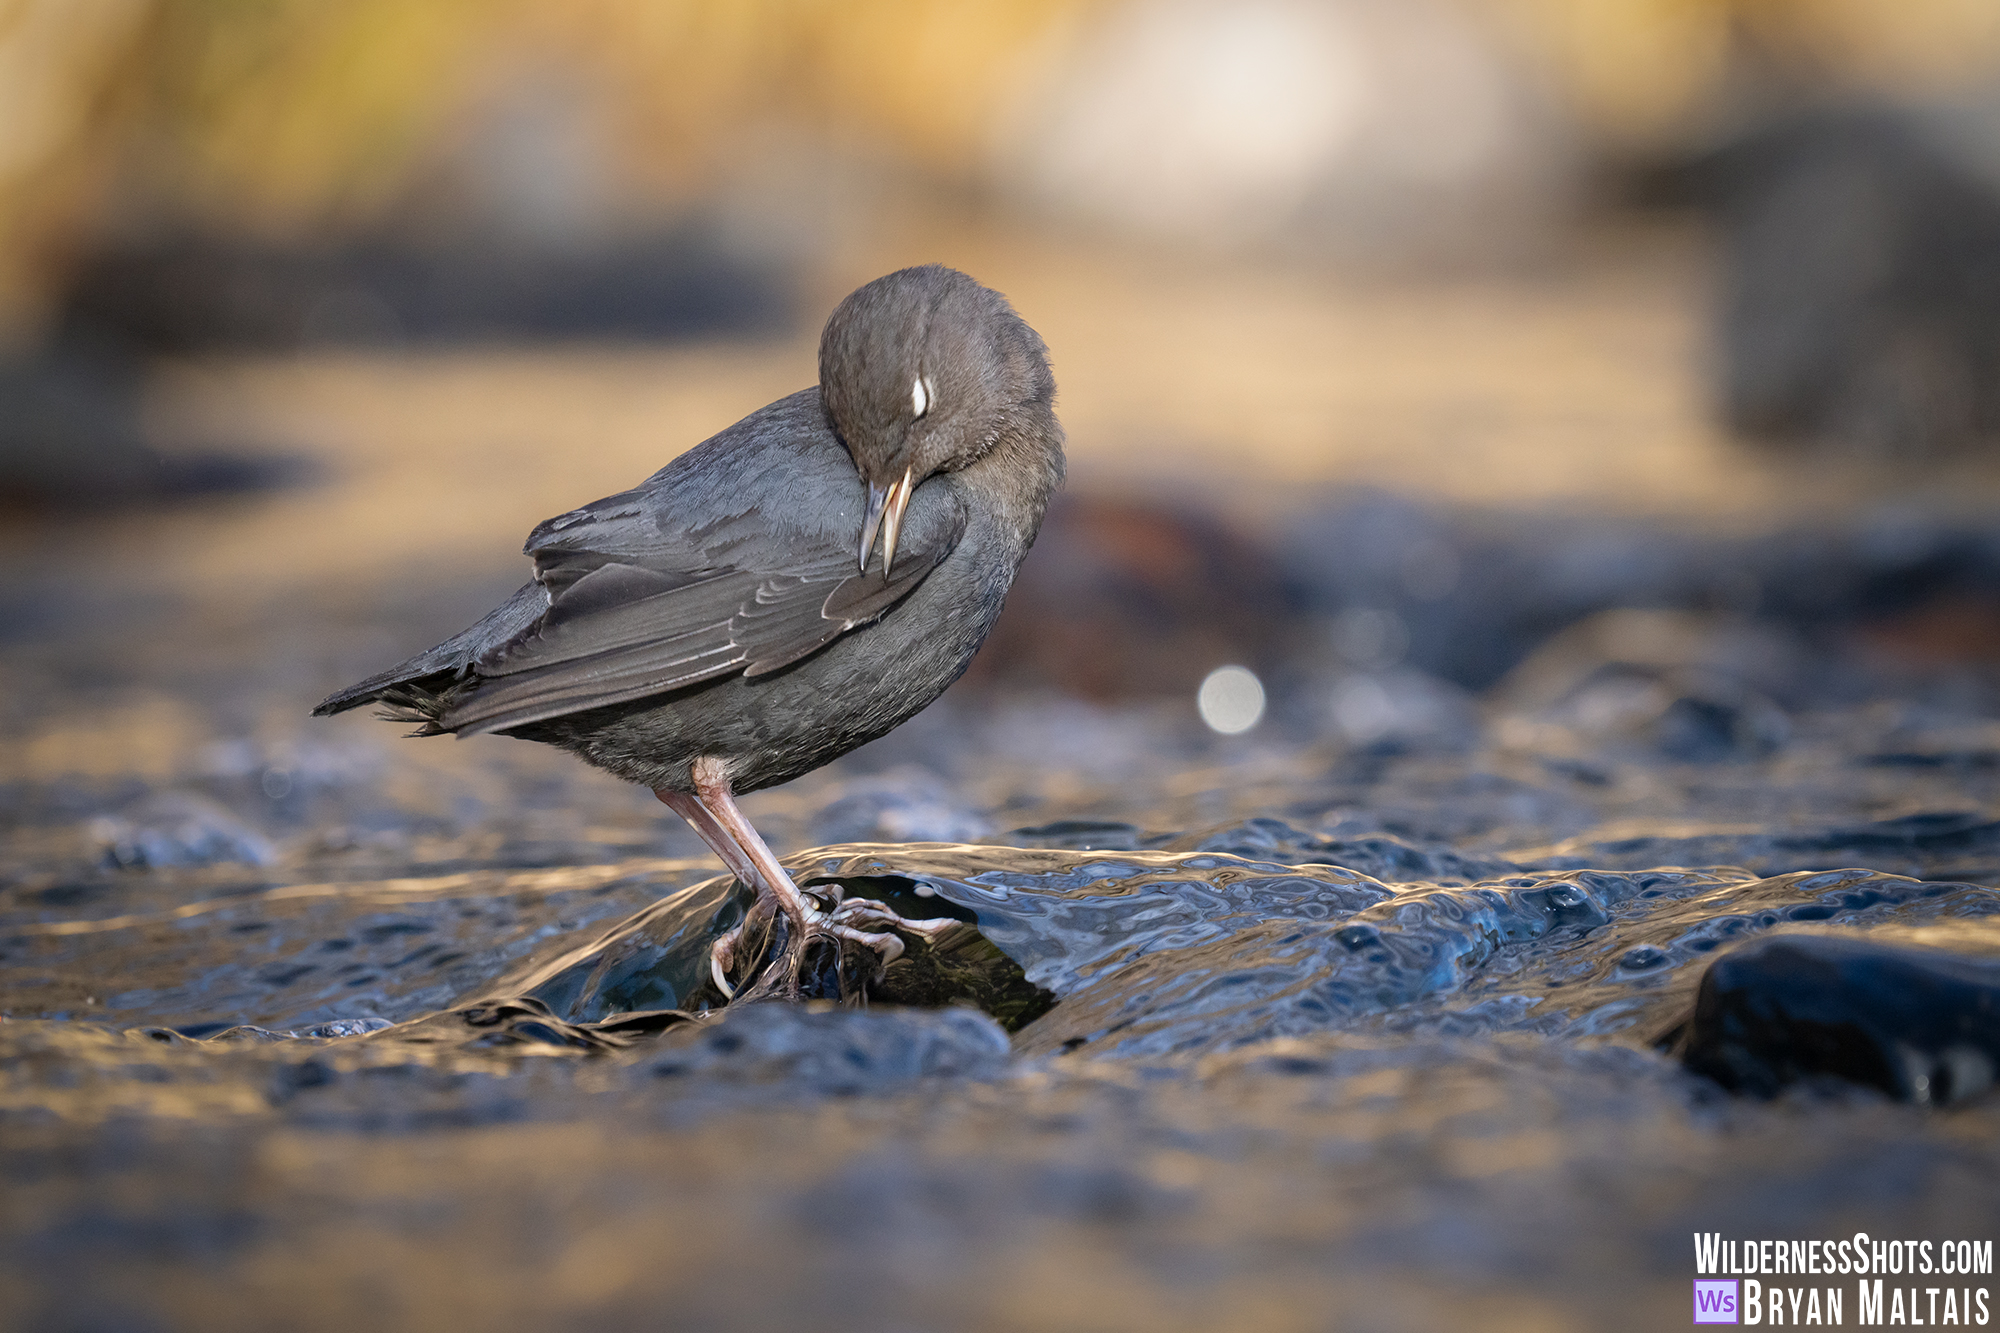
Eye-level Perspective
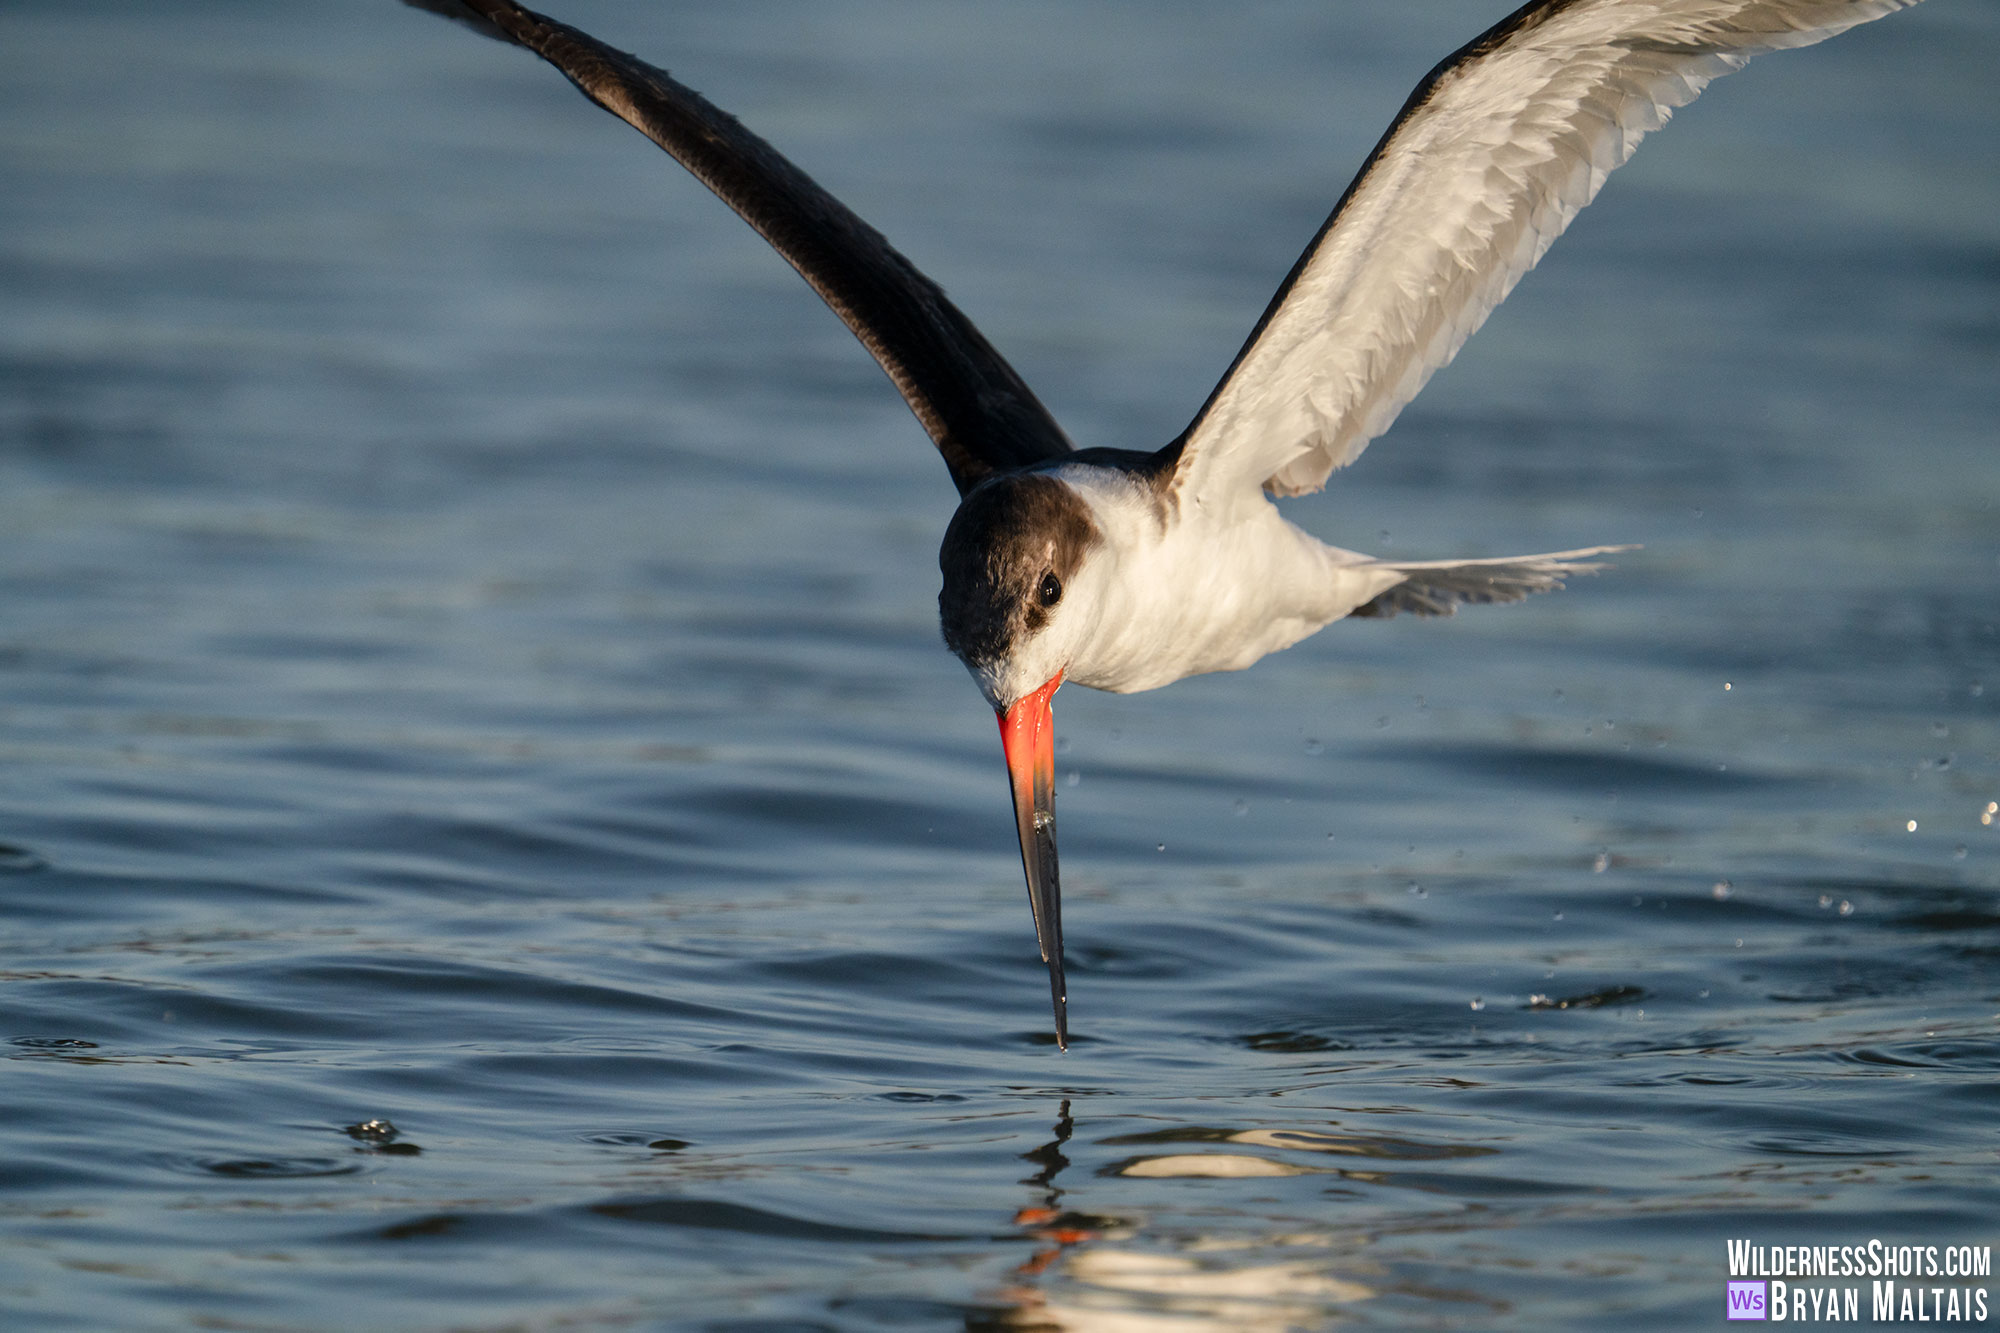
The best perspective is usually at eye-level with the animal. This often requires crouching down, laying on your stomach or positioning the camera low to the ground. Shooting a duck with your lens at the water’s surface creates a perspective that connects the viewer with the bird and sees as it sees. Photographing down on the bird creates an unnatural perspective that reminds the viewer that it was taken by a photographer who was standing up. It’s not always possible or easy to lay on your belly to look through the viewfinder. Articulating screens allow you to sit up while setting your camera on the ground and looking down on the screen.
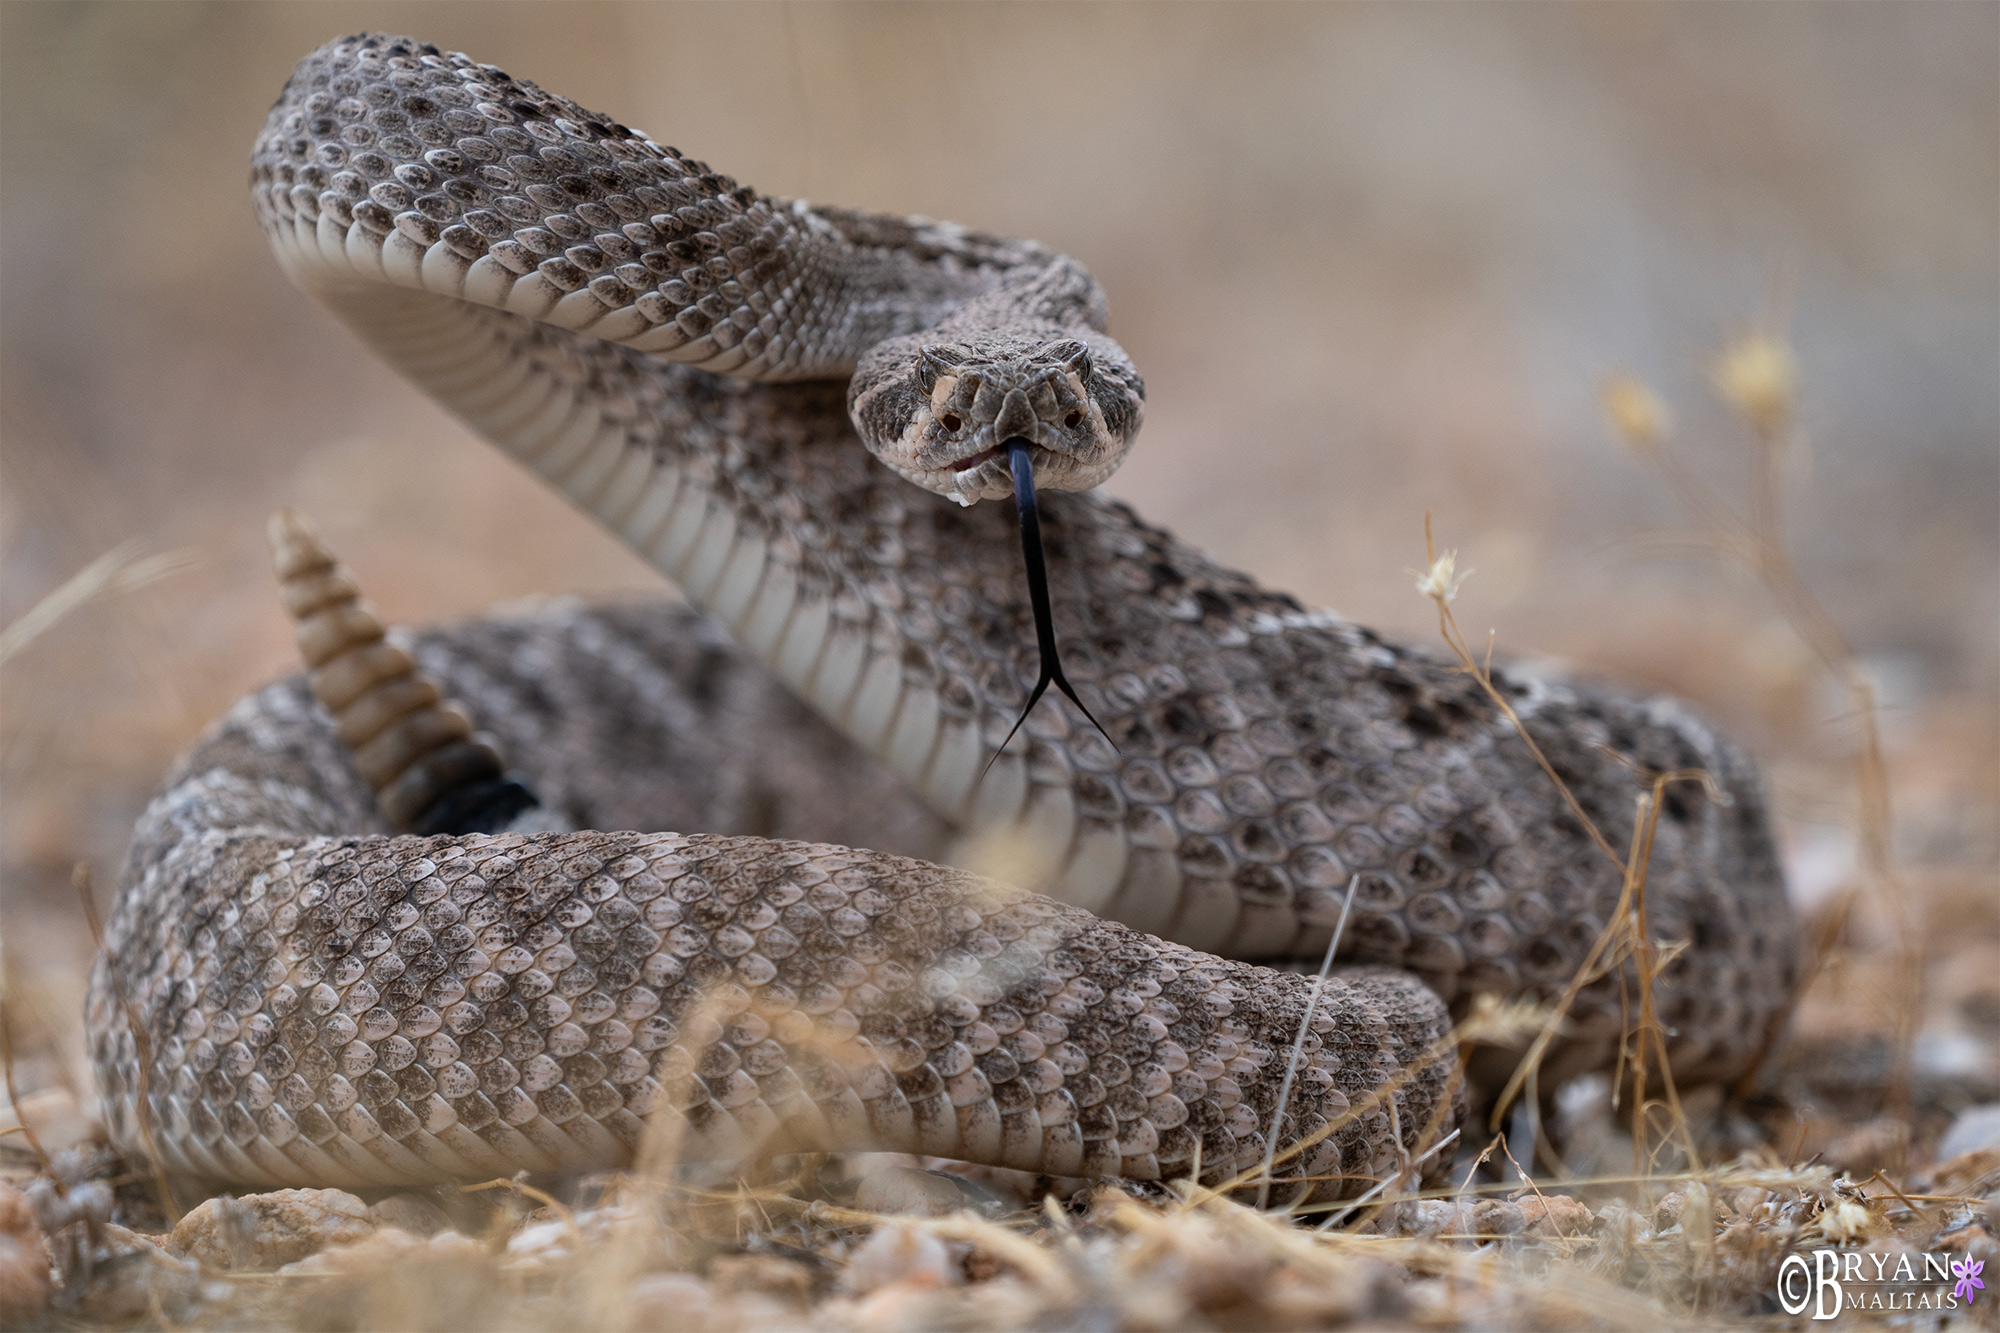
I held my camera at the height of the snake’s head looking right into his eyes for maximum impact. At 250mm, 1/640th sec was sufficient to freeze the motion of his tongue. As focal length increases, motion is magnified and you need a faster shutter speed to freeze motion. Western Diamondback Rattlesnake, Tucson, AZ. Sony A7rV, Sony 100-400mm G Master. f/5.6, ISO800, 1/640th sec
Background
The background is critical in wildlife photos! In fact, under the strictest standards, a great shot of an animal with a poor background is a missed shot. The background should contain color and texture that fills empty space while still being clean and simple. It can show part of the animal’s habitat as long as there’s no clutter that deemphasizes the animal. It could also be a solid color from a completely defocused background. Complicated backgrounds like tree branches or boulders introduce too many shapes and shadows that distract the viewer.
Empty space is the enemy of good wildlife photos. A blank sky behind the animal, especially if it’s white or solid gray, is boring. You should always strive to move yourself into a position that captures a nice background. This can be particularly challenging when aiming up to photograph birds in flight. Wait for the birds to fly low in front of distant trees or mountains. Dramatic clouds are also good to fill the background.
Separation between the animal and its background is crucial to make it stand out. This is accomplished by achieving shallow DOF with good bokeh. Using a large f/stop helps with shallow DOF, however, the distance of the background from the animal has an even greater effect. The closer your camera is to the animal, and the further the background, the shallower the DOF and the more defocussed the background will be. This effect is so powerful that it’s possible to get a blurred background even with a small aperture like f/16 if using a telephoto lens.
In situations where there are several animals of the same species to choose from, photograph ones with the best background.
Light
Good light is just as important for wildlife photos as it is for landscape photography. The presence of beautiful light can differentiate a mediocre shot from a masterpiece. Unfortunately, it doesn’t always coincide with when the action is happening. Light is generally described by its hue, hour, angle and whether it’s filtered through a medium like clouds or a forest canopy.
The best type of light depends on the situation. For example, during golden hour, the light has a luxurious warm hue and the sun hangs low in the sky. You can use this to back or sidelight animals, which casts a glowing halo on their fur. This is called rim lighting. Birds exhaling on a cold, still morning are also captured when this low-angle light shines through their breath.
Let’s say you need a very high shutter speed to capture fast action and you’re using a teleconverter, which robs light. In this case, you likely need bright mid-day light, even though this isn’t traditionally considered “good” light.
Diffused light from an overcast sky can be ideal to show an animal’s true colors without being obscured by the sun’s color cast. Cloudy skies also let you shoot animals from any angle, where under sunny skies shadows would obscure one side of them.
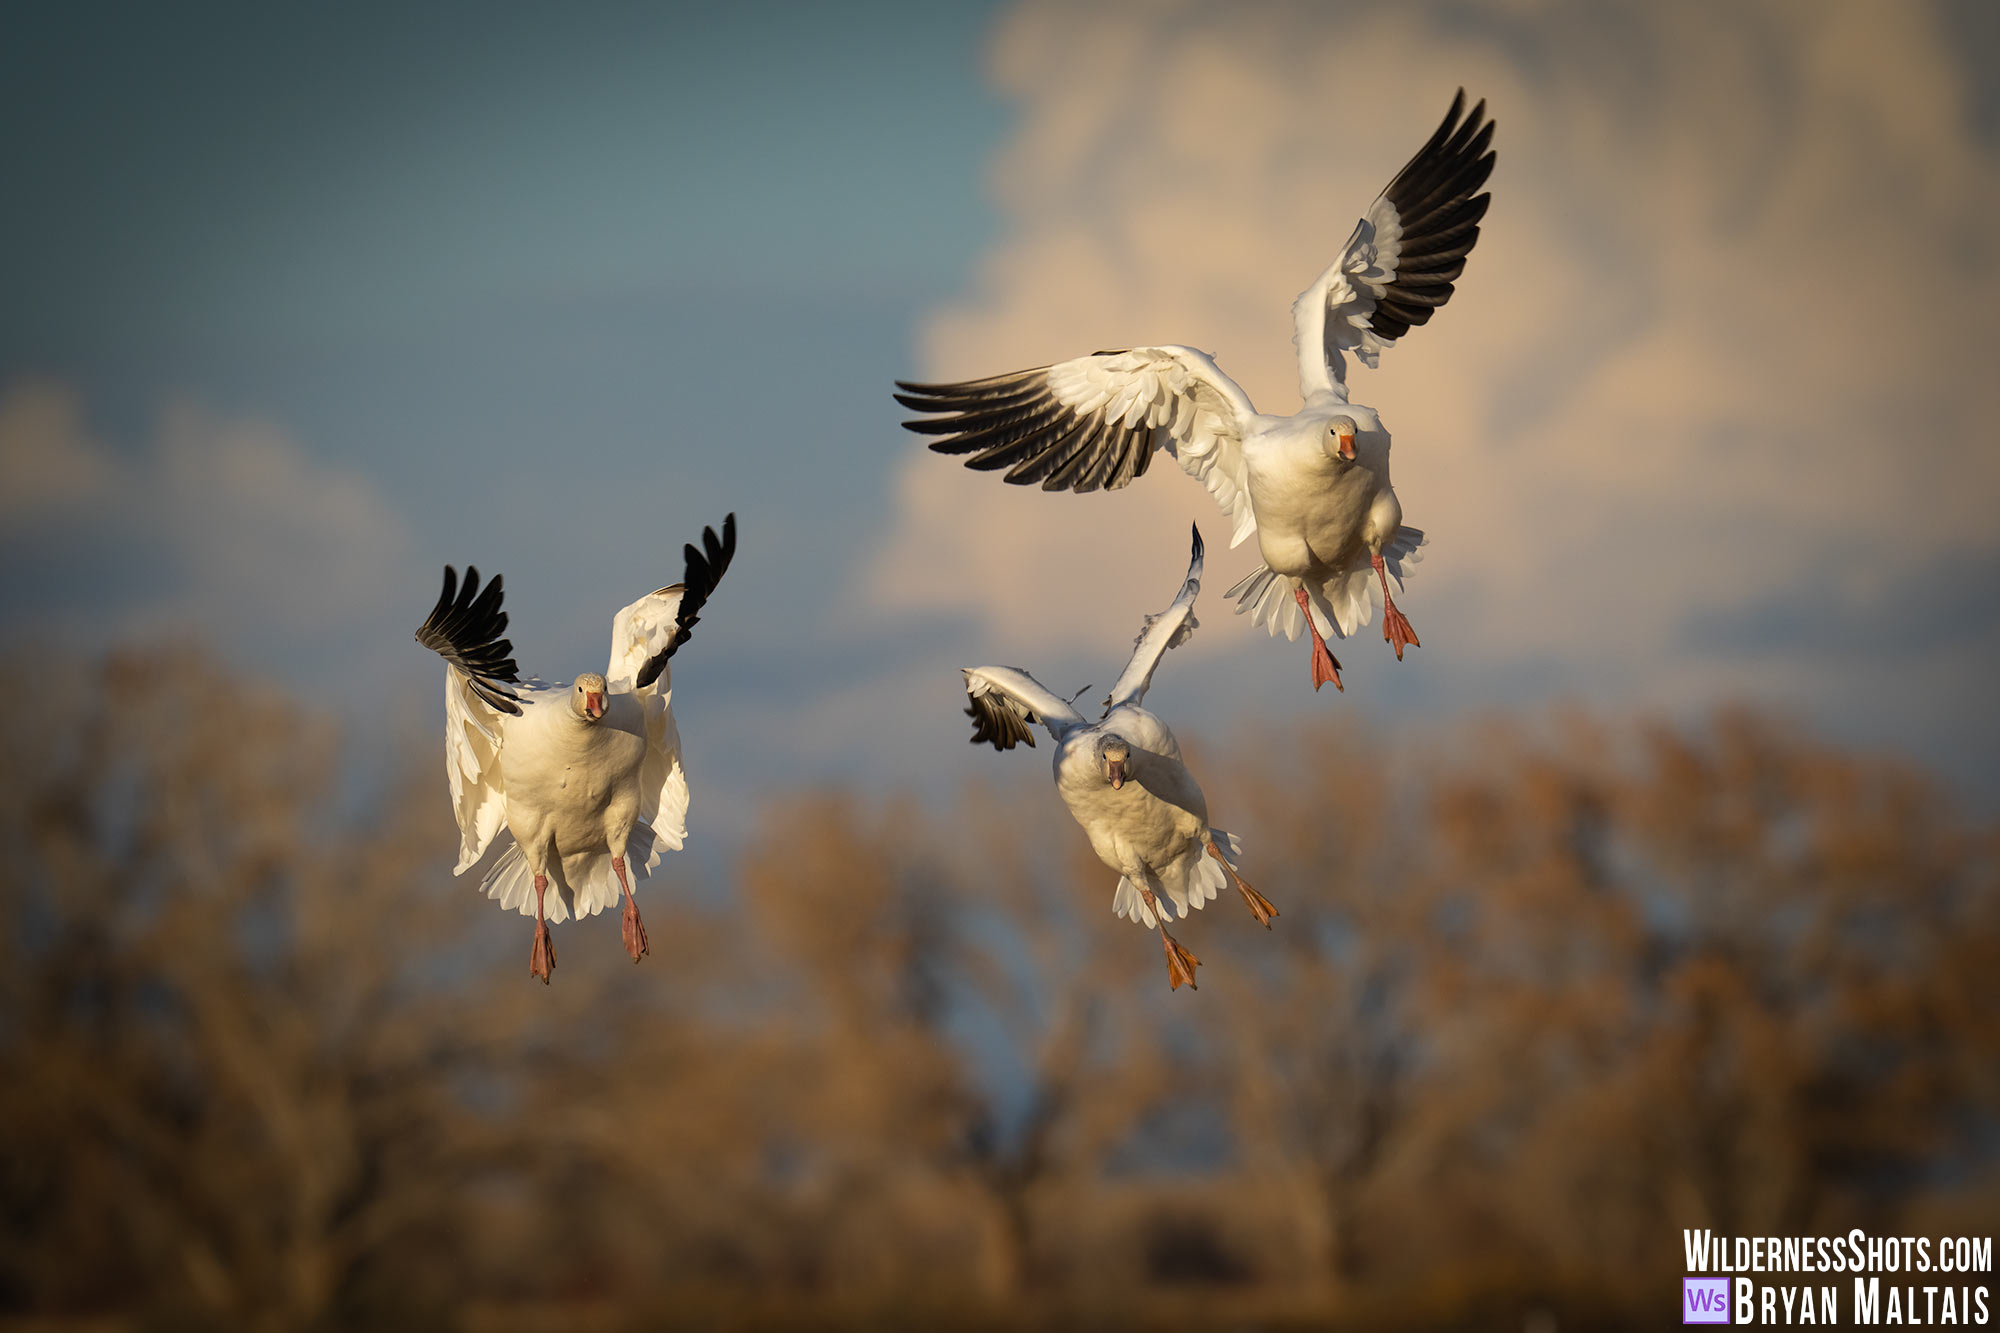
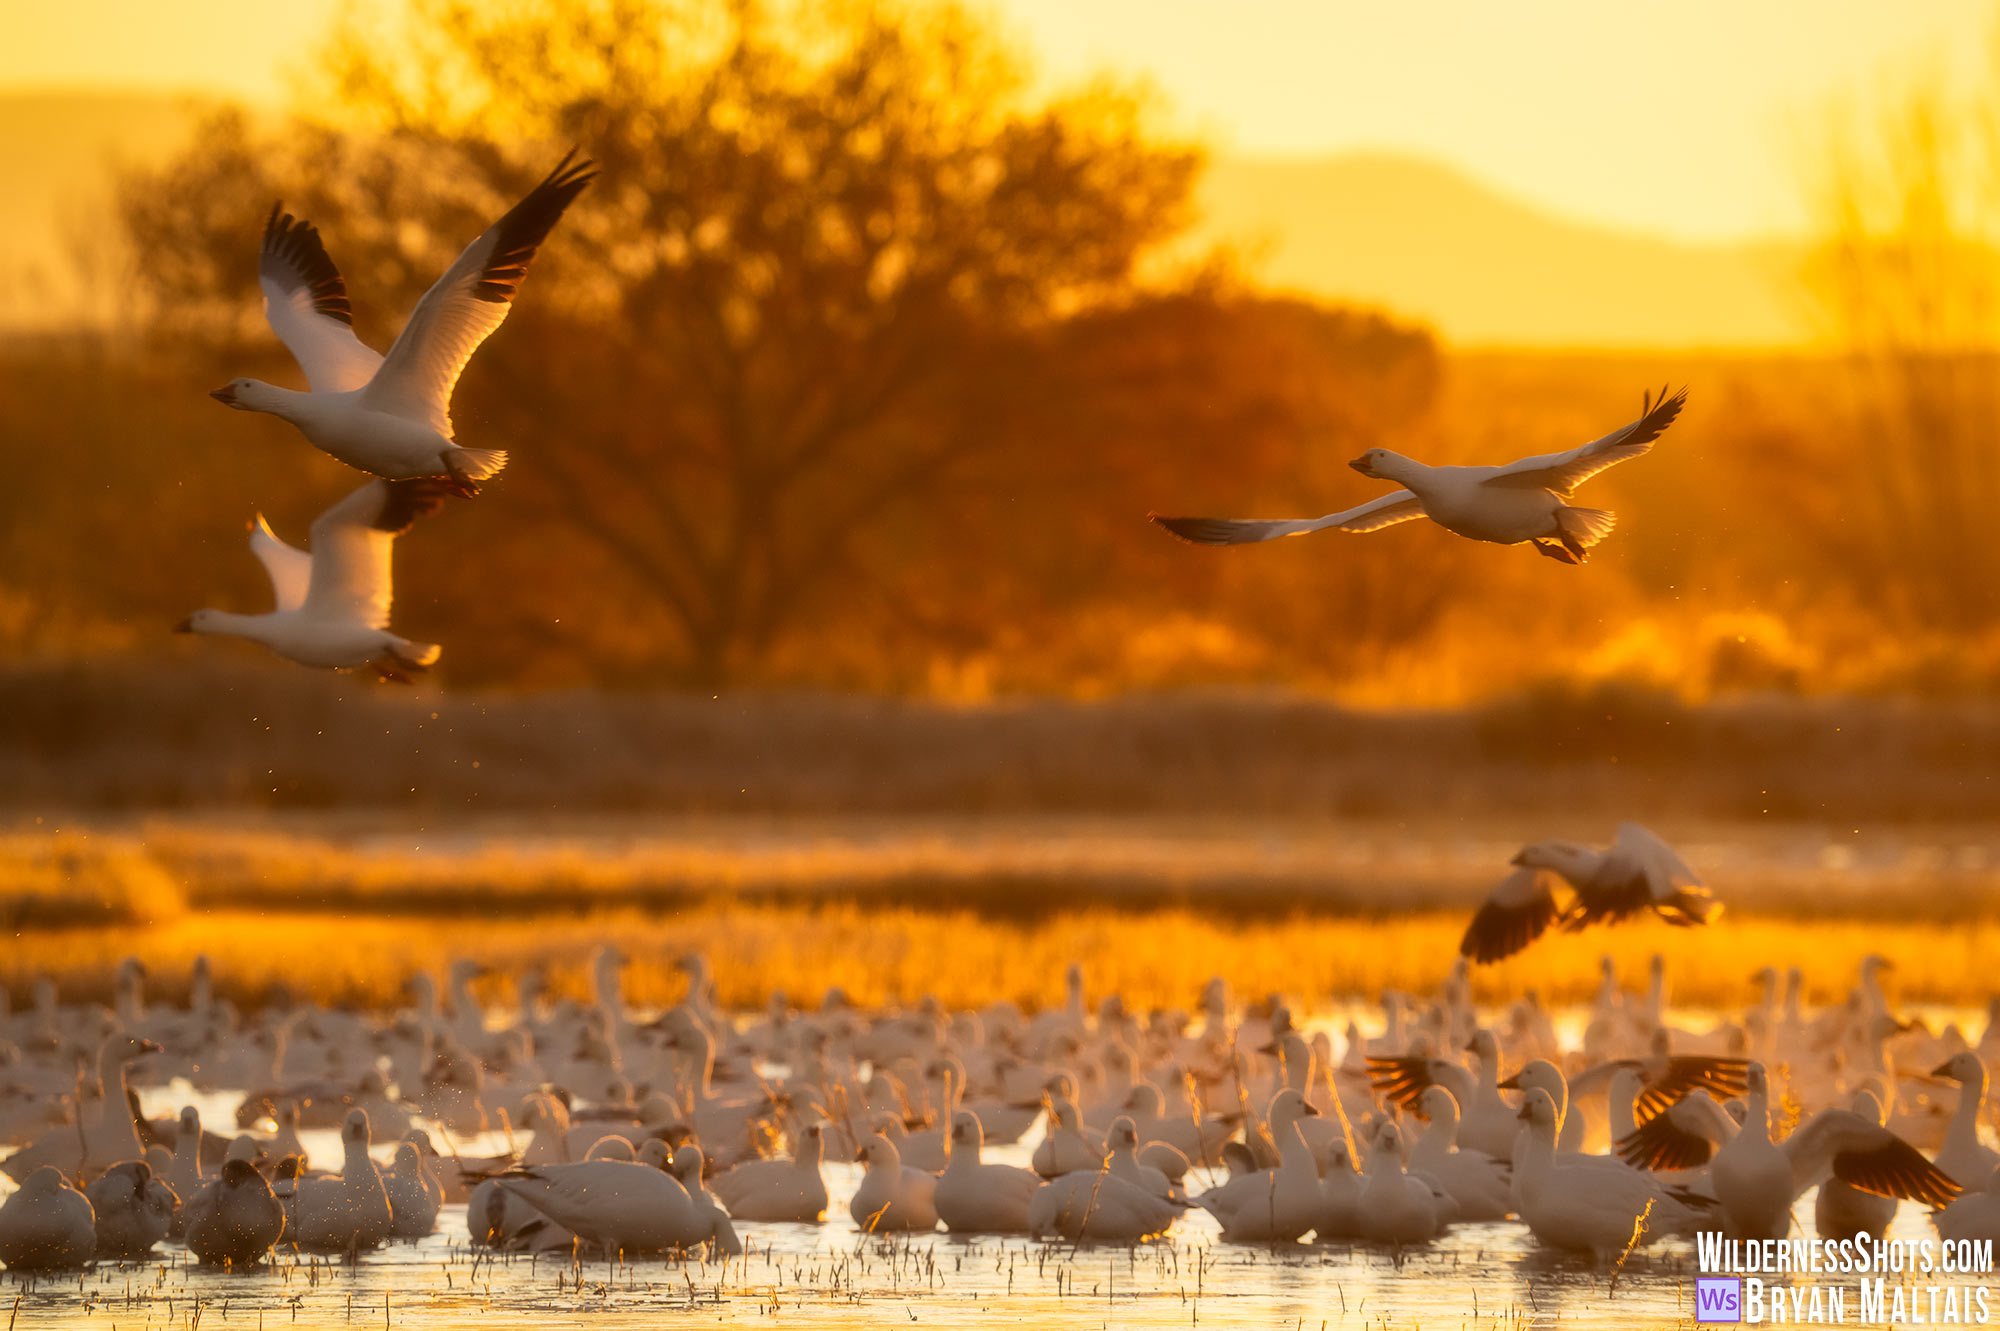 Just before the Snow Goose “blast off” in Bosque del Apache, NM
Keep your Camera Locked and Loaded
You should always keep your camera ready to go when out shooting wildlife. It should be within arm’s reach, powered on, lens cap off, and with wildlife settings dialed in. This may seem like common sense, but it’s easy to keep your camera packed up en route to your shoot, only to witness your target animal trotting by before you can grab your camera.
When walking around, your camera should only be slung by it’s strap en route to your final destination. If there’s any chance of encountering animals, you should be holding it ready to shoot.
What are the best Settings for Sharp Wildlife Photos?
The main challenge in wildlife photography is consistently achieving sharp photos, especially in the low light of a forest or at day’s end. The telephoto lens magnifies imperfections in technique that lead to unsharpness. Motion blur and missed focus are the biggest causes, and overcoming them comes with practice and knowing your equipment.
Preventing Motion Blur with Shutter Speed
Motion blur from using a shutter speed that’s too slow to freeze motion is the biggest cause of unsharp wildlife photos. The fix is simply to use a faster shutter speed.
To figure out the minimum shutter speed needed to freeze action, start with the reciprocal rule. This states that shutter speed must be faster than the lens focal length just to prevent blur from camera shake when hand-holding. In other words, if shooting with a 600mm lens, the minimum shutter speed should be 1/640 sec.
That’s just a baseline shutter speed for a stationary animal. Shutter speed needs to be above 1/640th sec to freeze slow movement, 1/2000 sec for faster movement like an animal galloping or a bird gracefully flying, and above 1/32000 sec for vigorous movement like an Osprey catching a fish. The faster the motion and closer the subject, the faster the shutter speed should be.
As you know from the exposure triangle, you must increase aperture, ISO, or ambient light to use a faster shutter speed. A grainy shot from using high ISO is always better than a blurry one from too slow of a shutter speed.
The Panning Technique
Panning along with a moving animal can capture it sharply while blurring the background. This happens because the animal effectively becomes a stationary object, while the background moves through the frame like a filmstrip. It may take some experimentation to figure out the ideal shutter speed to do this. To pan, rotate your torso, not your arms, and keep them tucked against the side of your body for maximum stability.
You can also deliberately use a slow shutter speed while panning to capture motion blur in the animal’s moving parts, like its legs or wings, while still getting its eyes and head sharp. This is because most animals use their neck like a gimbal to perfectly stabilize their head on one plane while the rest of their body moves around.
How to Focus in Wildlife Photography
With few exceptions, focus should always be on the animal’s eyes. Being such small points, they can be difficult to focus on, especially if the animal is moving. Under the strictest standards, you’ve missed the shot if the animal’s body is in focus, but not the eyes.
Most cameras now include animal eye focus tracking, which is the best mode for wildlife photography. Before its advent, arguments could be made for shooting wildlife in AF-C, AF-S and manual focus, and every camera performed differently in each mode. Eye focus tracking negates having to discuss every iteration of focus.
With eye focus tracking, when you frame the eye within the designated focus spot, the camera locks onto and tracks the eye as long as the animal doesn’t move too erratically.
Prefocus for Animals that spring into action or take-off
Auto focus in any mode isn’t yet fast enough to track animals as they spring into action in a sudden burst. Examples would be a ground squirrel that takes a short rest on a rock before hopping to another, or a songbird flying off a perch. There are two ways to deal with this. The first is to prefocus on a spot in front of the animal, lock focus there (this is what the back focus button is for), then hope the animal moves through that focus plane as you take the shot. When the animal seems like it’s about to move, start shooting on continuous high.
There’s a slightly different technique for animals that predictably return to the same spot like birds landing on a perch. With your camera on a tripod, manually focus on a plane the animal is likely to move through and keep it there. When the animal approaches, start shooting on continuous high. It also helps to use a small f/stop to increase the odds of getting the eyes in focus. Using a remote shutter release makes it easy to sit back and observe the scene and start clicking when the animal approaches.
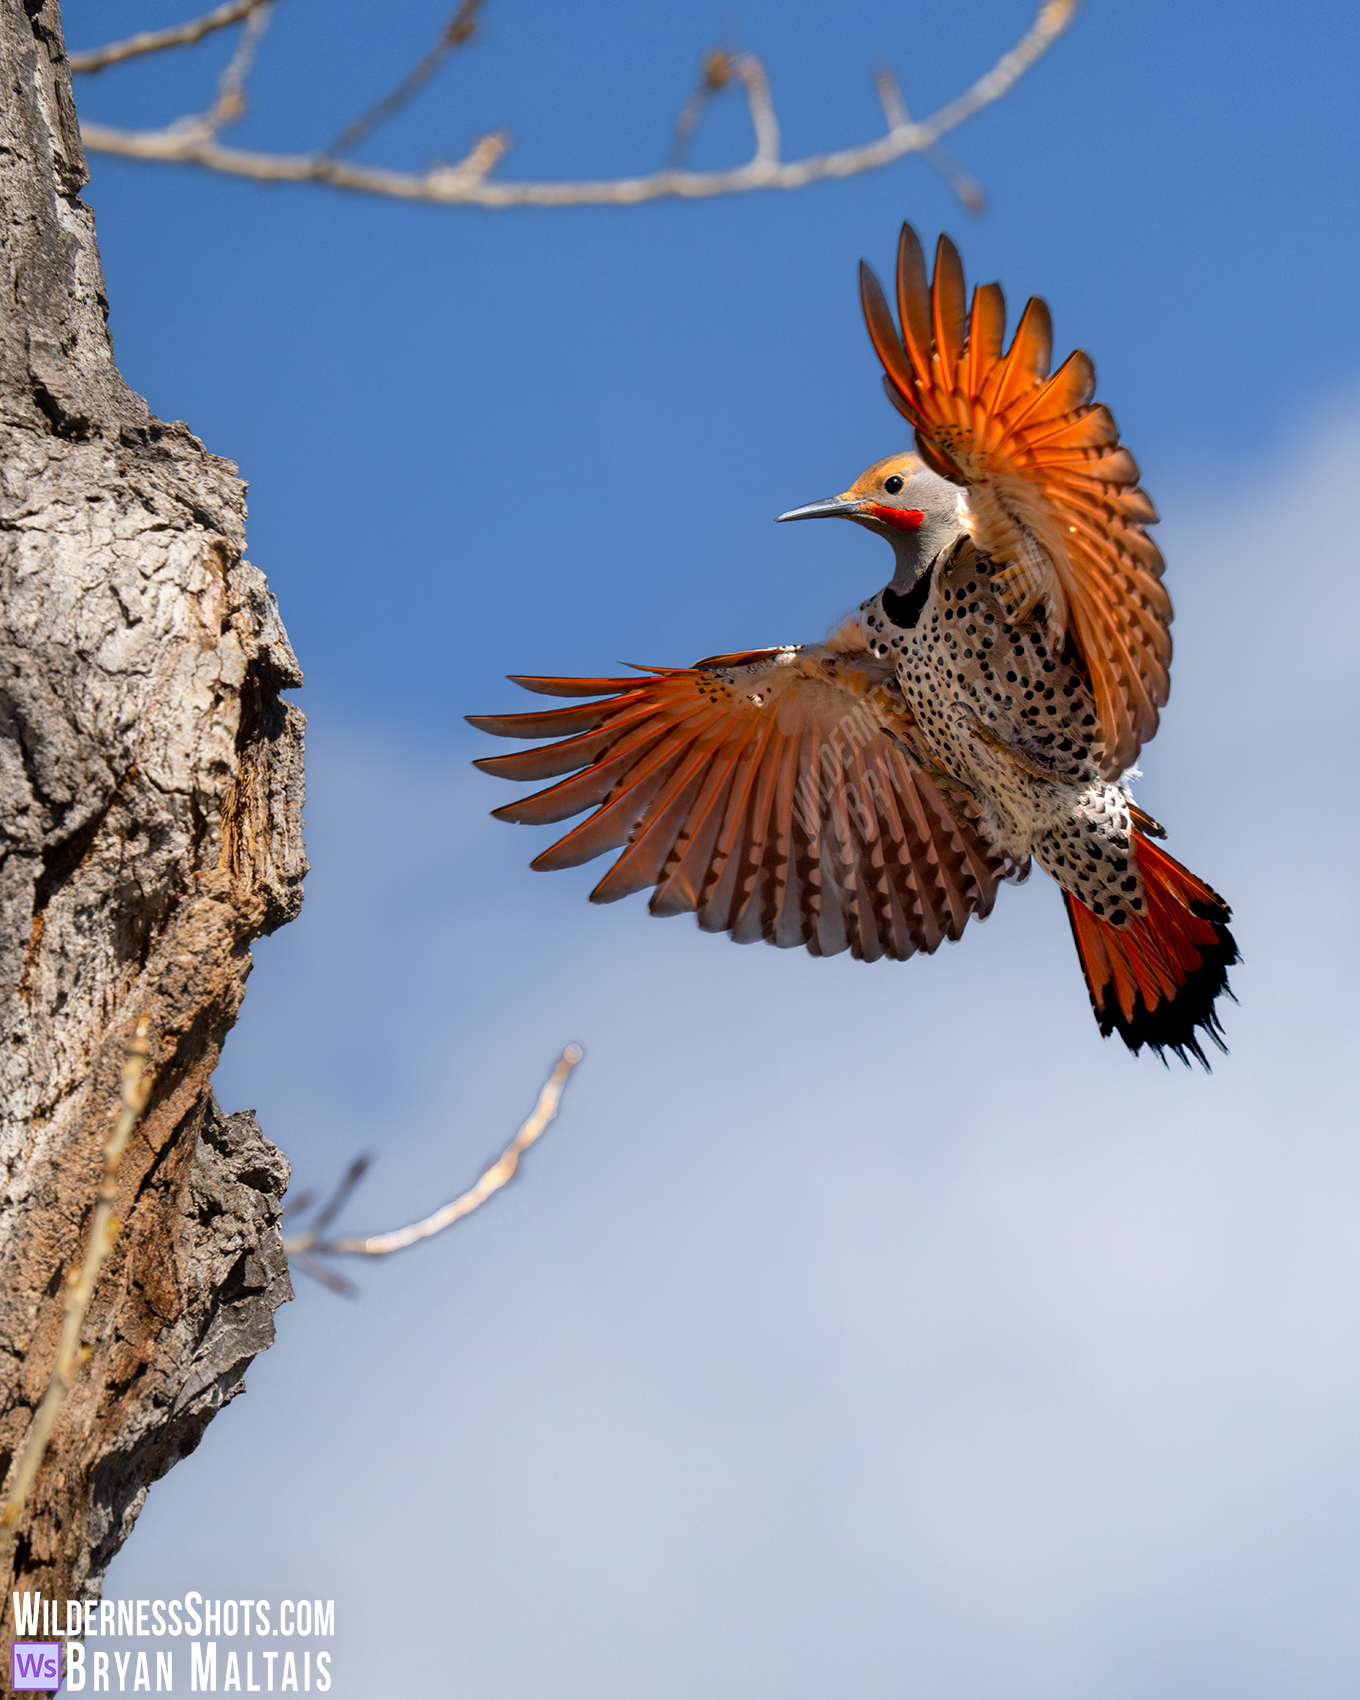
I captured this image of a Northern Flicker with its wings spread for landing by manually focusing on the tree trunk and keeping focus there. Whenever a Flicker approached for landing, I began shooting on continuos high.
How to Acquire moving Animals in the Frame
Powerful telephoto lenses only show a narrow field of view that makes it difficult to find moving animals through the viewfinder. The simple trick is to first look down the barrel of the lens at your target with your naked eye, then quickly transition to looking through the viewfinder. When you look through the lens, the animal should be in the frame. If the tip of the lens (or lens hood) has any kind of mark or knob, you can use it as a sight.
Bokeh and f/stop
In most cases, the desired aesthetic in wildlife photos is a sharp subject with a defocused background. This is accomplished by using a wide aperture like f/4 or f/5.6, which produces shallow depth of field. Also, as discussed in Background, the closer your camera is to the subject and the further the background, the more defocussed the background will be. Bokeh is the aesthetic quality of the out of focus areas of a photo. It can be smooth or busy.
However, you shouldn’t always shoot at the max aperture, even when smooth bokeh is desired. You can use a smaller aperture for increased DOF whenever the background is far away because it will be blurry no matter what. Using a smaller f/stop produces more DOF, increasing the chances of getting the eyes focused on quickly moving animals. Lenses are also somewhat sharper when used around the middle of their aperture range, so stopping down to f/8 from f/6.3 can yield slightly sharper photos.
Mechanical vs Electronic Shutter for Wildlife Photography
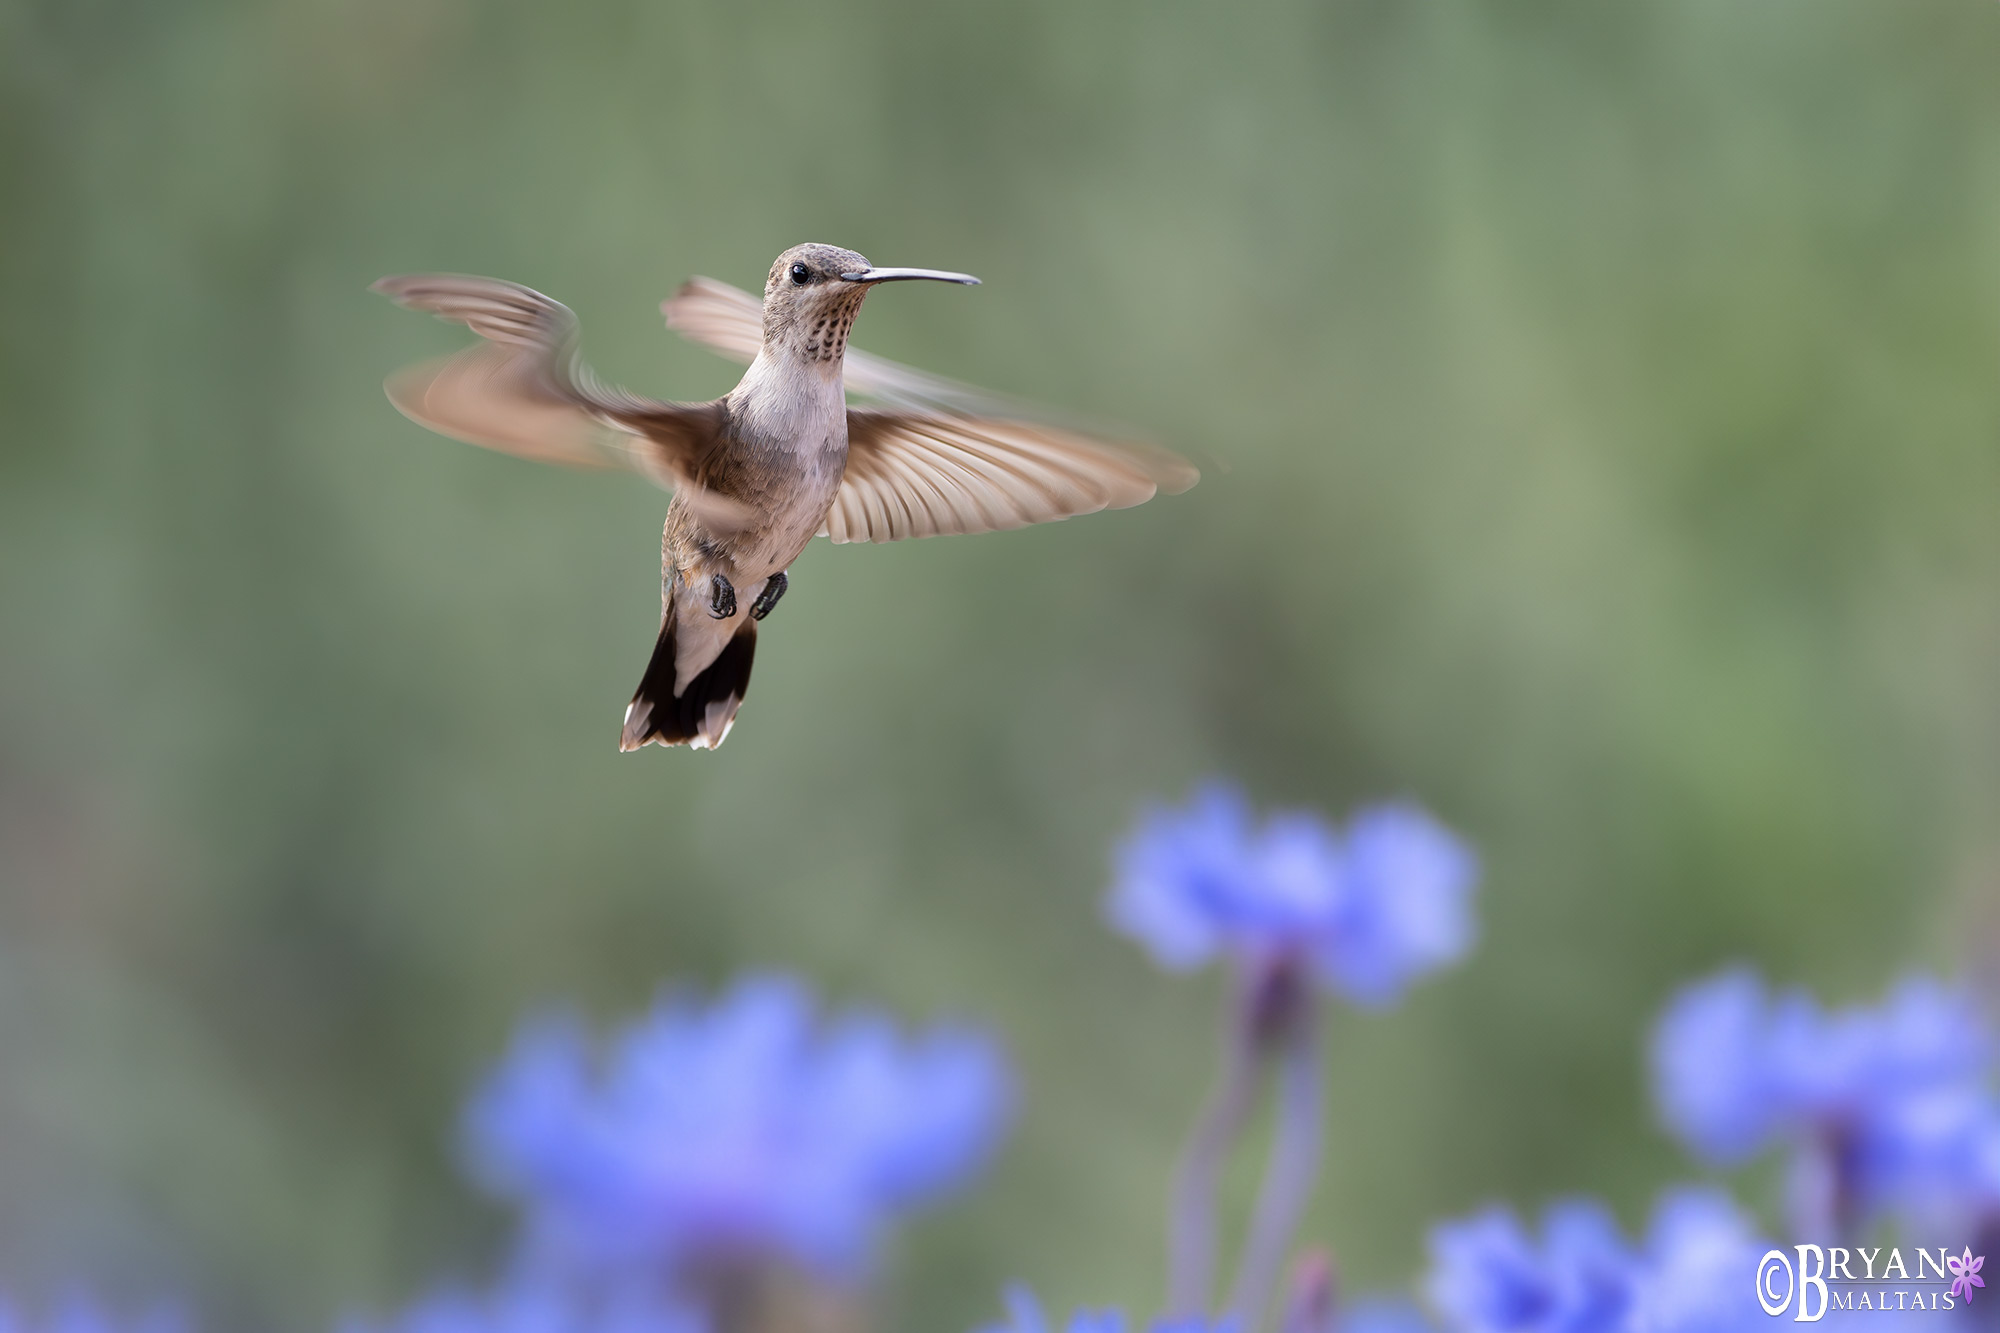
Most mirrorless cameras allow selecting between the mechanical or electronic shutter. While the electronic shutter extends camera life by sparing the mechanical shutter from actuations, it can cause the rolling shutter effect. This is when moving objects appear to stretch like putty between upper and lower parts of the image. The electronic shutter works by recording data from the sensor line by line, from top to bottom during the exposure. This can cause the same object to be recorded in 2 places at once in the photo if it’s moving fast enough. A perfect example of this happens when photographing birds in flight. The wing appears as a wavy streak in both the top and bottom of the photo because the up and down wing beats were captured. To avoid rolling shutter, use the mechanical shutter with fast-moving animals.
 On the Anna’s Hummingbird above, mechanical shutter was used. On the Black-chinned Hummingbird below, the “putty wings” are caused by the rolling shutter effect of using electronic shutter.
Drive Mode and Frame-rate for Wildlife Photography
When trying to capture action, set the camera’s drive mode to continuous with frame-rate on high. This is called burst mode. As the name suggests, the camera sounds like a machine gun when you hold down the shutter button as it shoots continuously. It gives you a batch of images from which you’re more likely to have captured that split second of action that you were after.
The main drawback to shooting in burst mode is that it captures piles of unneeded images. This quickly eats up battery power, memory card space, and it creates a lot of labor sorting through images.
Practice will improve your proportion of keepers to trash. At first, you’ll be inclined to shoot nearly everything as precaution against missing out on a good shot. Soon you’ll start to recognize when interesting behavior is about to happen, and refrain from shooting false starts.
What are the best Shooting Modes for Wildlife Photography?
Manual Mode + Auto ISO
Manual Mode + Auto ISO is the best shooting mode for wildlife photography because you can control shutter speed on the fly. It also gives you direct control over the aperture should you need to change the f/stop to adjust depth of field. Though it’s called Manual Mode, you don’t actually have to juggle all the settings. You set shutter speed and only change it when needed, same with f/stop, and the camera handles exposure by controlling ISO.
Aperture Priority Mode?
Aperture Priority mode was the standard for wildlife photography during the film and early days of digital before Auto ISO, and is still the norm for many shooters. The drawback of AP Mode is that the camera sets the shutter speed instead of you. But the camera doesn’t know which shutter speed is best for the subject at hand, so it defaults to the reciprocal rule, which keeps shutter speed around the lens’ focal length. This is way too slow to freeze action. To overcome this, you manually control ISO, and keep it high enough to produce the desired shutter speed. However, this is cumbersome and very difficult to stay on top of as ambient light changes. You may have astutely pointed out that you can also use Auto ISO in AP mode, which lets you set a minimum shutter speed. However, to change the shutter speed, you have to dig into the ISO menu instead of just flicking the dial.
Shutter Priority Mode
Don’t use Shutter Priority mode for wildlife photography because it constantly changes the aperture to control exposure. You want the aperture to stay at the f/stop that you set it. When the f/stop changes involuntarily, so does Depth of Field and bokeh, which changes the aesthetic of every photo.
Auto Mode
Don’t use Auto Mode because it blocks control of ISO, Aperture and focus modes. It uses the lowest possible ISO to deliver a reciprocal shutter speed (shutter speed=lens focal length). These are good settings for handheld photos of still subjects, but not fast action.
How to Photograph Wildlife Summary:
- Use the right Lens-Use a super telephoto lens, or a short lens if you can get close to the animals.
- Capture Action, not just a Portrait-Instead of the animal just standing there, try to capture it in flight, running, yawning, interacting with other animals, etc…
- Become a Biologist-You have to learn about animals, observe them and scout to know where they will be and when.
- Get close to Wildlife with Cover and Concealment-Use camouflage or a blind and arrive before animals do.
- Photograph animals where they’re habituated to Humans-Getting close to animals is easier along wildlife driving loops and mass annual breeding/migration gatherings.
- Use the Rule of Thirds–Position the animal off to one side, not centered in the frame.
- Get at Eye-level with the Animal-Shooting down or up at the animal looks artificial
- Include a beautiful Background-The background should be blurred, simple and uncluttered, but it should not be empty. Fill it with color.
- Shoot during good Light-Golden hour creates beautiful, dramatic light. Overcast skies creates even, diffused light. Mid-day sun can create ugly shadows.
- Always keep your Camera Ready-When near wildlife, have your camera on, within reach, settings dialed in, and lens cap off.
- Shoot in Manual Mode with Auto ISO
- Use a sufficiently high Shutter Speed and ISO to freeze action
