How to Photograph the Milky Way
Knowing how to photograph the Milky Way unlocks an ethereal world. Photographing the Milky Way brings me to dark, mysterious locations where I can see a glowing expanse of our galaxy that’s normally obscured by civilization. Nestled in the middle of the Milky Way is the galactic core, a dense nest of stars where within its center the super massive black hole Sagittarius A* tethers our galaxy in place with its gravity. Despite being in our local galaxy, the core is incomprehensibly far away. Traveling at 38,000 mph, it would take the Voyager spacecraft 450,000,000 years to reach the center of the MW. The word galaxy comes from the Latin root “galaktos”, meaning milk. It might seem like the Milky Way would be technically challenging to shoot. After all, you have to solve problems like gathering enough light to expose dim stars while operating your camera in the dark. But unlike other subjects that can be shot with highly variable settings, there’s a recipe for getting sharp, properly exposed MW photos.
In this post:
- Step by Step Milky Way Settings
- The Basics: Celestial Apps | Finding Dark Skies | Avoiding the Moon | The Galactic Core | Milky Way Movement | The Southern Hemisphere Milky Way
- Milky Way Image Quality
- Milky Way Cameras and Lenses
- How to position the Landscape
- How to illuminate the Landscape: Ambient Light | Blue Hour | Using the Moon | Light Painting
Step by Step Milky Way Settings
The Test Shot
Before dialing-in your final settings, you need to take a very bright exposure to precisely compose your final frame. It’s a good idea to preserve your night vision by using a dim or red headlamp while shooting at night. With practice, your camera will become an extension of your fingers and you won’t need a light to see the camera controls at night.
1. Mount camera to tripod- Your tripod should be sturdy enough that it won’t wiggle during 30 second exposures even with some wind.
2. Turn off image stabilization on camera and lens- On some older cameras IS causes blurry images when tripod mounted, and aftermarket lenses with IS can do the same.
3. Set image quality to RAW- If you’re not already shooting in RAW and post-processing them, MW photography is the reason to start. You’re going to need the dynamic range of RAW files to get the most from your MW photos.
4. Set shooting mode to Manual- Auto modes don’t work at night.
5. Switch to manual focus-Auto focus doesn’t work at night.
6. Manually set white balance to 3800k- This is a good starting point for a cool hue in the sky. You can tweak it after the test shot to produce the desired hue. If you can’t get WB just right, don’t waste valuable time adjusting it while the MW is rising. It’s not a permanent part of RAW files and can be easily changed in post-processing.
7. Set widest f/stop- This is typically f/2.8 on fast wide zooms, f/1.4 to 1.8 on fast prime lenses, and f/3.5 to 5.6 on slow lenses.
8. Set highest native ISO- ISO 6400 or 12800 on most cameras.
9. Set shutter speed to 30 seconds
11. Use self-timer or a Remote Shutter Release
12. Ensure Long Exposure Noise Reduction is off-If shooting JPEG+RAW this feature will pause the camera for a long time after taking each shot while it reduces noise in the JPEG.
10. Set Desired Focal Length-Use the focal length that works best for the scene. I often use 18mm because it captures the breadth of the MW without rendering the landscape too small. Or zoom in to capture just the galactic core.
13. Focus on a Star-
- To see a bright preview in the viewfinder you may have to deactivate “live view” through the menu.
- Aim the camera at a bright star and position it near the middle of the frame, not the edges. Lens edges have distortion that can render stars out of focus.
- Activate manual focus assist in the menu. Move your focus point over the star and manually focus until it’s sharp.
- Make sure not to focus to the lens’ limit at the “∞” symbol. This focuses beyond true infinity and can result in blurry stars!
- Once you’ve achieved sharp focus, don’t accidentally bump your focus ring or turn auto focus on. You can also tape your focus ring in place as a precaution.
14. Roughly frame the composition and take test shot
14. Frame the final composition-Look at the bright test shot and reframe your composition so it’s precisely how you want. Repeat as necessary.
15. Readjust Settings and shoot final Image-The test shot should be over-exposed. Now adjust your settings for proper exposure based on the aspects of image quality most important to you. Decrease ISO for reduced noise, decrease shutter speed for reduced star trails, or decrease aperture for better image quality. Remember that you can increase the brightness of the MW in post-processing.
These settings work well for most MW shots:
- ISO 4000
- 25 sec
- f/2.8
Plan your Milky Way shot with Celestial Apps
Photographing the Milky Way requires thorough planning because it changes position throughout the night and year as the Earth continuously rotates and tilts. You have to know precisely where to stand to capture the MW perfectly positioned above the landscape. You also need to know the Moon’s activity and the timing of twilight so their light doesn’t overpower the MW.
Celestial apps have you covered. They show the position of every celestial object, from anywhere on Earth, on any desired date. They also show the Moon and light phases. Stellarium and Google Earth are excellent for planning your shot in advance. In GE you can stand in the exact location you intend to shoot and view the actual position of the MW above the landscape using the sun slider. Good apps for planning in the field include the Photographer’s Ephemeris, PhotoPills and SkyView. Many are free so it makes sense to have a few. Apps are a good starting point, but once you become familiar with the night sky you won’t be reliant on them.
As a photographer, you should always carry a traditional magnetic compass on your trips. If your device’s compass is not calibrated, which happens often, apps will steer you into shooting the wrong part of the sky! Before basing your shot on what the app tells you, you should verify that it’s pointing you in the right direction with your compass.
Head to a Dark Sky
Most Earthlings have rarely seen the Milky Way because we’re relegated to the omnipresent glow of civilization. Just a faint glow from city lights can strongly impact night photos because we set our cameras to be as light sensitive as possible. You can locate suitably dark regions with dark sky apps and websites. Unfortunately, primordial dark skies are rare, even in the American west. The darker the surrounding sky, the brighter the MW appears, which begets higher quality images. However, sometimes the landscapes that we want to capture along with the MW aren’t located in true dark skies. For example, from within Rocky Mountain National Park there’s moderate light pollution from the Denver metro area only 20 miles away, but I can still capture decent MW photos. Twilight also acts like light pollution so you must know when it ends and dark night begins. This is especially important around the shoulders of peak season when the MW rises close to twilight.
 Avoid the Moon
 Avoid the Moon
A bright Moon also acts as light pollution that overpowers the Milky Way. If it weren’t for the Moon we’d have a practically limitless season to photograph the MW, but it reduces this window to a few nights per month. A lunar calendar or night sky app can tell you the Moon’s location, phase and brightness. You can avoid it during the one week per month of a new Moon, before it has risen, or after it has set. It would be frustrating to plan a trip around a perfectly positioned MW only to encounter the Moon bleaching out the stars. You don’t have to avoid it completely, just a bright one. When in the opposite direction of the MW, a dim or crescent Moon can illuminate the landscape without diminishing the MW.
The Galactic Core is the Milky Way’s Showpiece
When photographing the MW, we’re really concentrating on the Galactic Core. It’s the thick, dramatic cloud of stars towards the base of the MW. Without the core, the MW is more of a dusty trail than blaze of glory. Watching the Galactic core slowly rise above the southeast horizon in a dark sky is one of nature’s spectacles.
In the midlatitude of the northern hemisphere you can see the galactic core from late February to late October. This is considered Milky Way season. Cities along the midlatitude include Sacramento, Denver, Baltimore, Madrid, Ankara and Beijing. Outside of these dates you can’t see the galactic core at night because it rises during the day. The exact dates vary with latitude. Further south, the season is longer. Near the arctic circle, you can only see part of the galactic core in March before the midnight sun obscures it.
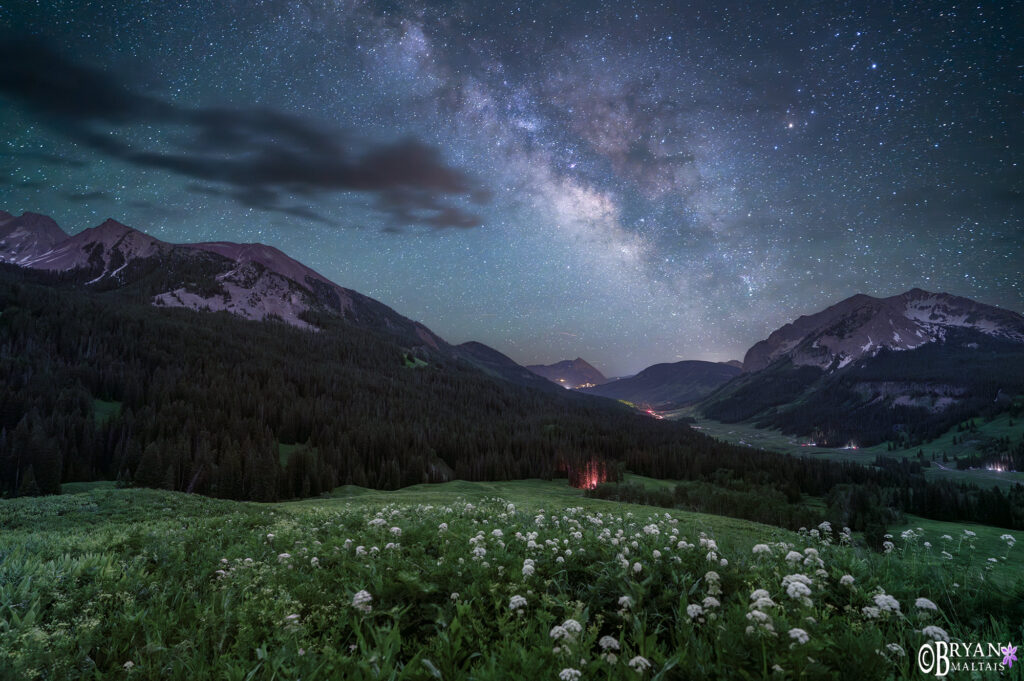
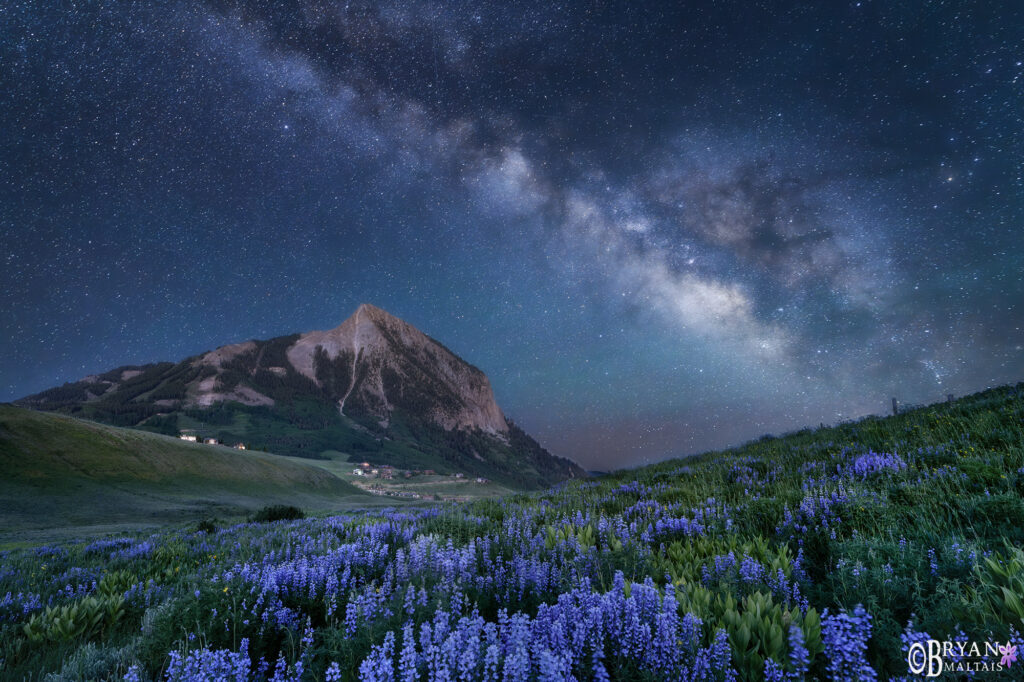 Milky Way over a field of Lupine and Mt. Crested Butte. I shot a blue hour photo of the foreground, left the camera in place and shot the same frame with the Milky Way later in the night, then blended them. Sony A7R V, Sony 16-35mm G Master @ 18mm, f/2.8, 25 sec, ISO 4000. Blue hour photo f/11, 16 sec, ISO 100
Know the Milky Way’s behavior throughout the Night and Year
Within Milky Way season, peak season is from early spring through July when the rising MW forms a coveted diagonal line over the southeast horizon. This is called the rising view. It stays low over the landscape for about an hour as it transits into a vertical position. This is the ideal time to capture a horizontal composition of the landscape with the galactic core in the upper right of the frame.
The MW always rises in the eastern sky with the galactic core to the southeast. As the MW rises higher through the night, the galactic core transits from southeast to southwest. The MW raises like a toll gate. Once upright, it’s ideal to shoot the MW positioned next to tall landscape features like a hoodoo or spire. Shooting the MW upright lets the fun continue late into the night after the rising view has passed. By August, the MW is already vertical by nightfall and the rising view can’t be seen again until next year.
The MW is shaped like an arch. As it rises higher into the night, the arch stretches from a gradual bow to a “u” with long legs. When you photograph the rising view, you’re capturing it while it’s still a bow. When you photograph the upright view, you’re actually capturing a straight leg of the “u”.
The MW rises earlier every night as the Earth tilts. In Winter, the galactic core is up during the day and can’t be seen at night. At midlatitude it returns in March, rising in the morning shortly before twilight. This provides an excellent opportunity to capture a foreground exposure during twilight just after shooting the MW at night . In June, the rising view is around 23:15 pm. By August, the MW rises during twilight and is already vertical by nightfall. From mid-spring to mid-summer you get several hours of dark night to shoot the MW with the galactic core before twilight.
 The Milky Way in the upright position above Castle Gardens, WY. Nikon D810, Nikon 14-24mm @ 16mm, f/2.8, 25 sec, ISO 4000
How to Photograph the Milky Way in the Southern Hemisphere
I’ve had the thrill of photographing the MW on New Zealand’s South Island, which is night sky photography on a golden platter. Abundant dark skies are rich with constellations not seen in the northern hemisphere including the Southern Cross, Magellanic Clouds and Alpha Centauri. Above all, the entire mass of the galactic core is suspended in the center of the MW during peak season. At this time, it briefly forms a horizontal line over the horizon before it sets; something we don’t get up north.
The seasonal and nightly movement of the MW in the southern hemisphere is much different than in the northern. MW season, when the galactic core is visible at night, falls between January and November. Peak season, when the core is low to the horizon, lasts from late May to October, which is winter down under. During peak season the MW can be photographed in its setting view over the western horizon in a glorious horizontal position. The setting view occurs shortly before sunrise in May and just after sunset in October. The huge galactic core magnificently suspended across the width of the western sky makes capturing a landscape beneath it very easy.
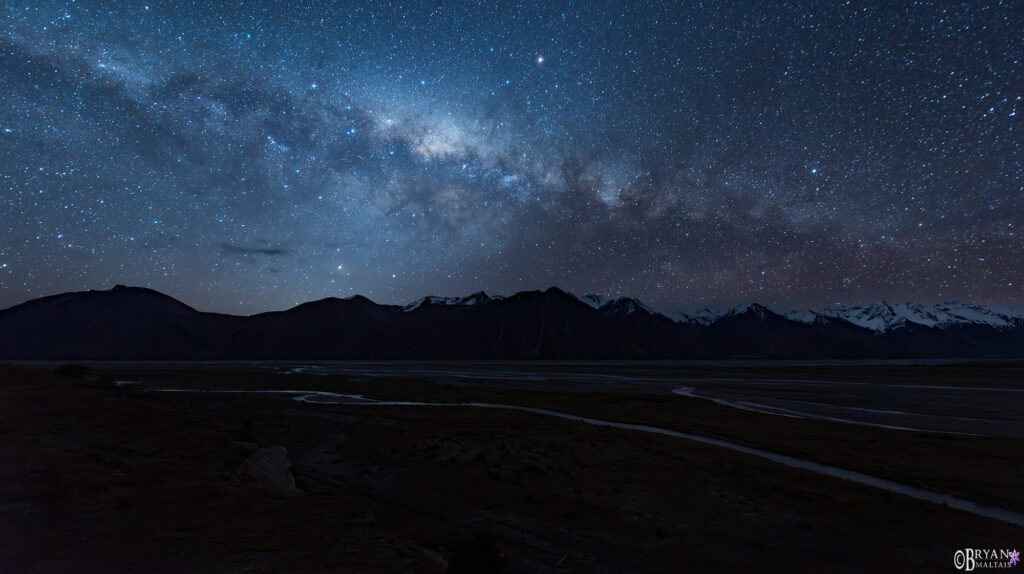 The galactic core suspended above the Southern Alps, New Zealand. Nikon D810, Nikon 14-24mm @ 14mm, f/2.8, 25 sec, ISO 3200
Addressing Image Quality Problems in Milky Way Photos
The goal of making Milky Way photos is to achieve low noise, ample depth of field and minimal motion blur, just like in daytime landscape photography. However, at night we have to sacrifice all of these somewhat to gather the most light. You must use settings that push your lens and camera to their threshold. Namely, a wide f/stop, high ISO and long shutter speed. Each noticeably degrades image quality in a particular way.
High ISO Noise
Noise from using high ISO is the main factor diminishing image quality. We use it to get exposures of 30 sec or less to prevent star-trailing. To address noise, “AI” denoise apps drastically reduce image noise in post-processing while preserving detail. In the past, noise reduction destroyed image detail along with noise. AI denoise is now a standard feature of Lightroom and Adobe Camera Raw. You can also reduce noise with a star tracker or by shooting a multi-row panoramic, but these complex methods have become less practical with the advent of AI denoise.
Wide Aperture Image Degradation
Using a wide aperture like f/2.8 is necessary to use the lowest possible shutter speed and ISO, but this also degrades image quality. The shallow depth of field of a wide aperture means that focusing on the stars will sacrifice foreground sharpness. You can solve this by making a separate exposure that focuses on the foreground, then blending it with the MW exposure. You’ll likely do this anyway to capture a brightly lit exposure of the landscape (described below). Using the widest aperture also causes darkening of the corners from vignetting, which is easily corrected in post-processing by applying lens profile correction. Lens sharpness also suffers at wide apertures, especially in the corners. This is a necessary evil of MW photography, but not overly noticeable. You can minimize all of these problems by stopping down to f/4 if the MW is particularly bright in a dark sky. If using a very fast prime lens like f/1.4, you can stop down to f/2.8.
Minimizing Star Trailing during Long Exposures
Slight star trailing is a necessary “imperfection” during the 15-30 sec exposures you’ll be using. Star trailing makes the stars look like tiny dashes instead of points and is noticeable when pixel peeping. A little bit of trailing is beneficial because it makes stars appear larger, and subsequently brighter. While purists seek minimal trailing at any cost, that cost is more noise from using higher ISO. Star trailing can become excessive when using a slow lens (like a kit zoom) that requires exposures longer than 30 sec. Trailing is also more apparent when using long focal lengths that magnify motion. If you find rules useful, the “500 Rule” calculates the slowest recommended shutter speed to minimize star trailing at a particular focal length:
500 = Maximum Shutter Speed
Lens Focal Length in Full-frame
For example, if shooting at 18mm, the maximum recommended shutter speed would be 28 sec. If shooting at 50mm to capture a tight crop of the galactic core, 10 sec would be the maximum. If using an 8mm lens on a micro four thirds camera, 31 sec would be the maximum.
 Contintntal Divide. Sony A7R V, Sony 16-35mm G master @ 17mm, f/2.8, 25 sec, ISO 4000. Blue hour photo f/8, 25 sec, ISO 200
Best Cameras and Lenses for Milky Way Photography
Lenses
The lens is far more important in determining how well you can photograph the Milky Way than the camera. A good all around lens for night sky photography needs to be wide and fast. I use a 16-35mm f/2.8 zoom, available for most brands (Sony | Canon RF | MFT ). It’s a workhorse that many landscape photographers already own so might not be an extra purchase. The focal range is good because I often shoot the MW around 18mm, but enjoy the option of zooming in to 35mm to emphasize the galactic core. Ultra-wide zooms like the 12-24mm and 14-24mm (Sony | Nikon Z | MFT) are excellent if you specialize in the night sky, or if your brand doesn’t make a fast 16-35mm. However, if you’re considering one of these for general landscape photography, the focal range may be limiting, and some have a bulbous front element that prevents using screw-on filters. Slower lenses (f/4 and above), like kit lenses, force longer exposures and higher ISO causing more noise and star trailing. That’s fine if that’s what you have available and just want to have fun shooting the night sky.
Prime lenses are also good for night sky photography because they’re usually sharper with less distortion, and are typically one stop faster than their zoom counterpart. That’s impactful because it cuts shutter speed or ISO in half. Some lenses suffer from coma, an aberration that makes stars in the corners look like bow-ties. Check reviews before you buy. Because primes lack the flexibility of zooms, choosing focal length depends on what you seek to capture. The 14mm captures a very wide swath of the sky, but can minimize distant foreground elements. The 16mm, 18mm or 20mm lenses are good generalist. The 35mm renders an impressive “magnified” view of the landscape and galactic core, but is too strong to show the arc of the milky MW. By 50mm the picture looks like just a bunch of stars, but the MW is not discernible.
While full-frame and MFT shooters enjoy a generous ecosystem of lenses, APS-C shooters are limited to only a few lenses good for shooting the MW. One option is to use your brand’s ultra-wide full-frame lens. For Sony shooters, the 12-24mm f/2.8 effectively becomes 18-36mm on APS-C, which is an excellent range for both the MW and general landscape photography. For Canon and Nikon APS-C shooters, the Tokina 11-20mm f/2.8 offers stellar performance for a good price. With some brands offering both mirrorless and DSLR cameras, make sure you order the correct mount.
Camera
You can do Milky Way photography with any modern interchangeable lens camera. The specific camera model and its features are largely irrelevant, but sensor format matters. Full-frame sensor cameras have the largest sensors and apertures to gather the most light. This gives them the highest dynamic range and lowest noise, delivering the best night sky performance. They’re also twice the price and weight of other formats. Their enhanced image quality is apparent when pixel-peeping, and is important if you sell or frequently make large prints. Micro Four Thirds cameras have sensors half the size of full-frame that render very high noise in night sky photos. While that doesn’t matter for having fun, this might be a format to avoid if you intend to shoot a lot of Milky Ways. Most photographers shoot with an APS-C camera, which is a sweet spot in price, size and performance.
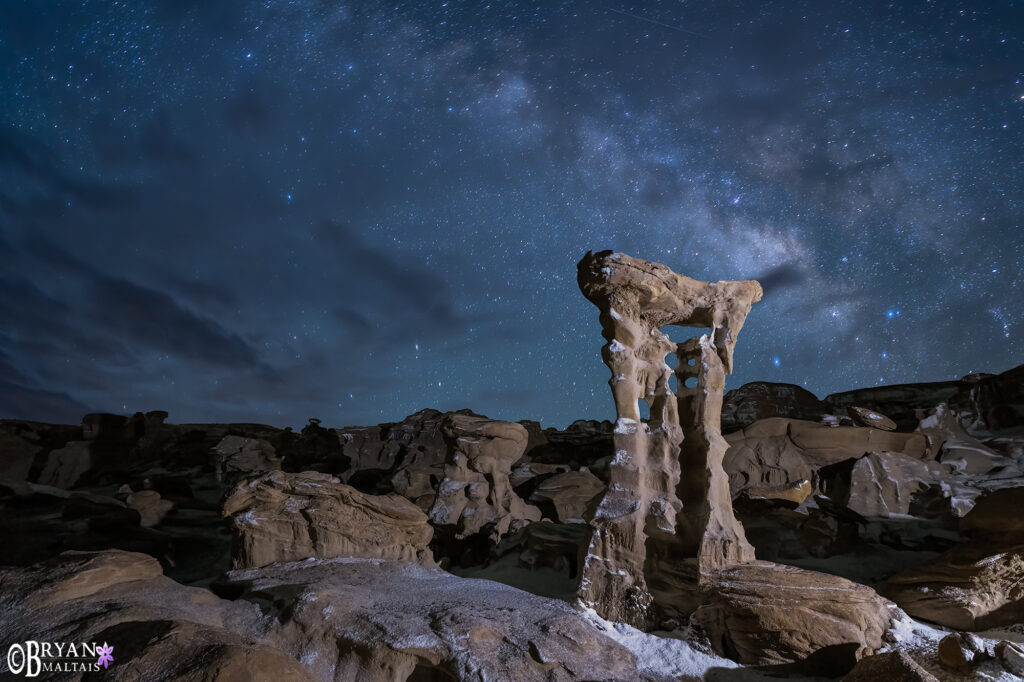
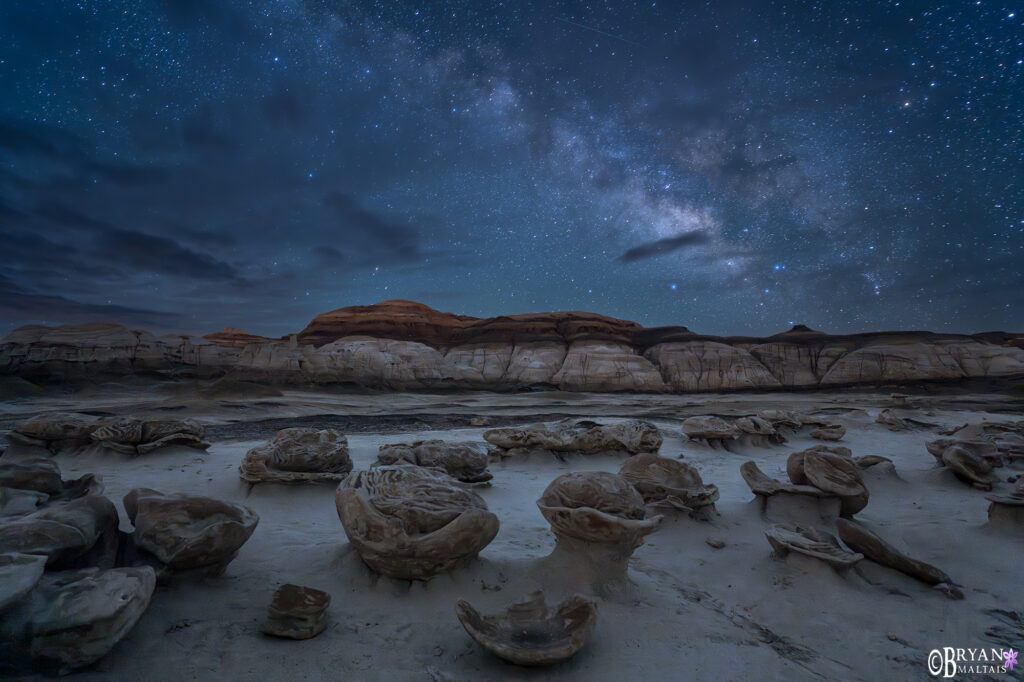 Alien Eggs. Sony A7R V, Sony 16-35mm G Master @ 17mm, f/2.8, 30 sec, ISO 3200
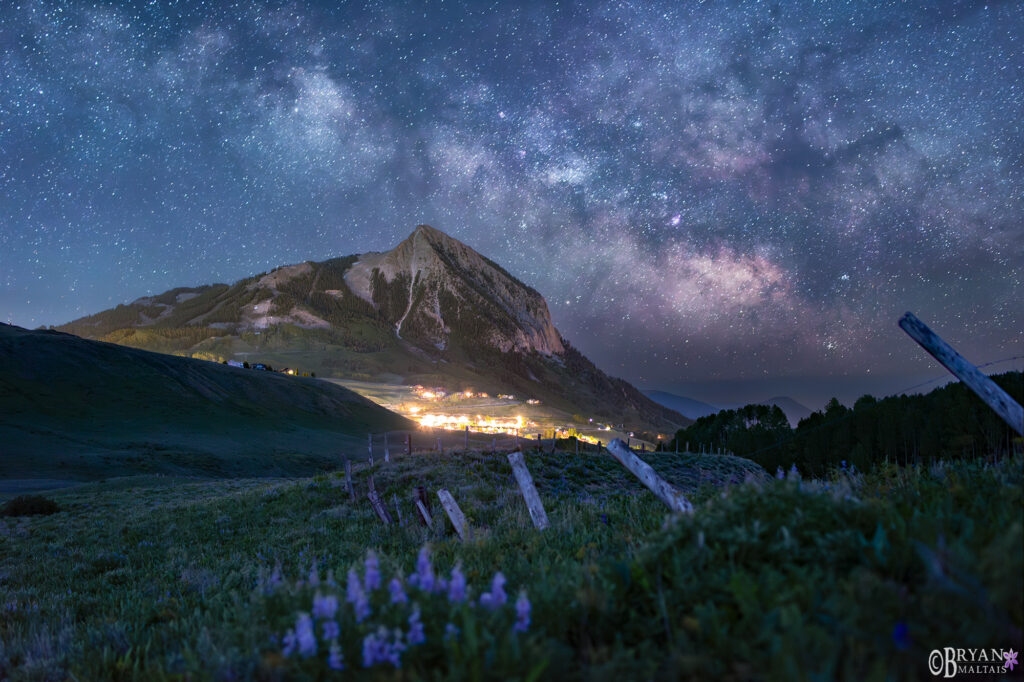 The Galactic Core over Mt. Crested Butte, Colorado. Using a 35mm prime lens captured a close view of the galactic core while emphasizing the landscape size. Nikon D810, Rokinon 35mm f/1.4 lens. f/2.8, ISO 4000, 25 sec
How to position the Landscape under the Milky Way
When I talk about Milky Way photography, I’m referring to photographing it above a gorgeous landscape or cool foreground element. To ensure the landscape looks good in the final image, there are 3 qualities it must posses. First, it must face the right direction to be properly positioned below the MW. Next, it must be large enough. Lastly, it needs to be illuminated so it doesn’t appear as a black silhouette in the final image.
How to align the Foreground with the Milky Way
Milky Way photography would be much easier if all of our favorite daytime compositions aligned with the rising MW, but they rarely do. To shoot the rising view with the galactic core to the southeast, the landscape needs to face roughly northwest. Along Colorado’ Front Range this is challenging for me because most of the great mountain scenes face east. To capture a panoramic view of the arching MW to the east you need a west-facing landscape beneath it. When the MW is in the upright position to the south/southwest, you need a roughly north-facing landscape or subject. You can find suitably positioned landscapes in Google Earth and by scouting. I keep my compass handy to see if interesting scenes face the right direction when I come across them. I keep track by saving all of the targets I want to photograph in Google My Maps.
How to keep Foreground Prominence under the Milky Way
The landscape element must be large enough to have presence in the photo. This can be challenging because we typically shoot the MW at very wide focal lengths, which minimizes size. This causes mountains that are large, but distant to appear as little bumps at the bottom of the frame. To overcome this, you need to get close to large features with vertical dimension that breaks the horizon line. Shooting among hoodoos and arches is great because you can walk right up to them and have them protrude up into the sky beside the MW. When the MW is rising, following the rule of thirds can also preserve foreground prominence by positioning the landscape in the lower 2/3 of the frame. Shooting with a higher focal length like 35mm gives a magnified view of the landscape with the galactic core rather than a grand view of the sprawling MW.
How to illuminate the Landscape in Milky Way Photos
While a Dark Knight is optimal for capturing the MW, it produces an image with a black foreground that lacks detail. The RAW file captures some brightness data from the starlight in the foreground that can be brought out in post-processing by increasing shadow exposure. However, this process typically generates such bad noise that the foreground image is useless. Even AI denoise can’t work miracles and usually produces an artificial-looking image when applied to such extreme noise. The solution is taking a separate exposure of the foreground under well-lit conditions or different settings that brighten it, then blending it with the MW exposure. This is different than simply dropping in an unrelated picture of the MW.
Using Ambient Light to expose the landscape in Milky Way Photos
Often, the dim ambient glow of starlight is all you’ll have to work with for brightening the foreground. The process to use this light is simple. First shoot the MW, then refocus on the landscape and shoot a long exposure in bulb mode at high ISO. I’d start at ISO 4000, 2 minutes, and your widest aperture. Your final settings will require some trial and error. Reduce ISO and close the aperture if brightness permits. If your camera doesn’t shoot in bulb mode without having to hold down the shutter button you’ll need a remote shutter release/intervalometer. Even with a long exposure, the foreground will still initially appear too dark, but there will be a lot of stored data to tease out. The trick to create a final image with low noise is to take about 5 repeated shots of the scene using the same settings, then averaging them in Photoshop. Blend the resulting image with your MW exposure.
 Galactic Core above the West Elk Mountains. I made a separate exposure for the foreground under ambient light and blended it with the Milky Way. Sony A7R V, Sony 16-35mm G Master @ 17mm, f/2.8, 25 sec, ISO 4000. Ambient light photo f/4, 3 min, ISO 1600
Using Blue Hour to expose the Landscape in Milky Way Photos
Blue hour, aka twilight, lasts about 20 minutes. It’s when the sky still has some brightness, but there are no warm tones from sunset/sunrise. Capturing blue hour entails taking the shot during twilight, leaving your camera in place, then photographing the Milky Way when it rises. The challenge is framing the shot during daylight to capture the Milky Way without being able to see it. Thorough planning is essential to prevent the the MW rising out of frame and wasting your blue hour shot. Depending on month, you may need to leave your camera in place for hours without touching it before the MW rises. In early spring the MW rises in the morning shortly before twilight. This is a great opportunity to shoot the MW when you can see it and then shoot blue hour only a short while later.
Settings for blue hour are straightforward and similar to daytime landscape photography. Use an small aperture, base ISO, Aperture Priority Mode and let the shutter speed land where it will (up to 30 sec). You can also shoot in “M”and set shutter speed yourself. If 30 sec isn’t long enough at these settings, you’re probably shooting too late into blue hour. Set your focus on the landscape knowing that you’ll change focus to the stars for the MW exposure. If you want an overall cool hue, manually set white balance to around 4000k. You can use spot metering mode and meter off the foreground for proper exposure. Otherwise the brighter sky will skew foreground exposure and you’ll need to over-expose by 2-3 stops.
Blending the foreground and MW images can be complicated, especially using blue hour. The the trick is to equalize the look of both before you blend so there’s no perceptible separation between the images. In a nutshell, this usually involves reducing blue hour brightness, increasing Milky Way brightness, equalizing color balance, and dodging and burning around the horizon. The detailed process is worthy of a separate post and is more art than science.
Using the Moon to expose the Landscape in Milky Way Photos
Because Moonlight naturally occurs in the night sky, it matches the MW exposure and is easier to blend. On a night when the MW is up before or after the Moon, you can shoot an exposure of the landscape with the Moon, leave your camera in place, then shoot an exposure of the MW without it. Remember to refocus on the landscape. If the Moon is dim or a crescent you can shoot the MW with the Moon up, and make a separate long exposure for the landscape. Moonlight is reflected sunlight, so using daylight white balance gives accurate color tones. You can also manually set a cooler white balance if desired. A particularly bright Moon may allow shooting the landscape at f/11, base ISO and ~30 sec in manual mode.
 I made a separate exposure for the foreground using 2 LED light panels. Sony A7R V, Sony 16-35mm G Master @ 17mm, f/2.8, 25 sec, ISO 4000. Ambient light photo f/5.6, 1 min, ISO 1000
Using Light Painting to illuminate the Landscape
If your landscape is composed of nearby foreground elements like rock formations, you can illuminate them with an artificial light source like a headlamp, flash or stationary light panels. Light painting is a powerful tool because you can control the intensity and aesthetic of the light. You can also use a lower ISO and smaller f/stop than exposing the foreground with ambient light. During a long exposure, the longer you shine a light on a surface or the brighter the light, the lower ISO and smaller aperture you can use.
The best way to illuminate the foreground is by placing fixed LED light panels just outside of the frame and taking a long exposure. When properly positioned, this produces consistent and adjustable light. You need at least two lights mounted on tripods or propped up with whatever is available. Position the lights, take some test shots and reposition as necessary. Start with a 30 sec exposure and go longer if necessary to preserve a small aperture and low ISO. A long exposure can capture a lot of illumination so your lights should be dim. Using very subtle light to barely light the scene can make it seem like only natural light was used. To that end, you should also diffuse the lights with a portable soft-box or by throwing a white cloth over them. LED light panels sufficient for light painting are relatively small and cheap. Make sure all of the lights’ white balance matches, otherwise you’ll have funky colors intermingling in the image.
If you don’t have or feel like hauling light panels into the field, you can light paint with your flashlight or headlamp. If light panels are the spray gun of light painting, the headlamp is the paint brush. It’s slow and splotchy, but gets the job done. During a long exposure, drag your light over every surface to give it an even coat. Inevitably, the first try will have dark spots that were missed, bright spots where the light lingered, and lines of overlap. You also have to move more slowly over distant objects. The goal isn’t for perfect light coverage in a single exposure, but to take several shots and blend the best parts of each using the lighten layer blend mode in Photoshop. Using a very bright light to shine on objects too far away can produce and atmospheric beam in the image.
Light painting can come from any illumination source that gets the job done. On several occasions while contemplating how to paint a scene, passing-by vehicle headlights solved the problem for me.
Contact me if you’re interested in learning how to photograph the night sky. I offer both group and private workshops around the American West.
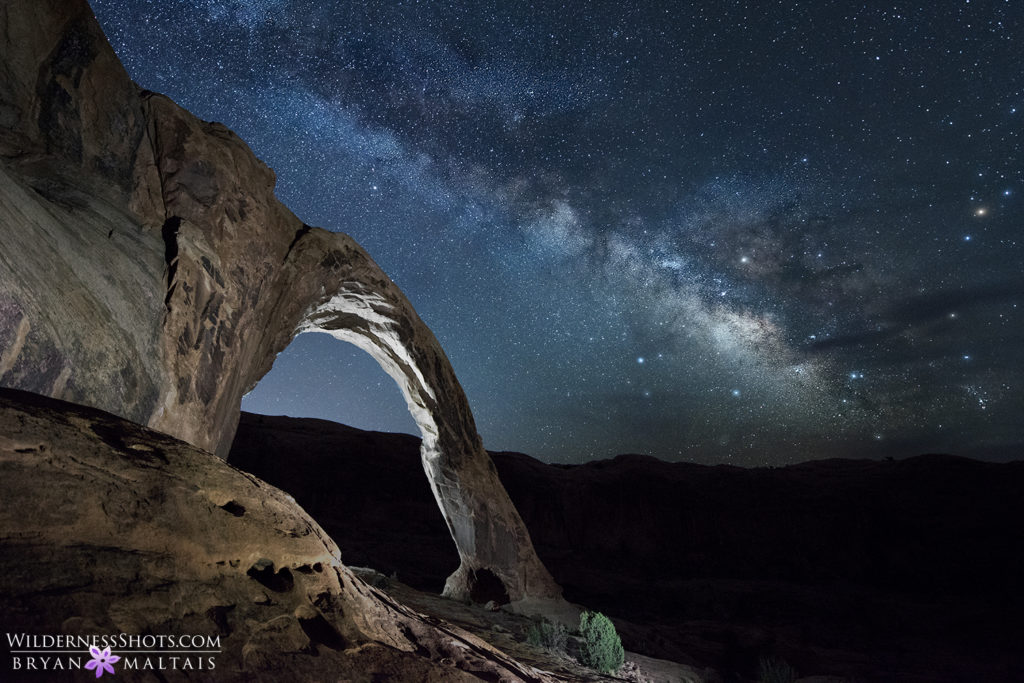 I light painted this arch in Moab with my headlamp while a friend illuminated it from the other side. On this occasion I painted during the Milky Way exposure. Nikon D810, Nikon 14-24mm @ 18mm, f/2.8, 20 sec, ISO 3200
